Thursday, February 26, 2015

Rodeo Time

Every year our town pauses to pay respects to a wonderful tradition; the Rodeo! Schools close and parade routes are erected. It is a great honor to participate in the rodeo parade, which is the only non-motorized parade in the country. It's all horse-drawn carriages, horseback riders, and of course lots of marching bands.

My children are both in preschool now and both got to participate in their own school parades. For this they each needed a horse, and we received homework to make one at home. Hmm, to be the child of a crafter...


I took a trip to Hancocks and found the brown felt on sale, as well as the stuffing and thread on sale. Finally, I found some yarn that would match the felt well and headed home to begin work.


I drew up a rough sketch of what I wanted it to look like, but was really just winging it. Typical for me. They turned out way bigger than I'd wanted so I actually had to shrink it down by a couple inches. They still look a little big to me, but it's all good. The kids enjoy them.


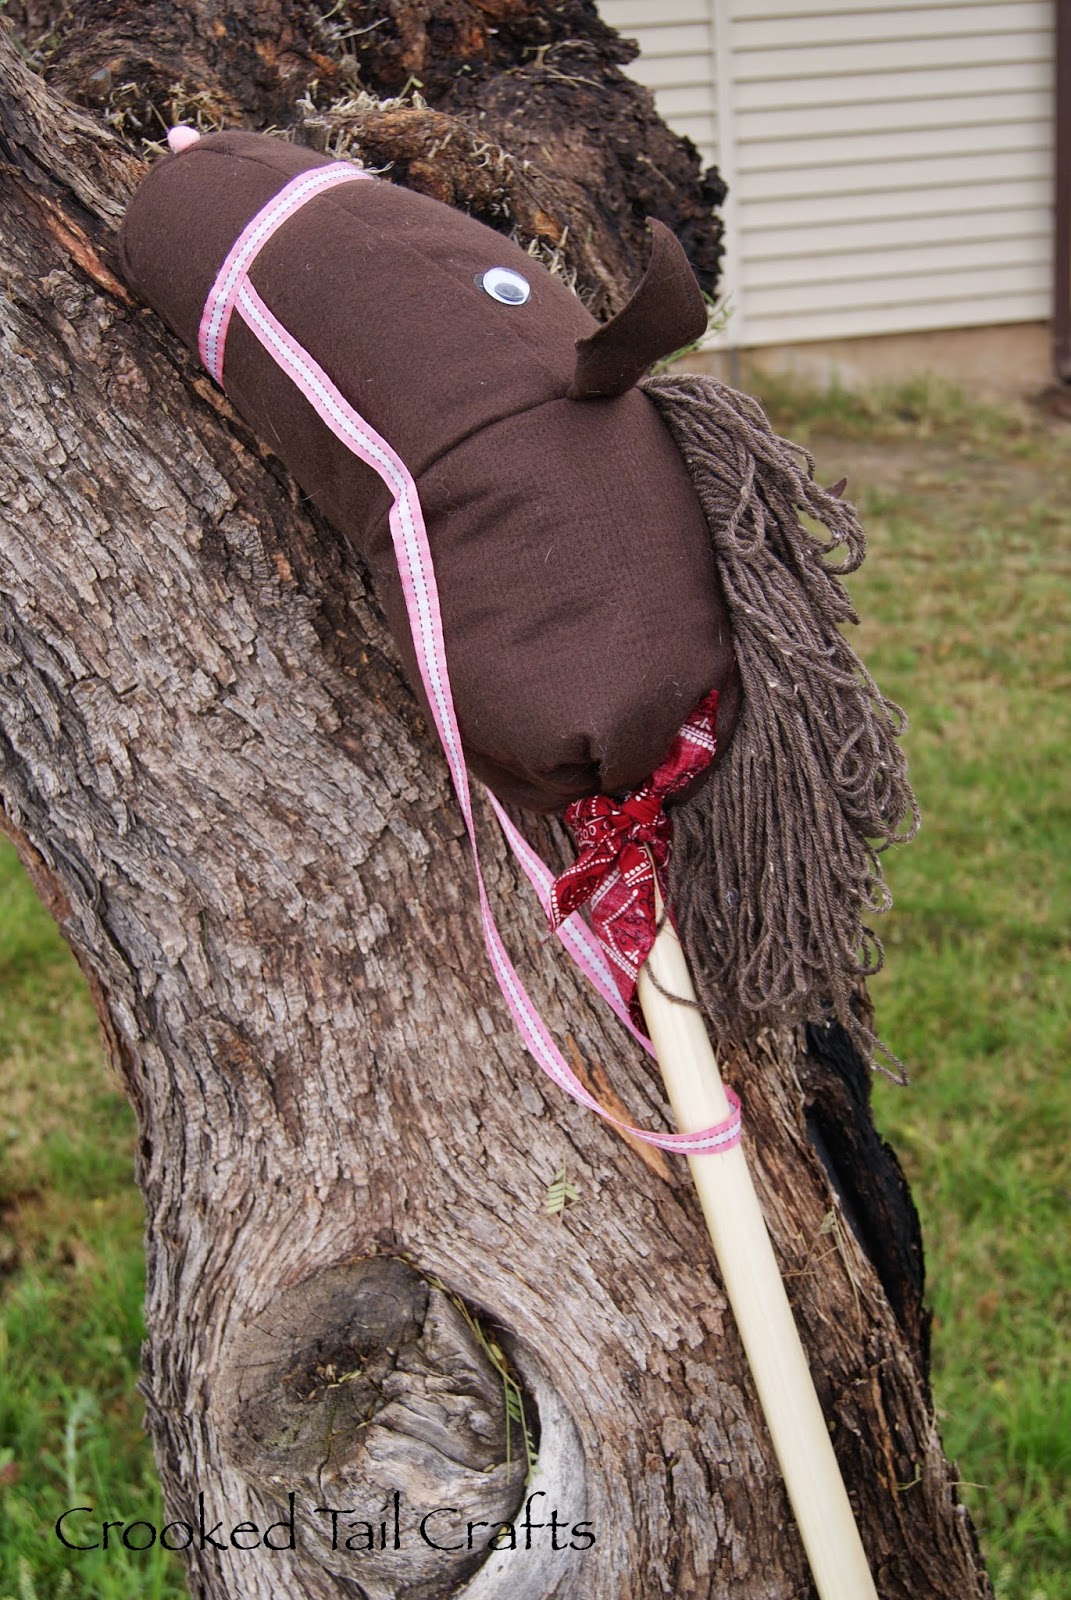
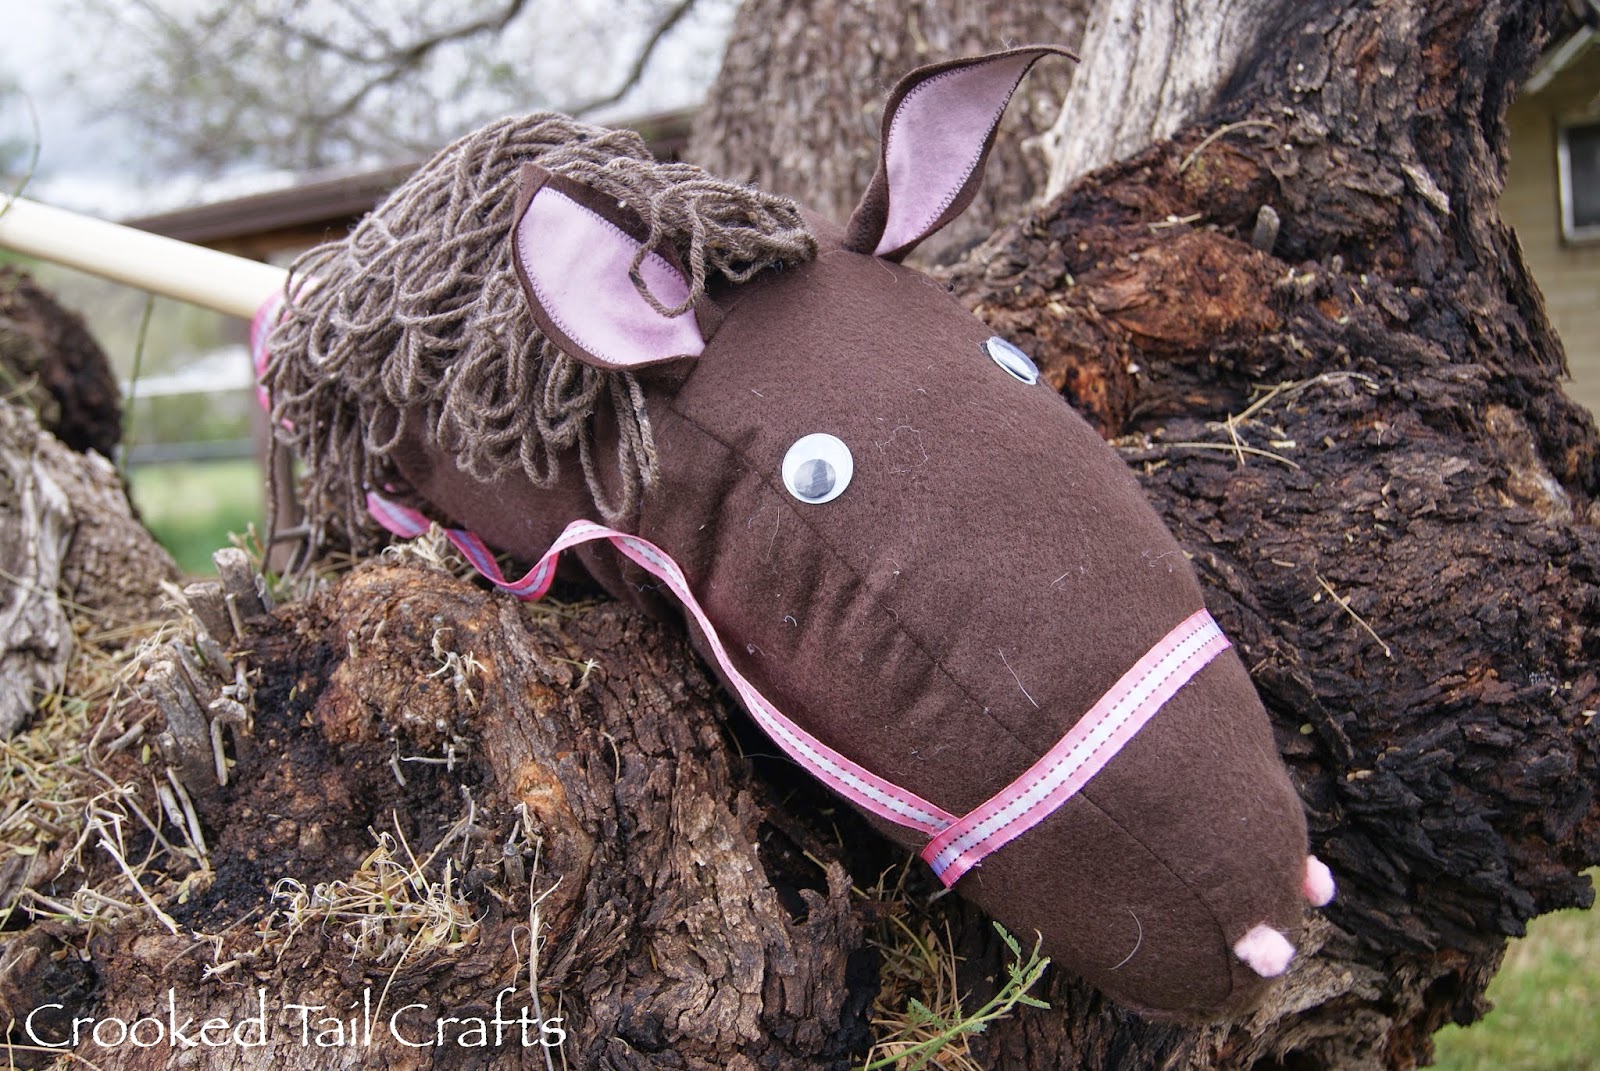
For the ears, I added a little pink for my daughters horse and red for my sons so they could tell them apart. I used a basic zigzag to attach them.


My DH got some outdoor tool handles from the hardware store and cut them to size. I stapled the horse to the handle, but needed something to cover the staples. He suggested making a bandana...Perfect! I wrapped it, then used a glue gun to secure it. Now it was the kids turn.


They chose where to put the eyes and bridle; I helped with the glue gun. My son suggested we add a nose with pompoms, which was a fun addition. They immediately took them outside to start playing and had a blast. They are a little heavy for my daughter, but she solved the problem by putting the reigns around her neck. Whatever works.

This was a fun little project. I would never have though to try this. Of course, there are things I would totally do differently if I could, but the kids are happy and so am I. Should be a fun weekend; YeeHaw!

Tuesday, February 24, 2015

BOM #11

I can't believe we're already on block #11 for the Blockbusters Block of the Month I've been working on with my LQS. I keep waiting for the set of fabric I don't like, but I have loved every set so far. One month to go!

This month I saw the fabric (Pink!! Love it!!) and the pattern, which looked like a blooming flower on point, and I thought I had it in the bag. Then I got home and started measuring the fabric and realized there wasn't enough to do what I had originally envisioned. Bummer!!


Trying to recalculate was challenging. Every idea I had wouldn't work with the fabric I had. It was so frustrating. I settled on this layout because it's all I had fabric for. As I look at it again, I am thinking about where I could add some more color. It just feels like too much green.


I've already turned it in for the month, but when I get it back next month I might go back and make some adjustments. As I look at the whole set together I see some additions I might try to make with the color scraps I have left over. There are a few spots where it would be nice to add a splash of color.


Very excited to see the last set of fabric and the last pattern. Then I'll need to start thinking about piecing it all together to finish a top. Hmm..maybe some batik browsing in my future? Awesome!

I'm linking up with Freshly Pieced for WIP Wednesday. I'm hoping this one won't be a WIP for too much longer. Time will tell.

Friday, February 20, 2015

Mini Pirate Wall Hanging

Okay, okay... I said I was finished with the pirate room, but...


Now I'm really finished. I had some scraps left and his walls seemed so blank. They needed something, and I thought a wall hanging would be the perfect, fast project to work on. I mentioned this project in this post as one of the projects I had stacked up on my sewing table. Yeah! One more done!


I was trying to match the pattern to the quilt I made, as well as make it about crib size/cuddle blanket size. I also matched the quilting; a basic meander thru the cream strips as well as some blue meander in the borders and patchwork blocks.


I pulled from my stash for the backing. The beautiful blue/green fabric is leftover from my SIL's t-shirt quilt I made last fall. I also used it to make my Dad's birthday present, the Cycling Snack Bag. I am so proud of myself for using up my stash. One of my goals being accomplished. I did a quick machine binding and called it good. I realized I don't have any 2015 printed labels yet, so I haven't labeled this one. Need to get some of those printed out.

So happy with this quick little finish, and my son is too. So glad he's so appreciative; he warms my heart. I'm linking up with Crazy Mom Quilts today for Finish Friday. Can't wait to see what I can get done next.

Wednesday, February 18, 2015

Colorful Handkerchiefs

My LQS has a blow out sale every December to help clear out and prepare for their inventory counts and new lines in the new year. This last year I scored a beautiful fabric from Blend Fabrics called 'Paysleigh'. It was a repeating pattern of hankies and the colors were just delicious. They also had a beautiful periwinkle solid that matched the hankies well. It was a pick that, although I had other projects going on, I couldn't resist working on this one right away.


Once I was able to get the fabric cut, things went smoothly. But the squares weren't actually squares; they were off by 1/2". I had to make some adjustments, which slowed me down, and then I was off... until I got to the border.


The quilt panel was long and narrow (I often have this problem). From the Paysleigh piece I had a bunch of triangles, but like the other pieces they weren't squared up. To make it easier on myself I cut squares and put them on point like the rest. I like the modern twist these border blocks add.

Now all I have left is to quilt it. Hopefully I can get that done quickly as well. We'll see...

I'm linking up with Freshly Pieced today for WIP Wednesday. This is #3 of my list of 4 from this post. I think I'm doing a good job at catching up with all these different projects I started. One of the others is ready to be pinned so it can be quilted, too. I'm getting there.

Monday, February 16, 2015

Girly Thank You's

My daughter had her third birthday a few weeks ago and she received some wonderful presents from friends and family. She is all girl! She got princess dolls, tutu's, her own princess dresses, and of course a crown to go with it all. 

To share our thanks, and continue a tradition of writing cards to people for their thoughtfulness, I made these little cuties. 


A white base for the card, I actually took one piece of pink paper with embossed glittery swirls on it and cut it in half. It created two slightly different looks, which was kind of nice. For the "thank you" part, I stamped a CTMH acrylic stamp on white card stock and used a punch to create more swirls on either side. It also gave me a nice place to thread some lacy ribbon thru and attach it to the card. 


 When they were tilted towards the light the glitter swirls really pop. So cute! I love the paper with the glitter embossing on it. I struggle to find the right projects for them, but this one was definitely the right one. I hope they were well received. My daughter sure is a happy girl!


I mean, how happy is a girl that can lick ice cream off her plate while wearing fairy wings, a princess dress and a crown? So Happy!

Thursday, February 12, 2015

Making Cycle-Snacking Easier

Strange title, I know, but it's for good reason. My recent finish is a little different than usual. And, of course, there's a story to this...

My son has become very aware of gift-giving in the last few months. It started with Christmas when I wanted him to start thinking about giving to others.  Apparently the message stuck because he is ready to give everyone presents now. Not the message I was totally going for, but we'll work with it.

Fast forward to last weekend. It was my Dad's birthday and we were celebrating on Sunday. My son was adamant we needed to get him a present and I told him we could make something. My Dad enjoys cycling and a while ago I made him a little pouch to hang on his front bar so he'd have easy access to snacks, his cell phone, etc. It was my first try and there were a lot of design flaws. I have been talking about making a new one but hadn't done it yet.


We had our project picked so I asked my son to pick out some colors he thought Granddad would like. He pulled this beauty from my scrap stash. I did a basic quilting just to hold the layers together as I completed the rest of the bag.


One of the design changes was the velcro. Last time I made it horizontal and it only fit one bike. This time I made them vertical so that it would be more adjustable and wouldn't flap in the wind when riding.


I also changed the elastic on the pocket. I lined the pocket with green to try and lighten it up a bit so it's easier to see. I sewed a pocket for the elastic to string thru and pulled tight. I pleated the bottom so it would allow items to sit down IN the pouch.


Finally, I bound the bag with a solid navy. I am really happy with how this one turned out. I tried it on my bike and it seems to work great! I sure hope he likes it. We put a few of his fave snacks in the pouches and wrapped it up. It was a hit! Kudos to my son for making me do this.  It was a totally awesome finish!

I'm linking up with Kelly at My Quilt Infatuation for NTT and Crazy Mom Quilts for Finish Friday. Feels good to have a finish again. I want to keep that going.

Sunday, February 8, 2015

Way More Than There Should Be

I somehow managed to get myself working on several different projects at once. I always prided myself on sticking to one thing at a time when it comes to my quilting projects. I'm not sure when it happened, but I found myself starting new projects when I ran out of materials for the project I was currently on. One thing led to another and... well, now I seem to have more than I can keep track of.


After finally completing my son's bed quilt, I knew what I should work on. I finished this top last year and have all the fabric I need to quilt it. However, after finishing the other twin size I wasn't really feeling like moving right on to another one. I find it very tiring to quilt something this large on my regular machine. It makes me dream of a long arm and I loose energy. I decided it would be better to move on to something else for now.  I'll come back to it though; very soon.


I figured a good distraction would be to make a wall hanging with the Pirate scraps. My kids walls are blank because I'm afraid of them knocking a picture frame on themselves. I thought this might be a good alternative to dress things up while still keeping it safe in the bedrooms. Let the wrestling matches continue...

All I have left to do on this one is quilt it. Hopefully this week I can get this done.


Just to keep things interesting, I started cutting up some fabric I recently purchased at the LQS during their sale. I was really excited and thought it would be quick to put together. No such luck. The "squares" ended up 8" x 8.5" and it took me time to be okay with trimming them down to square. I set them in the periwinkle, which I absolutely love, but realized I didn't have enough. So...to the side it goes until I can get some more.


So, I needed to do something in a small amount of time, you know, before nap time ended, so I pulled out this beautiful set of fabric a friend found for me up north. I saw a quilt at our local quilt show, posted here, and it's my inspiration. I think I'll set the blocks in black and use black in the other blocks. Looking forward to seeing how this one turns out.

Way too much going on. I am not used to having this many projects at once and it's a little overwhelming. I guess whatever I need to do to get myself back on track.  It's just a matter of time, and hopefully once I have a few smaller projects finished I can feel good about getting some other things going.

Wednesday, February 4, 2015

Pirates Room Finished

I might be back on track. I cranked it out and I finished my sons Pirates Quilt! He was so excited to have it all set up. He was ready to go to bed an hour early just to hang out in his new bed... so sweet!


I got my inspiration from a pattern I found online made with this set of fabric. When I went back to get more information from the pattern it was gone. I'm not sure what happened, but I'm glad I was able to at least get my ideas before it disappeared.


If you remember, I finished the curtains for his room in November. It was both encouraging and discouraging at the same time. I was reminded every time I saw them that I hadn't finished the quilt yet.


Ha ha, in your face curtains! I have now finished the quilt to match. :) It feels good. The square pictures were actually part of a panel, but I didn't like how it cut out; it wasn't squared up. So, I decided to take a little extra time and frame of the squares.  Totally worth it.  They look so much better.


Of course, for the back I used the leftover fabrics. I don't love this look, but I like the price. I'm happy with how it turned out and think it was a good compliment to the front. My son didn't even notice so no problem.


I did a basic meander for quilting. Keeping it simple, and machine sewed the binding so I could crank it out faster.


So now I have a very small amount of scraps and a big blank wall above his bed. I'm thinking a quick wall hanging might be a good way to use those up. I need to see if I have enough, but it would be nice.


Completing this one helped me move on to another project.  Awesome! I already have the top almost completed. It will be coming soon. Until then, I will basque in the glory of my finish!