Friday, October 31, 2014

Sailboats in the Festival

I decided I really want my Sailboats Quilt to give it a try in the Blogger Quilt Festival in the Small Quilts category. I encourage everyone to come visit and vote for your favorites in the coming days! It's going to be a lot of fun, and you might get some new ideas to try.


This was a quilt born of an accident, and so much fun I couldn't resist. The fabrics are from a line called Noah's Arc, but I don't remember the designer. 


 I purchased them many, many, many years ago for another baby quilt and used them to 'practice' my sailboats block pattern. Little did I know it would turn into this wonderful finish!


I wanted to make the quilting look like the wind blowing in the sails, and the waves rocking the boats, so the swirls seemed like the perfect pattern to accomplish both of those at once. 


Finished with a hand-stitched binding in yellow, this little guy was an awesome project that I accidentally fell into and fell in love with!

Tuesday, October 28, 2014

Working on a Couple Pieces

I think I am the kind of person that works best under pressure. I'm not a procrastinator; when I have something that needs to be done I tend to get right to it. I get so excited about it, I can't stop. Even when I'm not working on the project, I'm thinking about it.

So, right now I have a couple different pieces I'm working on that I'm so anxious to have completed, I haven't been putting anything away each day in hopes that I might be able to return to it at some point before the day is over.


Unfortunately, that hasn't been happening, but I've gotten one top done and I'm getting so close to having the second top done, it just encourages me to work more and more. 


I can't share too much yet, but here's a sample of the colors I'm working with right now. I love 'em! The colors are deep and bright and super contrasting, and SO MUCH FUN! 


I hate having so much scrap, but I've tried to make mini's out of these before and have come to the conclusion that I am not meant to make mini's. :(  Maybe someday I'll have the patience for it, but I'm just not there yet. 

I hope the recipients love them as much as I do! I can't wait to have them done and share them. So now it's time to try and get a little more work done before I crash. I still need to get up early with the kiddos.

I'm linking up with Freshly Pieced for WIP Wednesday.  I'm working' away here, and looking forward to seeing what others are working on, too. 

Monday, October 27, 2014

Blogger Quilt Festival Quilt

I decided to enter the Bloggers Quilt Festival this year in the ROYGBIV category. This is my first time entering a link like this and I'm so excited to start doing more of this.

The quilt I want to share is "Rainbow of my Very Own"


This quilt was inspired by my daughters discovery of hearing and enjoying this particularly sweet children's book by Don Freeman. I'll keep the story brief, but you can read the more in-depth version here.


My daughter was born deaf and we were able to provide hearing for her with Cochlear Implants. I want to encourage both sign language and spoken language with her and assumed evening story time would be the perfect time to practice signing. My daughter had other plans.


This was her favorite book and she had me read it aloud over and over again, night after night. I fell in love with the story simply because of how much she loved it and loved to hear it (though it really is a very sweet story).


I had two packs of hand-dyed rainbow spectrum fabrics and was inspired to create this beauty.  I designed the pattern off a basic snowball pattern with alternating yellow and green corners. I finished the borders with rainbow spectrums and quilted it using a modification of a flower template I had to help the flower pedals pop.


I absolutely love this quilt and hope you do as well. Thanks for stopping by.

Tuesday, October 21, 2014

BOM7 - Pretty Purple Flowers

Not a very exciting title, but what are you going to do?  Definitely doesn't reflect the coolness of this block. The last couple of blocks have been really challenging, but this one came together right away.


I actually thought of the design while in the class getting the fabric and pattern. I thought I'd change it when I got home, especially because I had plans for the last two and then came home and discovered I didn't have enough fabric, but it worked! Yeah!


Rather than create one big flower, I decided to break it into three flowers with a stem this time.  The pattern leant itself to that well.


That makes seven blocks now.  It's really starting to come together. I love seeing all of these blocks laid out. I have actually thought about quilting-as-you-go on this one because I keep thinking of quilting patterns for each of these flowers as I piece them together. I hope I can remember what I was thinking about when I am all finished and ready to quilt. I've never tried the quilt-as-you-go method so it's a little intimidating. Maybe I need to add it to my sewing 'bucket list'.

Have to get this block over to the Quilters Market for display and then next week we get our new block. Can't wait to see what's next! These are awesome, and have been so much fun!

Friday, October 17, 2014

A Rainbow of my Very Own

This finish is so special to me. I'm very excited it's done! I have posted tidbits about my daughter's hearing loss, but to understand this quilt, I have to tell a little story.


When I first started reading books with her I had a music stand set up with the book propped on it so I could sign with the book open. We had a pretty good rhythm down until she received her first cochlear implant. After that, she didn't want to sign books anymore. What I thought would be our signing part of the day became our speaking part of the day. It was wonderful to see how she responded to the stories, and she immediately identified her favorites, as all kids do.


One of the first books we read together was, "A Rainbow of my Own" by Dan Freeman. It's a lovely story about a little boy who goes out after a rainstorm to find a rainbow, but when he gets to where the rainbow should be, it's gone. He imagines what it would be like to have a rainbow to play with. While the little boy is playing with the rainbow, they decide to play hide-and-seek and the rainbow hides in a flower garden. At the end of the book, he finds a rainbow of his very own in his room.  It's so sweet, and my daughter loved it! She would have me read it again and again. You can tell by how tattered the book is that we've enjoyed it tremendously.


I was so inspired by this book and the love of verbal reading it encouraged in my daughter, I wanted to make a quilt about it. I had a couple of fat-quarter packs of hand-dyed fabric in a rainbow spectrum. I bought it years ago at a LQS that's known for having a little of everything. It was totally meant to be used in this project.


I got some green batik to use as the greenery surrounding the flowers, and offset the flowers themselves to make it look like they are swaying in a garden of flowers. The flowers are basically 4 snowballs, each with 1 yellow corner and 3 green corners to create the flower center and the leafy edges.


The flowers ended up creating a long, narrow quilt and I still had a ton of scraps left, so I decided to create the repeating rainbow bands down each side. It gave the quilt a nice width to balance the length a little more.


The backing is a batik I purchased at another LQS that recently closed. I was able to get it for a pretty good deal. I like that it has all sorts of colors on it, although I admit it's not my favorite print. I struggled with whether to actually use it, but in the end decided I was interested in the front, so it didn't really matter what was on the back. Now that it's completed, I think it looks pretty nice.


I modified a quilting template I had to create the flower look on each flower in the garden. Other than that, I kept it really simple with 1/4" offset lines down the borders. I didn't want to take away from the flowers; the whole point of the quilt.


Finally, I hand-stitched the binding down, which went surprisingly fast, and I added a label on it. I actually named this one and dedicated it to my daughter. It's a keeper.


I am linking up with Crazy Mom Quilts for Finished Friday. I feel like I've been able to really crank them out lately. I worry I might be coming to a screeching halt as we approach the holidays and the chaos that comes with them.  We'll see. Fingers crossed I can keep chugging away.


Tuesday, October 14, 2014

Sailboat Block Tutorial

After finishing the Sailboats Quilt, I worried I'd loose the measurements for the pattern. I also thought it would be fun to share it with others. So...

I decided to put together a tutorial with pictures and everything.


This pattern makes 2 Finished Blocks: 7 ½” x 7 ½”


Pieces Needed to Complete the 2 Blocks:

2 - 2 ½" x 7 ½" strip, color
4 - 2 ½" x 2 ½"squares, white
1 – 5 ½" x 5 ½" square, white
1 – 5 ½" x 5 ½" square, color
1 – 3 ½" x 3 ½" square, white
1 – 3 ½" x 3 ½" square, color
2 – 2 ½" x 3 ¼" strip, white
2 - 1" x 7 ½" strip, white

Draw sewing guide-lines on all of the white squares. The 5 ½” square and the 3 ½” square need lines on either side of the diagonal point. The 2 ½” squares need one line each from corner to corner. 


Match the squares together and pin; set aside. Align the 2 ½” squares on each end of the color strips and pin.  Sew the squares along the lines. Iron smooth and then cut ¼” seam allowances along the sewn lines. 


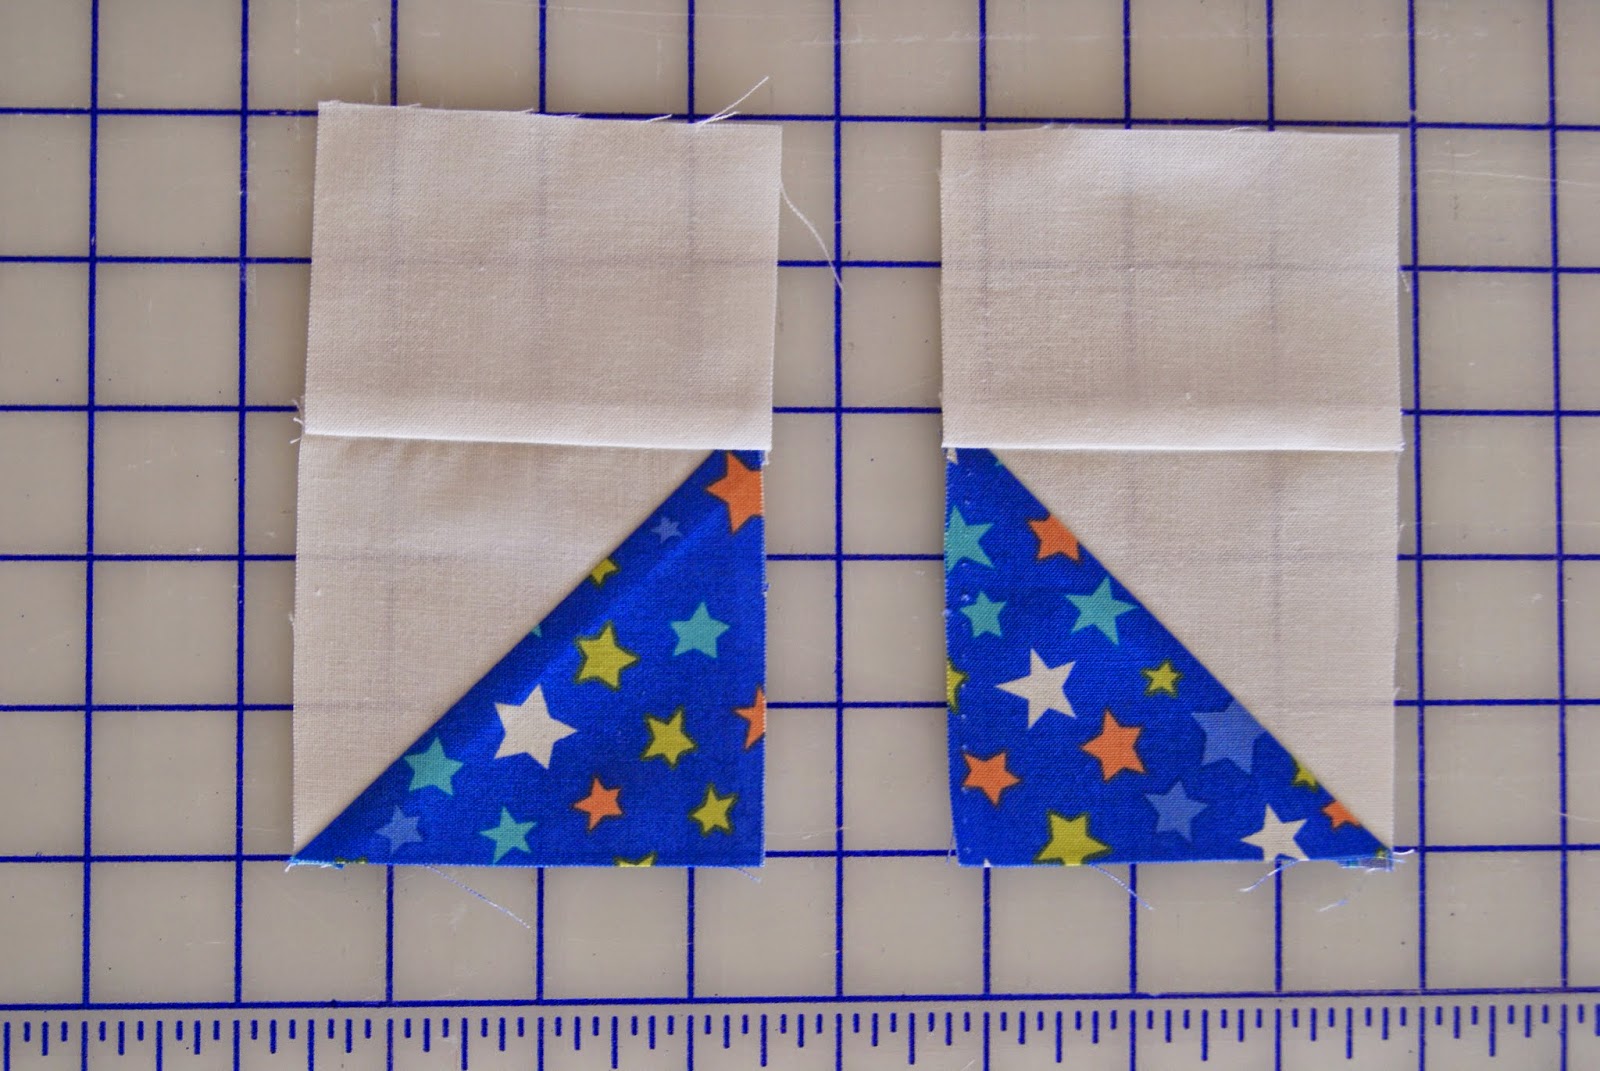
This will create 4 HST's and 2 rectangles with white triangles on each side. Iron towards the colors and trim the flags off the HST's.


Take the 2 -  3 ½” HST's and lay them out. Align the 2 - 2 ½” x 3 ¼” strips with the tops of the HST's, making sure that one of the color triangles in the HST is facing left and the other facing right. The 2 ½” x 3 ¼” strips should be attached to the white part of the HST's. Iron towards the white strips.

Now sew the strip you just made with the 3 ½” HST to the 5 ½” HST, making sure to have the colors up against each other. Iron towards the 5 ½” HST. 


Sew the 7 ½" color strip to the HST's so that the colors are matched up with each other. Make sure to align up the points before sewing. Iron towards the 7 ½ “strip. 


Finally, sew the white 1" x 7 ½" strip to the bottom of the boat. Iron towards the color strip and you are finished!


Aren't they soooo cute?!? Just a fun little pattern that has so many applications. I hope others find this helpful! This is such a fun and easy block, and I have been loving it.

I am linking up with Freshly Pieced for WIP Wednesday and with Kelly for NTT. I am also posting this in my tutorials link. I'm looking forward to seeing what others have been working on.

Wednesday, October 8, 2014

Sailboats Quilt

I have a confession...this quilt was totally an accident.  It started off as a block and turned into a whole quilt, and it is the perfect example of how I figure out a pattern.

I found this absolutely adorable quilt online and wanted to figure out the sailboat block. I did some Pinterest browsing and discovered it was a pretty unique pattern. So, I decided to figure it out for myself. I figured I'd make a couple of test blocks with some scraps just to find the measurements and then get to work with a different set of fabric for a quilt top.

And then this happened...


Yes, that's right. Once I started working, I couldn't stop. I had scraps from my Baby's Blanket Quilt and I figured it would be perfect for practicing with. They come from the line called Noah's Arc from several years ago, and I actually completed 2 quilts with it already so this makes #3.


I decided to make it real simple with white sashing between each block and then finish it off with a scrappy border. I had a bunch of 1 1/2 inch strips leftover over from the previous quilt finishes, so I worked with those and simply cut them to different lengths creating the scrappy look.


I had this wonderful yellow bubble fabric that worked perfectly for the backing. Nice neutral color that is happy and warm.


I knew I wanted to have a windblown type of quilting look, so I figured it's a good opportunity for some different FMQ work. I love how the swirls make it look like winds and waves, following both themes of sailboats on the water.  So fun!


The yellow backing was such a nice match with the front that I decided to use it for the binding as well. I finished it off with hand-stitching and my simply little label.


I can't believe this came from practicing a pattern I made up, but oh my goodness! What a gem! It was so much fun to make, and actually came together pretty quickly and easily.


I hope it will bring joy to a happy little baby out there soon; I posted it on my Etsy site.

I'm linking up with NTT with Kelly, as well as Finished Friday at Crazy Mom Quilts. It's time to get back to work on the next project. Yes!

Tuesday, October 7, 2014

Boy-ish Thank You's

Last month was my son's 5th birthday! What?!?!? How is this happening? He's growing up fast, and is surrounded by wonderful, caring people. To celebrate his birthday this year, we had a simple dinner gathering at our house. It was all adults, except for my two kiddos, who incidentally, had a blast! He got some really neat presents that we've been enjoying daily and I wanted to send out thanks to those who thought of him on his special day. Sooo...


I put these little guys together.  It was based off a previous card I had made but it has different colors and prints. I wanted to make sure it looked more boy-ish, if that makes sense.  Some of my cards can be a little too much pink and frill; maybe when my daughter needs thank you's.


It was simple and quick to construct. Simply cut the pattern paper to size and frame it with a solid, corresponding color. Tack it to the card, an then cut a thin strip on another corresponding solid with a textured paper. I used a linen texture and sanded it a bit to give it a more distressed look. I stamped the "Thank You" sentiment (this particular stamp is from CTMH and the ink is chocolate chip from Stampin' Up). Finally, I added a couple of brads on either end and tacked it across the card. All finished!


I got these sent out before posting so as not to ruin the surprise in the mail for anyone. :) I hope the recipients enjoyed them!

Sunday, October 5, 2014

Inspired by my Little Pirates, Aargh...

I have been working to put my daughters room together. I finally feel like she has her own, serene place. I started the quilt over a year ago and finished it last spring.


Once the bed was put together and the crib removed, the decor looked incomplete. Sooo...I had to get creative.


I found some sheets at Target that worked perfect, but the curtains were a little pricey. I decided to buy one panel and then cut it in half and hemmed each piece. Voila! Two soft, simple curtains that match her room nicely. I already had dark purple liners for night time that I made for her nursery; thank goodness they still work for her room. New rug on the floor and the room feels totally different; grown up. Now it's a big girl room. It looks a little piecy in the pictures, but I promise it all pulls together great!

There's something so satisfying about completing a project. Pulling things together. Creates a calming feeling within...until I walk into brothers room next door and realize it has become a hodge-podge of random decor.

He has become super obsessed with pirates; I mean what little boy doesn't at some point. When he first graduated into his big-boy room, I bought a space-theme set.  It was on sale and he was happy with it. The rug is the same as it was a nursery; ditto with the curtains. 

This is no good.  My boy needs a room he can be proud of. Or at least that Mom isn't embarrassed by..."don't you make quilts to sell?" Why, yes...yes I do.

I had already made some pillowcases for him out of the Pirates fabric from Andover Fabrics. Of course, I'm a little late and most places have sold out of it, but I managed to find some pieces still out there on Etsy and at a wonderful little fabric shop, Bug Fabrics. I even found a panel, and I am such a sucker for panels.


I have been trying to plan out the quilt for his bed, but already have the curtains figured out in my head. I am so excited about this! I can't believe I'm finally doing it! Yeah! Fortunately, there's lots of pirate sheets out there, so I should be able to find something that will go with it.

So, here's to finding new projects to work on, even though I currently have one quilt that I'm binding, one that I need to finish quilting, and two that I am still working on blocks for. Nothing like throwing another project in the mix. Gotta keep things interesting, right?