Friday, September 30, 2022

Beer Batter Fish and Chips


Oh man! Weeks of binge-watching repeats of Master Chef has gotten me in the mood to try all the challenges they throw at the contestants. One I knew I had to try was fish and chips. It’s a little tricky though because the people in my house aren’t really fish eaters… or so I thought.


I had this idea floating around in my head, but it all really started when I was at Trader Joes and I happened to see a frozen package of cod pieces.  The pieces were about ½ oz to 1 oz; perfect for bite size fried fish, at least that was my thought. It wasn’t that expensive, which made experimenting a little easier to do as well.


 knew I wanted to make a British style beer batter so I did a little research and found a great recipe. The only downfall was that the fish was a little bland and wet inside the fried batter shell. I did a little more research to perfect the technique to avoid these two problems and came up with an awesome beer batter fish recipe.


Of course, the fries are a classic and something I simply dug into my blog recipe book for. Easy peasy, and a great addition to this classic British meal.


The best part was how well it was received! My family loved it; my son in particular has requested a repeat several times. I love when they love my food like that. Yeah!


Beer Batter Fish and Chips


1 lb cod pieces (or another firm white fish for frying)

4-5 medium size russet potatoes

1 c flour

1 tsp baking powder

1 tsp salt

½ tsp onion powder

1 bottle beer (ale, stout, lager, they all work)

1 large egg


Prep the fish. Cut them into pieces about 2in x 3in, give or take, and pat them dry with paper towel. Sprinkle them with coarse salt and set them aside to season.


Peel the potatoes and then chop them into 3/8 inch strips to make fries. Put them in a bowl with cold water in the fridge for about 30 minutes. Heat the oil in your fryer and then pull out the chilled fries and dry them thoroughly with towels. You’ll cook the fries twice to maximize crunchiness. Do the first fry at about 330 degrees F for about 3 minutes. Cook them in batches so they don’t drop the oil temp too much. Let them drain on a paper towel while you work on the fish.


Increase the oil temperature to 370F. In a bowl, combine the flour, baking powder, onion powder, salt and pepper. Make a hole in the center and drop the egg. With a whisk, begin to blend the egg in with the dry ingredients, and then slowly add the beer. Continue to stir while you do this to avoid lumps in your batter. If the batter seems to runny, add a bit more flour and blend in.


Make another bed of flour to dredge the fish pieces. Flour the fish pieces, and then carefully dip them into the batter, coating them completely. Once coated, immediately drop them into the frier, being careful not to splash. Allow them to cook until they’re golden brown, about 4-5 minutes. I also flip them after a couple minutes to get even browning. Once they’re done, pull them out of the oil and place on paper towel to eliminate excess oil.


Once all of the fish is cooked, re-fry your French fries. Again, do this in batches so the oil stays hot. Allow them to cook for about 3 minutes again; pull them out when they are a nice golden color. Place them on a paper towel to drain and add salt for flavoring.


Serve with a great coleslaw and some tartar sauce. Enjoy!

Thursday, September 15, 2022

Spring Flowers Hanky Quilt


So many years ago, while visiting my sister in Seattle, we spent a whole day visiting local quilt shops. We found this great little shop in an old-country-style village complex. There was a small community garden with chickens running around a everything. It was fantastic! My sister took the kiddos to see the chickens and get some candy from the little old time candy shop so I could have some time to browse.


Amongst many other fun finds, I found this little panel of hankies by Me and My Sisters Designs. I love their fabrics, and surprisingly have a difficult time finding them in my hometown in Arizona where they are located.


Although I was super excited to put this piece into a quilt, I wasn’t sure what to do with it yet, and I didn’t have any other complimentary fabrics to pair it with. So, this piece went into hiding until I could find some inspiration.


Fast forward to the pandemic and I was at home with kiddos and a lot of fabric to work through. I pulled this piece out first, but still had nothing to match it with so I had to continue waiting. That summer, however, while in San Diego, I talked my family into hanging out for lunch in a parking lot of an amazing quilt shop that has everything you could dream of. I was able to find some great pieces by Me and My Sisters that worked with my project.


I got home and started piecing things together. I wanted to keep the pattern simple so the hankies would be the star of the quilt. The hardest part was layout because even though I didn’t really want a pattern, I found that it was the only way to get the blocks to work together so I went for it.


My mom had this great green floral piece that worked perfectly for the backing with a bright pink stripe to bring it up to size. I used a meandering flower pattern for the quilting on each block. I felt like too busy a pattern would take away from the piecework.


I finished the quilt with an orange binding. I like that the orange pulls on colors from the front as well as the back of the quilt. It’s like it tying it all together.


This was a fun finish. I like the bright colors, and the adorable hankies. It would be a wonderful addition to a little girls room with all the bright colors and fun floral pattern. 


Wednesday, September 7, 2022

Natures Lost Four-Patch Quilt


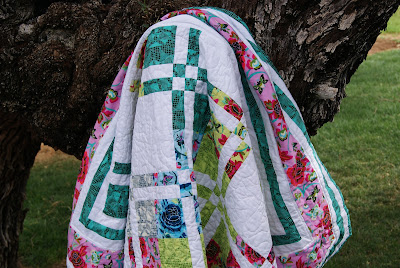
After finishing the Natures Beauty Garden Lattice Quilt, I still had a few pieces of 10” squares left from the layer cake pack. I decided to try making a hidden four-patch quilt. I have made hidden six-patches before, and I was intrigued with the narrow pieces and small squares. I had to give it a try.


To make the blocks, I simply took 2 white squares with 2 patterned squares. This created 2 blocks for every 10” square I had left to work with. Once I had the four patches sewn, I cut them and then mixed up the cuts to create a different look. I chose to go narrow, but you really could do whatever.


When it came to laying out the different patches, I tried to make it look random, but because I was working with so few pieces, it was really hard to avoid a pattern of some kind. I decided I was good with the semi-random, partly organized look. It was more about the flow of the colors than what patterns landed where. I really wanted the colors to pop and the quilt to have color flow, which I feel like I got.


Once I got all the blocks together, I felt like the quilt was still a bit small. I ordered some more fabric so I could create some borders. I went with a double thin border with a large center border so I could maximize on the borders while still having some variety and interest.


The backing was more of the pink floral fabric I used in the border. I love this fabric! It’s a fun pattern without it being too overwhelming, and the pattern is large which works great on a backing where you have a large piece of fabric.


The quilting was kept simple with a basic meander for the blocks of the quilt, and a simple quarter-inch-in straight stitch on the border.


Finally, I used some more of the teal fabric for the binding to complete the project. This was a fun finish. I love that I was able to use the whole layer cake pack and create 2 very different quilts with it. I also love all the bright colors and funky patterns. Very different from what I usually work with, but still cheery and modern like I like it.