Sunday, August 4, 2024

Squash in the Air Fryer

I am always trying to find quick and easy ways for me to get more veggies while making dinners the family will enjoy. We all know it’s not always an easy sell. The air fryer has given me a new avenue for making things on the side while I work on other things.


I like having an option that’s a fix-it-and-forget-it approach. The air fryer allows me to make spaghetti and meatballs for the family, and I can have spaghetti squash instead.


Same with other squashes. I can make Mac N Cheese and add some pureed butternut squash to mine. Or have an acorn squash when we have steak and potatoes. Lots of flavor while eating healthier.


Although I’ve specifically described the Spaghetti Squash in this post, it’s the same approach with several different squashes, which I’ve listed at the end of the instructions. I’m always looking for new ways to incorporate goodness! This is an easy one.


Spaghetti Squash in the Air Fryer


1 spaghetti squash, approximately 2-3 lbs

1 Tbs EVOO

Salt and pepper to taste


Preheat the air fryer to 375F. Cut the squash in half and remove the seeds from the centers. Brush each half with EVOO (I have used the EVOO spray from Trader Joes and it works well). Season with salt and pepper.


Place the 2 pieces into the air fryer facing down. You can face it up if you want more browning on the flesh; I prefer a softer texture on my squash. Cook for 25-30 minutes depending on your machine and the size of your squash.


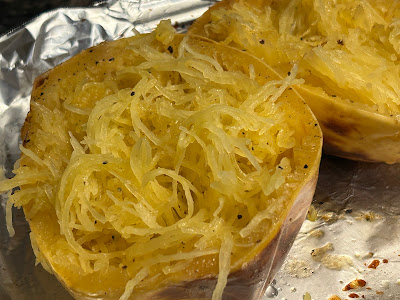
Use a fork to test for tenderness. When it’s soft to the fork touch, pull it out and allow it to cool for a few minutes. Turn each piece over and use a fork to gently scrape the squash and create the “spaghetti”.


*This also works with Butternut Squash, Honeynut Squash, and Acorn Squash. The times might vary based on the size of your squash, so watch it and check for doneness.


Crustless Apple Crumble

One night, the family and I were craving an apple pie. Something about warm, fresh-out-of-the-oven apple pie. Soft, flavorful apples wrapped in a flaky crust. Sounds amazing! Unfortunately, I didn’t have enough time to make that happen and I had to improvise.


Ideas began flowing. What if we… or what if we…


I love a traditional apple crisp, but when I mentioned I use oats in my crumble, it was rejected. I will save that for another day, and another post.


We all love the apples in the crisp, we just struggled to agree on the topping. I was flipping through cookbooks and found a recipe for a crumble. Not having oats was appealing to the household, but it was made with berries. We only had apples. Would it work? Let’s find out!


I’m here to tell you, it worked! The crumble on apples is so delicious that we’ve made the crumble by itself and sprinkled it on homemade peach ice cream. Again, another recipe for another blog post. For now, let’s focus on the Apple Crumble.


Super straight forward and easy to make, you can throw this together in a jiffy. If you have a Kitchenaid spiralizer, you can peel, core, and slice the apples even faster. It’s fantastic! Usually, I just like to go old-school and do it all by hand. Reminds me of working with my grandma in the kitchen when I was young. And so does this amazing Apple Crumble.


Crustless Apple Crumble


4-6 apples (I like Pink Lady, but any firm apple works, such as granny or Jazz, etc)

1 ½ Tbs lemon juice

¼ c white sugar

1 tsp cinnamon

2 Tbs butter, chopped into pieces

1 c flour

¼ c white sugar

¼ c brown sugar

8 Tbs butter, chopped into pieces

½ c walnuts or pecans, finely chopped but still pieces (optional)


Preheat the oven to 375F. Prepare your apples by peeling, coring and slicing them into ¼ inch slices cut in half. Place them in a bowl and add the lemon juice. Mix together to distribute the lemon juice and then add the sugar and cinnamon. Mix together and pour the apples into your baking/casserole dish. Finally, add the 2 Tbs butter pieces to the apples, spreading them around for even distribution during baking.


In another bowl, mix together the flour and both sugars. Add the 8 Tbs butter pieces and place in the microwave to melt the butter (30-60 seconds max should do it). Pull it out of the microwave and stir to make the crumble. Finally, add the nuts if desired and mix together. Spread the mix on top of the apples in the casserole dish, making sure the crumble is evenly distributed but still allow for clumps which adds texture.


Place the apple crumble in the oven uncovered. Cook for 25-30 minutes. It’s ready when you start to see a slight browning on the crumble and the apples bubble slightly on the sides. Remove from the oven and allow to cool for about 10 minutes. Serve with ice cream. Enjoy! 

Sunday, June 30, 2024

Classic Hamburger Buns

My husband has a favorite hamburger roll from when we was growing up. I learned how to make and it is been our standard roll now for at least 25 years. But I was looking for something new. Drives him crazy…although he does enjoy sampling my baking attempts.


I really wanted to find a bun recipe that I could make full size buns as well as slider buns. Something that was super simple, versatile, and still tasty and makes you want to more.


I found a fun recipe that hits the mark. We initially used it to make sliders and it worked really well. Then we tried full size burgers and again, it was a hit. These can be used for all sorts of things; burgers, sloppy joes, pulled pork, even ham or turkey sub sandwiches.


The recipe is written for full size buns, but if you’re making sliders you’ll divide the dough into 24 rolls. It’s alright to place them closer together so they get a nice “tear” on the sides of the finished roll. You can do this for the full size buns as well. It’s totally up to how you like to eat your buns.


Classic Hamburger Buns


¾ c water, warmed to 110-115

2 ¼ tsp (1 packet) yeast

¾ c milk (I use 2%)

¼ c canola oil

4 eggs

¼ c sugar

2 ½ tsp salt

6-7 c flour


Measure the milk and water together and warm to 110-115 degrees. Place the yeast and a tsp of sugar into your mixing bowl. Add the warmed water-milk and let it rise a bit while getting the rest of the ingredients together.


Prep your oil, sugar, salt, eggs, and 2 c of flour. Add them to the mixer bowl that’s fitted with a dough hook and turned to a low setting (my kitchenaid is set at speed 2). Once those are mixed together, continue to add a cup of flour at a time. Use a spatula to push the dough off the edges and into the bowl. Once your dough is pulling from the edge of the bowl, stop the mixer and turn the dough out onto a floured surface (it should have a little bit of stickiness to it still, but it should hold its shape well and be easy to knead).


Knead to dough for another 5-8 minutes by hand. Add flour as needed. Continue to knead until there is good elasticity to it. You shouldn’t have any more dough stuck to your hands as this point, and as a little test, if you pinch and pull, it should bounce back.  


Place the ball of dough into a greased bowl, cover it with towels and leave it to rise for about an hour in a warm place. Turn the oven on to 375F and have 2 half sheet pans ready with silpats or parchment that’s been sprayed with oil.


After it has doubled in size, turn the dough out onto a floured surface and cut the dough into 16 equal balls. Use the palm of your hand to shape each of the balls evenly. Press the center down slightly to widen the ball a bit, making for a better bun. Place 8 on each pan, being sure to space them out evenly.


Once all of the buns have been formed, cover with towels and allow them to rise once more for about an hour. They should double in size. Brush each bun with water before placing the pan in the oven. Bake them for 14-16 minutes. Pull them out and immediately remove them from the pan and onto a cooling rack. You can brush each roll with butter to help soften their tops a bit, but this is optional. Repeat this with the second tray.


These are fantastic as hamburger buns, pulled pork sandwiches, and can also be made into smaller slider buns. Also, they freeze wonderfully. Once they’ve completely cooled. Place them in sealable bags and keep them in the freezer for up with 3 months. Thaw them on the counter or in the microwave for a minute or so. They are excellent! 


Cowboy Stars Quilt

What can I say about western fabric, I just love it! I love the colors, and the patterns, and the ranch life style it portrays. The bummer about this is, I don’t actually make a ton of western quilts.


My mom went through her stash to do a major cleanout and I came home with even more of these beautiful cuts. I made a wonderful log cabin with one batch, and a fussy-cut baby quilt with some more. But with more still to work with, I decided to try making some stars.


I started with some small stars. I wasn’t sure what my plan was or what I was going to do with the stars, but it was fun to make these small stars… at first.

I quickly realized this was going to take a long time. I also realized I needed to incorporate more colors, and more sizes. I went through all of the fabrics that I thought would work well in this project. Then I broke them up into pairs; a dark and a light.


 I made sets of stars in the colors and broke all of the stars into dark and light piles. Then I just randomly matched stars together and started sewing pairs. Once the pairs were together, I made bigger stars and sewed all that together. I tried to be as random and unintentional as I could be, which is super hard for me.


Getting all of the stars put together was a challenge, but I was super happy with the random look of the finished product. It felt like it needed something to frame it, and to make the top a little bigger, so I added a navy strip and then some of the blue from the stars.


The backing is my attempt to use up the random large fabric pieces I have left from previous backings. It’s really a fun theme with wildwest cowboys wrangling up the longhorn bulls. It’s a very large print that is lost when cut into small pieces. But it looks super cool as a backing. I didn’t have enough so I countered it with a grey striped fabric.

 Once again, I did a basic meander for this quilt. The scrappy nature seemed to be perfect for that type of quilting. I had some pink fabric left over from the top of the quilt and I used that for the binding. I finished it with a label and called it done. The cats were pleased, but I’m thinking it will be perfect for our bed in the camper.


 I was so happy to get to use up a bunch of the western fabrics I’ve collected for so many years. I still have a ton to go, so hopefully there will be more western quilts in the future. 


Tuesday, May 7, 2024

Classic 1800's Star Quilt


When I was first getting into quilting in the early 2000s, I started collecting fabrics I liked. I didn’t have much reasoning other than whether I liked it. It’s a risky game because you can end up with a lot of different genres of fabrics. 


We had gone to our local quilt show and I found this beautiful fat quarter bundle of 1800’s reproductions fabrics. They came in reds, blues, greens, and browns. I loved it and added it to my collection.


I always had an idea of what I wanted to do, but I was so new to quilting I didn’t know how to do it yet. I needed to study and learn more first. In the meantime, I knew I needed white contrasting fabrics in each of the colors, so I started looking out for those too.


After so many years, this pack came out of the deep storage of project fabrics. I matched up the dark fat quarters with the light reproductions I had collected. Things were looking up. I decided a star pattern would fit the genre of fabric, and used my computer program to design a star block that I liked. 


I wanted to make a checkerboard style layout, so I mixed the different lights and darks and put them together randomly. Then, I laid the blocks randomly while still creating the checkerboard look. 


Once all the blocks were together, I felt like it was complete. It didn’t need any borders; I wanted to keep it simple. I found a nice, neutral colored backing and used a basic meander for the quilting. I felt like it didn’t need anything elaborate since it was a scrappy look.


The binding was a bit tricky. I didn’t want anything I’d already used in the quilt, but I also didn’t want it to take away from the rest of the top. I found a perfect dark blue in my mom’s stash. Binding done. All that was left was adding my tag. 


I am so glad this one is finally finished. I’ve loved this fabric since I found it all those years ago. Every time I saw it in the stash bin I was bummed I hadn’t used it yet. This was just the finish I was looking for with this collection.


I actually still have some darker reds and blues from this set that I pulled aside for another project. I’m hoping to get that one done next. Keep checking back.

Sweet and Spicy BBQ Sauce


I will admit that I am NOT from Texas. I don’t have BBQ running through my veins. I absolutely love it though, and wish I had a better grasp on it. On the flip side of that, I have eaten a lot of Texas BBQ and when I taste other bottled sauces you can get at the store, they just don’t compare.


At one time, Trader Joes had a Sriracha BBQ Sauce that was pretty darn close to the Texas awesomeness. When they stopped carrying it, I found myself once again without a good sauce to use at home. It was time for me to take matters into my own hands.
 

 I looked up some of my favorite recipe websites and started experimenting. They were good, but it seemed like too much sugar, too much ketchup, not enough kick, not enough flavor depth. I started mixing all these different ideas together and was able to come up with a sauce that hits all the marks I was looking for.


My hubby likes a more classic BBQ sauce, while I prefer the sweet and heat mixed together. The nice thing about making it at home is that I can make it just like we like, and I can customize even more with the sriracha for mine.


This recipe hit the spot for us on BBQ. I am ready for summer now and the great picnics and camp trips we can enhance with awesome BBQ.


Sweet and Spicy BBQ Sauce


½ c ketchup

1 ½ c  (15oz can) tomato sauce (or 6oz tomato paste with water to make 1 ½ c)

¼ c cider vinegar

¼ c + 2T molasses

2T mustard

¼ c red wine vinegar

1 tsp paprika, garlic powder, salt

2 tsp onion powder

½ tsp cayenne pepper

1 ½ T brown sugar

½ tsp liquid smoke

1 tsp sriracha (optional)*


Add all of the ingredients (see note for sriracha) into a saucepan and turn the heat to medium-high. Bring it to a boil, and then reduce to a simmer. Simmer for about 20 minutes. The longer you simmer, the more the flavors will blend and become super tasty.


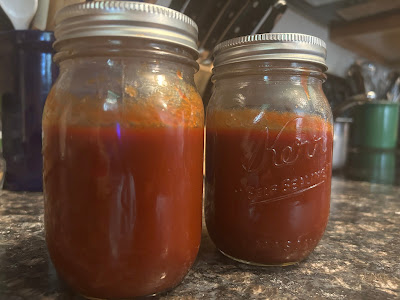
Serve warm or save in the refrigerator for about 2 weeks. This recipe makes about 2 half pints. Freeze in batches for up to 6 months.


* If adding sriracha, I wait until the end, split into two different batches and then add ½ tsp sriracha to one batch and leave the other without. You can add all of the sriracha with everything else if you want the whole batch to have it.


Tuesday, April 30, 2024

Rainbow Cubic Scraps Table Runner


Once I completed the Rainbow Cubic Quilt, I had scraps left over from the strip cutting. It felt like such a waste to toss them, but I also didn’t want to pick them all apart to create something new.


I looked at the pieces and realized they create a pattern of their own. It would be just enough to make a cute table runner. 


I sewed the scraps together, but had an uneven number. To keep from having any waste, I pieced them together so colors would blend together. Red with pink, blue with purple, and teal with green. It was a nice touch to create a unique pattern.


Because of the nature of the scraps, I didn’t really need to add a border to this one. Also, I was trying to keep it to the size of a table runner so no need to make it too wide for that.


I found a nice and calm backing of clouds in blues and whites. It was perfect.


I used a basic meander and was able to finish the quilting quickly. I used the same grey binding I used on the cubic quilt, and that was it! This table runner was ready for running tables.


I’m so glad I was able to use the scraps from the cubic quilt to create something new. I am also glad there was no waste. This little fabric pack was a lot of fun and I created a couple neat projects from it.


I actually think I have enough scraps left for one more project…

Rainbow Cubic Quilt


When I first started getting into quilting, my mom and I went to a local quilt show. They had so many beautiful quilts to admire and inspire, and they had a great selection of venders with more inspiration and the fabrics to match. As a door prize, there was a raffle and out of some freak of luck, I won a prize! That never happens. 


The prize was a beautiful pack of eighths that were all the same pattern but different colors in a rainbow. I loved them, but I didn’t know what I was going to do with them so they were put away for safe keeping.


Over the years, my quilting skills improved and I became interested in trying a cubic quilt. During the pandemic, the fabric pack came out and I started to think it might be a good fabric for a cubic quilt. While I was confident with angled sewing, I decided to try using a cheater method that uses strip quilting to create half-hexagons and then sew things together in a row to create the cubic illusion.


It worked really well and came together mostly quickly. The slowest part was having it on the floor for layout. My cats thought it was a great runway and tried to change my sewing order a few times. Such creative spirits.


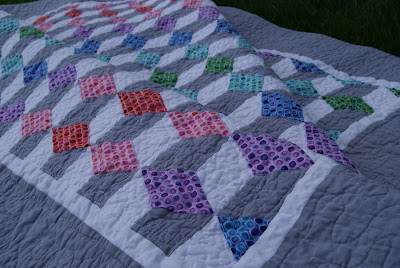
Once all the cubes were sewn together, I felt like the quilt needed a border to pull it together. I kept it simple, matching the grey in the quilt to the grey in the border. I also used the grey for the binding, creating a nice simple border to frame the quilt.


I found this great neutral backing at the LQS that was perfect for this project. Darker than the grey on the front, but still in the same shade group and the flowers were just too cute.


I used the basic meander again for this quilt because of the scrappy nature of the quilt. However, when quilting I only quilted on the white and grey. I didn’t quilt on the colors at all. It creates a nice puffed up look for the colors, really making them pop out from the quilt.


This quilt was a fun experiment and challenge. I really enjoyed figuring out how to get this to work, and it’s fun to look at it and get confused about where the cubes are going. Now my cats can sleep on it without a re-design too.  We’re all winning.