Thursday, June 17, 2021

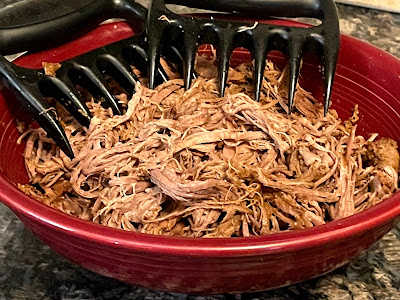
All Purpose Shredded Beef in the Slow Cooker


That title might sound boring, but I have so many different recipes that call for shredded beef… but they’re all different. Sometimes it’s tacos, sometimes is chimichangas. Sometimes I want a sweet and savory BBQ sandwich, and even other times I want a well-seasoned shredded beef for a salad. You name, I want a go-to recipe that can do it. 


This is something I’ve been putting off. I’m not sure why but it’s just not been a priority. I’ve found Mexican style shredded beef, and occasionally I will make a plain shredded beef. It just didn’t have the flavor I was looking for.


I did some searches to try and find that perfect recipe. We all know how that goes.  I had no luck, but I did find a couple of recipes with elements I thought might work well together. I decided to do a “little of this, little of that” approach and find a good rub for the meat. I also decided to bolden the flavor of the juices the beef cooked in without overdoing it.


Enter the yummiest, most flavorful, most versatile shredded beef ever! It’s delicious by itself, but it also goes amazing with BBQ sauce, and with salsa, and with a stir fry sauce for an Asian twist. I love how this recipe can do so many things! 


The best part of it all is that it freezes too! It makes for a great quick meal on a busy night. I don’t know about you but our nights are getting busy again. It feels good, but it also feels good to have all new dinner ideas for those busy nights. Mmm… it’s time for dinner! BBQ here I come!


All-Purpose Shredded Beef in the Slow Cooker


2-3 lbs tri-tip roast (or other shredding roast)

2 ½ tsp paprika

2 tsp garlic powder

2 tsp onion powder

1 ½ tsp salt

1 tsp black pepper

1 tsp chili powder

1 ½ c beef broth (1 small can)

½ c water

1 tsp liquid smoke


In a small bowl, mix together the paprika, garlic powder, onion powder, salt, black pepper, chili powder. *You can add 2Tbs brown sugar for a slightly sweeter rub. * Rub half the mix on one side of the meat, then flip it over and rub the second half on the other side.


In a measuring cup, blend the broth with the water and liquid smoke. Pour about ½ a cup into the bottom of your slow cooker. Place the meat in the slow cooker and pour the rest of the liquid around the meat. I try not to disturb the rub too much and pour around instead.


Cook in the slow cooker for 8-10 hours on low, 4-5 hours on high. When finished, pull out of the slow cooker and shred immediately. Remove any large pieces of fat from the meat. Make your freezer packs, add your favorite sauces, it’s ready for your special touch.

Monday, June 14, 2021

Mini Broccoli and Cheese Quiche


During the Covid lockdown, I spent a lot of time in the kitchen experimenting.  My family got to taste a lot of those experiments, for better or worse. I had purchased a deep-dish quiche pan and our first couple of rounds didn’t go smoothly. I sort of put it all aside and focused on different baking projects instead.


Recently, I have been trying to get back into shape… and back into life. It’s been weird because kids are still home and hubby’s work schedule is a bit wonky. I am also contending with crazy heat and no gym to escape to right now. My answer has been to totally rearrange how I start my day. Instead of coffee and breakfast right away, I am now starting with a jog first thing and some strength training before having an energy drink. Breakfast is the one thing I haven’t been able to figure out.


I want something with lots of protein that will keep me satiated until lunch. I also need something that’s quick and convenient because I don’t have much time running around with the kiddos.


I thought about what types of ingredients I’d want to have in a breakfast. Eggs always come up, but I like to have a little taste of veggies and meat as well. I also thought about how to have something quick. I found these small quiche pans that are small enough for a single serving, perfect for a morning breakfast, and still easy enough to make a home.


The coolest thing about this quiche recipe is the flexibility. The base of milk, eggs, and cheese needs to be there but then you can decide on veggies and proteins. I have used bacon, sausage crumble, and chopped up ham. I’ve also used peppers, onions, and broccoli. Next on my list is spinach and possibly even asparagus, as well as Canadian bacon and sausage links. There are lots of different ways to make this yours… make it unique. You can also use one large quiche pan instead of a bunch of small ones. The only catch is that it needs to cook a little longer.


I have found a quick breakfast that I can heat and eat while kids are racing around getting ready for their day. It has been an energy lifesaver. Now I can make it all the way to lunch with no problems.


Mini Broccoli and Cheese Quiche


2 pie crusts (homemade or store bought will work)

1 ¾ c half and half (or 1:1 blend of heavy cream and milk)

5 large eggs

½ tsp salt

¼ pepper

½ c yellow onion, finely chopped

1 c fresh broccoli, finely chopped

½ c cooked bacon, finely chopped

1 c shredded cheddar cheese


Use the pie crusts to fill each of 8 5-inch mini quiche pans. Place them on a rimmed cookie sheet and place them in the freezer until you’re ready to fill them.


Pre-heat the oven to 350. Measure the half-and-half and add the eggs, salt, and pepper. Whisk them together for a couple minutes to help provide some air for lift during baking. Add the onion, broccoli, bacon, and cheese to the egg mixture. Stir to blend together. Retrieve the quiche pans from the freezer and then evenly distribute the mixture between the 8 quiche pans.


Bake for 30-35 minutes, until tops are golden and the egg is set. Pull them out to cool. Remove the pans and serve, or allow to cool completely at wrap in plastic wrap or foil and stick them in the freezer. They will keep for a couple months at least. To re-heat simply pull one out, remove from the wrappings and place on a plate. Microwave for a couple minutes, depending on your microwave. You can also warm in the oven, but it will take more time to warm that up.


You can also make one large one. Follow the same steps using one pan instead of 8 and pour the mixture into that pan. Bake at 350 for about 50 minutes. Pull out and allow to cool a bit before serving.


Saturday, June 12, 2021

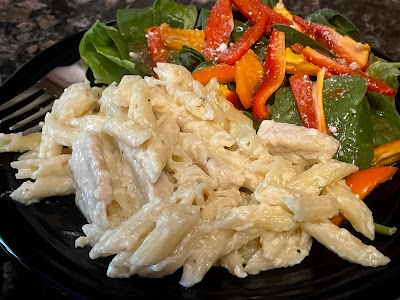
One Dish Chicken Penne Alfredo


The other night I was posed with an awkward dinnertime debacle. I wasn’t sure what to make.  We’ve all been there before, right? I did the mandatory tour through the pantry to see what might jump out at me, but no luck. I already had my protein, chicken, and had sliced it up with something else in mind. My taste buds were calling out for alfredo sauce though, and ideas began to develop.


I remembered an Alfredo Shell recipe I’d found (need to get that in here for posterity), and the sauce for it was amazing! It was creamy and flavorful, flexible and the best part…leftovers were still as tasty as the original meal! Oh yeah!


I decided to make this into a casserole with mini penne (my favorite tube pasta) and serve it simply with broccoli and a salad. Easy Peasy! You could really use any kind of pasta; rigatoni, gemelli, medium shells, etc. I found the sauce recipe and made a couple tweaks to it so it would work with my ingredients. I admit, it takes a pot and a pan, but it’s one dish for serving.


When I served this to the family, they ate it up! Everybody cleaned their plates, even my picky eaters. This was a winner all around. The best part is that the leftovers have provided lunch for me and my son twice now! That’s a win too. The shells are good, and everyone loves those too, but when I’m looking for a quick meal that doesn’t make a lot of dishes and can be on the table quickly, this is my new go-to.


One Dish Chicken Penne Alfredo


1 lb chicken, cut into thin slices

1 Tbs garlic salt

1 tsp pepper

2 Tbs EVOO

2 c pasta, uncooked

3 Tbs butter

3 cloves garlic, minced

1 c heavy cream

1 ¼ c milk (2% or whole)
2/3 c grated parmesan cheese

½  c shredded mozzarella cheese

2 large egg yolks, beaten

½ tsp red pepper flakes (optional)

 Salt and pepper to taste


Cook the pasta according to the package instructions, set aside. In a large saute pan, heat the oil over a med-hi burner. While it heats up, sprinkle the garlic salt and pepper over the chicken. Just before it begins to smoke, place the chicken in the pan. Don’t touch it for a few minutes to get a good sear on one side of the chicken. Start stirring the chicken to cook all sides. Turn down the heat and prepare the sauce.

In the pot you cooked the noodles in, melt the butter and add the garlic, heavy cream, and milk. Bring to a simmer. Beat the egg yolks in a small bowl or measuring cup. Add a spoonful of the hot milk mix to the eggs and stir them in. This is tempering the eggs. Too much heat and it will cook the eggs. Do this several times and then slowly pour the egg mix into the milk mix while stirring. Remove from the heat and pour it into the saute pan with the chicken. Add the mozzarella and mix until smooth. Add the pasta noodles and stir together. Finally, add the parmesan cheese and give it a final stir before serving.


*The sauce part of this recipe came from here, with some minor changes.


Wednesday, June 9, 2021

Abstract T-Shirt Quilt


Back in April, I was chatting with a friend about my quilting projects I’ve been working on. I mentioned how I’d been catching up on old projects and I’m finally reaching the bottom of the pile of UFO’s. I showed her a couple of recent finishes, and she asked me if I’d ever made t-shirt quilts. Why yes, yes I have.


I was so excited to do this quilt project for her. The shirts were adorable, and the colors were so fun! She had made the shirts for the grandkids and now they’re all grown up. What a wonderful way to keep them for memories.


When we discussed the pattern she was interested in, I realized she wanted a more abstract pattern. The shirts lended themselves to this because they were different sizes and a large collection.


She had given me some fabrics she’d picked and I really wanted to incorporate as many as I could because they were all so beautiful. When I drew out the pattern, though I realized it was just too much; very busy. I had to scale it back and focus on calmer colors that didn’t distract from the shirts so I went blues and teals. For interest I added a couple splashes of pink and purple, which worked awesome to pull on those colors in the shirts.


I laid it all out before sewing together to make sure everything was working. Once I started piecing it together, it went very quickly and smoothly. Once I had the top done, I added a thin border in the dark blue and then a larger border in one of the colors in the blocks. It framed the quilt wonderfully. 


I did a basic meander all over except for the actual shirt drawings. I finished with a binding in the dark blue, which is also what the backing is, and it was ready to go.


I did wash it once with a color catch to make sure it wouldn’t bleed. It came out perfect; I love the look and feel of a newly completed quilt fresh out of the dryer.


I learned so much from this project. I learned about layouts with t-shirts, time management and how long it actually takes to complete a quilt from start to finish, and pricing on projects for others. I feel very proud of myself for how well it went, and of course the finished quilt. It is beautiful! Now it’s with its new owner and she’s in love as well.  I’m so glad I could do that for her; her memories have been preserved.