Friday, January 24, 2025

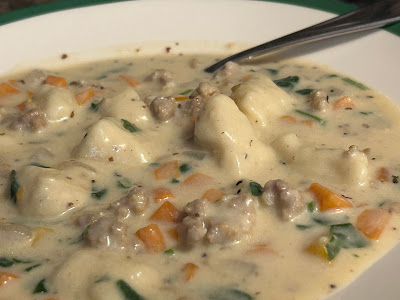
Creamy Sausage Gnocchi Soup


What do you do when you have leftover mashed potatoes from Thanksgiving? You make gnocchi, of course! In all honesty, this did not used to be my thought on leftover mashed potatoes. In the past, I would use them for potato pancakes, or to top a shepherd’s pie. More often than not, I don’t even have leftovers so it’s not much of a thought.


This year, however, I did have lots of leftovers. I might have done that on purpose though, because I really wanted to practice making gnocchi. It cuts a step out of the process when you know you’re making gnocchi, and makes it feel like a quicker process. It also combines tasks, which is way more efficient. You don’t HAVE to use leftovers, you can make some fresh cooked potato. 


One of my favorite memories as a kid was when we were little and we’d go up north to go skiing. There was a little restaurant that served home style meals, including an amazing chicken and dumplings. I’ve tried making it a couple times with biscuit style dough for the dumplings, but they’re too heavy.


These gnocchi hit the spot! They are soft and pillowy and absorb the broth of the soup so wonderfully. I decided to use sausage instead of chicken because I love the salty-savoryness that it adds to the soup. It creates a warm and comforting meal. Perfect for that cold night, after a long day. 


Creamy Sausage Gnocchi Soup


For the Gnocchi:

2 c cold mashed potatoes

1 c flour

1 egg, beaten

¾ tsp salt


For the Soup:

1 Tbs EVOO

1 medium onion, diced

2 celery sticks, diced

2 carrots, peeled and diced

3 garlic cloves, minced

4 Tbs butter

¼ c flour

4 c chicken broth

3 sweet Italian sausage links, removed from the casings

2 c half and half

½ tsp thyme

Salt and pepper to taste

2 c gnocchi

1 c fresh spinach, roughly chopped


Start with your gnocchi. Place ½ the flour on your pasta board or the counter. Add the mashed potatoes on top of the flour, and the make a well in the middle. Pour your egg in the well and add the salt to the well also. Cover the top of the well with another 1/4 c of your flour. Using your scraper, begin to fold and knead your ingredients together. As you mix, add more flour as needed if the dough is too sticky to work with. The less flour the better; it prevents them from becoming too gummy.


Once the dough is well mixed, divide it into 4 pieces and roll each into 1-inch wide ropes. Cut them into 1-inch pieces and then roll each piece down the tines of a floured fork to create the ridges. Set them aside on a floured tray until you’re ready put them in the soup.


Add oil to a cast iron dutch oven. Once warmed, but not smoking, brown the sausage and then remove it from the pan and set aside. Add a little more oil if needed, and then add the onions, celery, and carrots. Allow to them to sauté and soften for a few minutes. Once onions become translucent, add the garlic and cook for another minute. Add the butter and once melted, add the flour. Continue to heat and mix until the flour is all cooked through and the roux is a tan-brown color. Slowly add the chicken broth and blend with the roux so it won’t break it.


Once all the broth is added and blended together, bring to a simmer. Add the half and half to the soup slowly so as not to change the temperature of the broth too quickly. Bring it back to a simmer and add your chicken back to the pot. Add the thyme as well as salt and pepper to taste. Add your gnocchi and allow them to cook in the soup for about 5 minutes. Finally, add the spinach and let it wilt into the soup. Check for salt and pepper once more and it is ready to serve. 


Creamy Cavatelli and Chicken Soup


I have been experimenting with all sorts of things, including pasta. I am trying to master my pasta dough making skills, and with that I end up with a lot of leftover pasta. Every time I have leftover pasta, I pull out my cavatelli maker and crank some out to save for a future meal.


I got my cavatelli maker years ago from my mother in law, and though I’d made it once with her, I hadn’t made it since. I was a little intimidated because the recipe in the book that it comes with is different then what I’m familiar with. So… I avoided it.


I finally realized it doesn’t matter what I make with it, it just matters that I try something. The first couple times, they came out all funny shapes and stuck together. But once I got my technique down and the sizing right, they were pretty awesome.


Normally they’d go well in red sauces, but their density also plays well in soups or other recipes that have gnocchi. Just like in this soup. It creates a great robust flavor and texture with the chicken and the veggies.  It creates a hardy meal in the cold weather that feels like a big hug. It also makes for a pretty quick meal to put together on a busy night. Serve with some focaccia bread or a crusty loaf. So good!


Creamy Cavatelli and Chicken Soup


1 Tbs EVOO

1 medium onion, diced

2 celery sticks, diced

2 carrots, peeled and diced

3 garlic cloves, minced

4 Tbs butter

¼ c flour

4 c chicken broth

3 chicken breasts (or 2 c shredded rotisserie chicken)

2 c half and half

½ tsp thyme

½ tsp mustard powder

Salt and pepper to taste

2 c cavatelli pasta (or another robust pasta like gemelli or gnocchi)

1 c fresh spinach, roughly chopped


Add oil to a cast iron dutch oven. Once warmed, but not smoking, add the onions, celery, and carrots. Allow to them to saute and soften for a few minutes. Once onions become translucent, add the garlic and cook for another minute. Add the butter and once melted, add the flour. Continue to heat and mix until the flour is all cooked through and the roux is a tan-brown color. Slowly add the chicken broth and blend with the roux so it won’t break it.


Once all the broth is added and blended together, bring to a simmer. If you’re using shredded rotisserie, you can skip this step. Add the chicken pieces and let them cook for 15-20 minutes, depending on how thick your pieces are. Keep the liquid at a simmer so as not to overcook the chicken and make it tough. Once they’re cooked through, pull the chicken out and set it aside to cool a minute. Shred or chop the chicken so it’s ready to be added back to the soup.


Add the half and half to the soup slowly so as not to change the temperature of the broth too quickly. Bring it back to a simmer and add your chicken back to the pot. Add the thyme and the mustard powder as well as salt and pepper to taste. Add your noodles and allow them to cook in the soup for about 5 minutes. Finally, add the spinach and let it wilt into the soup. Check for salt and pepper once more and it is ready to serve.

Friday, January 17, 2025

Savory Pork Stew

We have had a brutal summer that won’t end. By the last week of October, we were still hitting high 90s, almost 100 degrees! All I could think about was all the yummy winter meals I was going to start making as soon as the temperatures budged even a little.


It finally happened and we cooled down and it finally felt like we could start eating “warm your tummy” type of meals. I have been wanting to fine tune my pork stew recipe since last spring, so it was the first one to pull out.


This meal will warm your soul. It’s hearty with the potatoes and the pork, has some healthy veggies in it to keep you feeling good, and a little kick that not only enhances the flavor but also warms the meal a little bit more. 


The nice thing about this meal is that it’s very versatile.  You can add more veggies like peas or corn or sweet potato, even butternut squash. You can also use a different protein like chicken. It would all work great with this recipe. Have some fun with it.


Now, I’m feeling like I have exactly 10 days before the weather warms up again and we will be back to grilling, so it’s back to the kitchen. If you find you’ve made too much, you can always refrigerate or freeze for later. Just reheat on the stove top, and add some chicken stock to help make the broth of the stew creamy again. It is just as delicious! Enjoy this great beauty.


Savory Pork Stew


2 – 2 ½ lbs pork shoulder, trimmed of excess fat and cut into bite-size pieces

½ c flour

1 tsp salt

½ tsp pepper

2-4 Tbs EVOO
1 large onion, diced

3 garlic cloves, minced

3 medium carrots, thick sliced

2 celery stalks, thick sliced

½ c wine

4 c beef broth

1 tsp thyme leaves

½ tsp dried rosemary leaves

1 tsp Hatch green chili powder

2 bay leaves

3 russet potatoes, peeled and cubed


In a bowl, mix together the meat, flour, salt, and pepper.  Make sure all pieces of meat have been well coated. Heat some EVOO in a large cast iron pot over med-hi heat. Sear the meat in 3 batches, making sure not to overcrowd the pot while searing. Add oil between each batch and bring it to heat before adding the next batch of meat. When each batch is seared, set it aside in a bowl.


Add a bit more oil and put in the celery, carrots, and onion. Once the onion is translucent and the carrots and celery have softened a bit, add the garlic. After just a minute, add the wine and allow it to burn off the alcohol while deglazing the pot. Let the wine reduce by about half (takes a few minutes), and then add the thyme, rosemary, and chili powder. Finally, add the beef broth and place the meat back into the pot.


Bring the stew to a boil and put the lid on. Leave it slightly tipped so the steam can escape a little allowing the sauce to thicken a bit while cooking. After about 45 minutes, add the potatoes and some salt and pepper to taste. Give the stew another 45 minutes to cook down and serve. Goes wonderfully with corn bread, focaccia, crusty French bread, or even just on its own.


Thursday, January 16, 2025

Traditional Strawberry Trifle


I’m not going to lie… I watch way too much Master Chef. It’s totally a guilty pleasure, but with a purpose. I like to watch all the different techniques they use and technical skills they learn and then see if I can replicate what they’re doing.


Even when I was little, I enjoyed watching cooking shows. Julia Childs, Jacque Pepin, Lydia Bastianich, and so many more. I just enjoy watching how they do things and what tricks of the trade I can pick up.


This recipe was totally born from that interest. I had seen a competition where they made trifles. They looked DELICIOUS! My curiosity was peaked. I just had to figure out a good custard and jam. I already had a plan for the sponge.


You see, growing up we had a traditional birthday cake that we used for EVERY birthday. My mom always made the most amazing angel food cakes. As an adult, we have veered from that tradition, but I do still make angel food enough that I have full size pans as well as mini’s. It’s a post and recipe for another day. You can use the store-bought angel food cake as a sponge. It works well for this particular recipe.


This was a fun way to honor my grandmother, whom was English. She loved creams, and would love this recipe for sure. The one big difference is that I didn’t add the traditional sprinkles to the top. She would be looking for those.


Strawberry Trifle


Sponge:

Angel Food Cake (or other sponge)

*I used an 8-inch angel food cake for this recipe. If you like more sponge, you can use a larger angel food cake or another sponge such as lady fingers or pound cake.

*cut it into 1-inch squares for assembly


Strawberry Sauce:

1 ½ lb fresh strawberries

¾ c sugar

1 tsp lemon juice


Custard Filling:

1 ½ c whole milk

¼ c heavy cream

2 tsp vanilla (or vanilla bean paste)

6 large egg yolks

1/3 c sugar

3 Tbs +2tsp cornstarch


Whipped Cream and Topping:

1 c heavy cream

2 tsp powder sugar (more to desired sweetness)

½ lb strawberries


For the strawberries:

Cut them into quarters and place them in a saucepan along with the other ingredients. Bring them to a simmer and allow them to simmer and break down for 15-20 minutes. Stir frequently to prevent burning or sticking. Use a masher to break them down more if you prefer, or just keep the chunks of strawberry as they taste wonderful in the trifle. Allow it to cool while you work on the other elements.


For the Custard Filling:

Pour the milk, heavy cream, and vanilla (also a vanilla bean pod if you’d like) into a saucepan and warm to 170 degrees. Do not let it boil. Meanwhile, in a large measuring cup whisk together the egg yolks and the sugar for 2-3 minutes. The color should become pale when it’s ready. Add the cornstarch and whisk for another minute to combine.

Remove the vanilla bean from the milk mix if you used one. Slowly add about ½ cup of the warm milk to the egg mix and whisk so that eggs don’t cook. Repeat that process until about half of the milk mixture has been added. Return everything to the saucepan and turn the heat to medium-low. Warm the custard back up to 170 degrees, stirring frequently. It should only take a few minutes and it should be thick enough that if you run your spatula through the custard, it will leave a line. Remove it from the heat and put it through a sieve and back into the large measuring cup. Place plastic wrap directly on the custard to avoid a film developing and the refrigerate until you’re ready to use it; within 1-3 days.


For the Whipped Cream Topping:

Pour the heavy cream and sugar into a mixing bowl with the whip attachment. Slowly increase the speed so that it is very fast (about an 8 on my kitchenaid mixer). As it whips, you will notice it thickening and becoming stiffer. You want it whipped and creamy, but not so much that it begins to separate. Taste for sweetness and add sugar as needed.

Finally, slice the strawberries to be placed on top. You can get creative here with slices, fanning, diced, quarters, whatever you enjoy to make your trifle look beautiful.


Final Construction:

The idea with a trifle is to create layers. It ensures that when your guest is eating it, they will be able to get a little of everything in each bite. I start with a single layer cake squares. Pour 1/3 of the strawberry mixture on top of the cake. Then pour 1/3 of the custard filling on top of the strawberries. Repeat these steps two more times. After the 3rd and final layer, place the whipped cream on top. Add your fancy strawberries to the top for a final touch. To make this feel really English, add some colorful sprinkles to the center of the top. Everyone will love this amazing dessert!