Thursday, December 21, 2023

Red Christmas Gift Quilt


About 10 years ago, while visiting my sister in Seattle, I found the cutest little quilt shop; Keepsake Cottage. They later went online only, and have recently closed for retirement. Every time I went into that store, they had so many fabrics to choose from, including some wonderful fat eighths packs they created on-site with fabrics from different collections.


This particular year, I was looking for fun and bright Christmas fabrics. They had this beautiful pink and red Christmas themed pack that was irresistible! I had to go for it. Unfortunately, it got tabled for years while I was distracted with children and other quilt projects.


During pandemic, I pulled it back out and was determined to find the perfect quilt for it. It took a while, and the completion of a couple other Christmas quilts to get my inspiration.


I have always wanted to make a gift box quilt. So fun and whimsical, and these fabrics were perfect! Reds and pinks accented with teals and blues was just what I needed for this project.


I started with a pattern on my computer to determine the measurements for two different sized gifts. Once all those were assembled, it was a matter of putting it all together. I kept it simple and modern with white sashing, and then froze when I realized I really needed a border and backing.


Last summer while at a LQS, I found a bolt of one of the fabrics in the gift quilt! What?!? That is perfect! I bought the last of the bolt (of course), and used some for the final border and the rest for the backing and binding.


There wasn’t quite enough for the backing so I added another fabric that had the same teals and blues as the front of the quilt.


I wanted the gift boxes to pop out, so I used a simple curved quilting on them. I then used a meander on the sashing, and finally completed the border with curved clamshells reminiscent of what is quilted on the gift boxes.


I saved enough of the red star fabric from the binding, and finished it off with that and a label.  I’m glad I was able to finish just one more Christmas quilt this year. It was such a fun finish and I’m so happy I finally got to use this beautiful pack of fabrics I got so many years about.

Wednesday, December 20, 2023

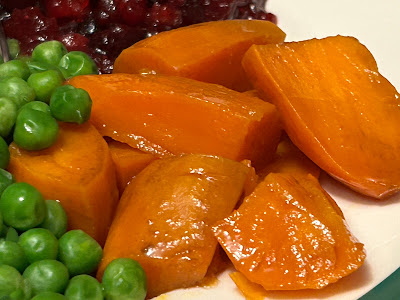
Candied Sweet Potatoes

Growing up, we always had the traditional spread for Thanksgiving; Turkey (of course), stuffing, cranberry sauce, five-cup salad, peas, mashed potatoes, all the goodies! I have a confession though.


My mom always made these amazing Candied Yams and I wouldn’t eat them because they were “weird potatoes” that I wasn’t familiar with. Silly girl. If I’d only known…


As an adult, I have been taking over more and more of the cooking duties for family gatherings, which I love. This was the next one to try, and I’m so glad I finally did. These are A-MAZ-ING! I even have my kids sold on these, and have opened them up to trying different potatoes and other veggies.


The best thing about this recipe is that you don’t have to pre-cook the yams. They soften in the sauce as it simmers on the stove top. I usually chop the yams ahead of time and keep them in water in the refrigerator until I’m ready to cook them.


Now, I’m not even going to pretend these are healthy, but sometimes you just have to ignore that and indulge because these are too good to pass up.


Candied Sweet Potatoes


6-7 medium sized yams (about 5 cups chopped)

¼ cup butter

½ cup light corn syrup

¾ cup brown sugar

¼ tsp salt


Peel and chop the sweet potatoes into large 1 to 1 ½ inch chunks. Store in cold water until you’re ready to use them. You can prep these as early as the day before use.

In a large saucepan or dutch oven on the stove top, melt the butter on medium heat. Add the corn syrup, brown sugar and salt. Bring to a boil and reduce to a simmer.

Drain the sweet potatoes and pat them dry. Place into the sauce in as much a flat layer as possible. Baste them with the sauce and put the lid on the pot. Keep the pot on a very low simmer for 15 minutes.

Remove the lid and bast the potatoes again. Allow them to simmer for another 15 minutes without the lid to allow a nice glaze to form. Potatoes should be soft by this point. Serve warm. Makes about 6 servings.


Tuesday, December 19, 2023

Stuffed Shells in Sausage Meat Sauce

Pasta is comfort food for us. Whenever we’re craving something warm and hearty, it’s pasta. When we’re craving something light and crisp, it’s pasta. The cool thing about pasta is you can make it fit whatever it is you’re trying to accomplish.


So, I make lasagna a lot and it’s a delicious warm and hearty meal. Sometimes it feels like a heavy meal though and I was looking for a way to lighten it up for those nights we are looking for a lighter version. Enter shells…


Shells are neat because they are these yummy little packages of soft and creamy cheese. We’ve tried a lot of different sizes and brands. I admit I prefer the Kroger Private Selection shells because they are a little smaller than many of the other name brand large pasta shells. It creates a better pasta-to-shell ratio, which makes a difference in your mouthfeel when eating.


These also re-heat so well. They make great leftovers, and can be frozen if you make a double batch to have a prepped dinner for another night. You’re going to love these!


Stuffed Shells in Sausage Meat Sauce


16-20 large pasta shells

½ onion, chopped

2 cloves of garlic, minced

½ lb Italian sausage (3 links, meat removed)

1-24 oz jar of marinara sauce

1 – 15 oz container of ricotta cheese

1 egg

2 cups mozzarella cheese, divided

½ cup parmesan cheese

1 tsp Italian seasoning

½ tsp salt

½ tsp pepper


In a large stockpot, boil water and cook the shells according to the package. Drain and set aside for assembly. Meanwhile, heat a skillet over medium-high heat. Add a little EVOO and brown the onion. Once browned, add the minced garlic and give it another minute. Push the onion to the side of the skillet and brown the meat. Once the meat is browned, incorporate the onions with the meat mixture and then drain any excess fat. Add the sauce (reserving about ½ cup for assembly) and heat through, then set that aside. Last prep step; mix together the egg, the ricotta cheese, 1 cup of the mozzarella, the parmesan, and the Italian seasoning, salt and pepper.


Now it’s time for construction. Heat the oven to 375 degrees. In a 7x10 inch dish, spray cooking oil on the bottom and sides and then spread the reserved sauce on the bottom. Put the cheese mixture into a piping bag or plastic Ziploc bag with a corner nipped. Fill each shell with the cheese mixture and place it into the dish. Repeat that with each shell until you’ve filled the dish or run out of cheese mix. Once all of the shells are filled and placed, pour the meat sauce over the shells across the whole dish. Finally, sprinkle the reserved mozzarella cheese on top of the shells. Loosely cover the dish with foil and bake for about 30 minutes, or until the cheese begins to bubble. Remove the foil and switch the oven to broiler on high and let the cheese brown a bit, just a few minutes. Remove from the oven and let it cool for a few minutes before serving.

Cranberry Chutney Sauce


When I was growing up, our cranberry sauce consisted of a can put in a sauce pan and warmed up.  I never cared for it. It was so tart and the texture was a bit mushy.


As the years have gone by and I’ve gotten more interested in cooking and mixing flavors, I’ve discovered the value of having some acid tartness in a meal. But I still wasn’t interested in the can warmed on the stove top.


Once year at Thanksgiving, the host served a cranberry chutney that included other ingredients like orange and pear. I was intrigued, and it got me thinking maybe I can find a way to dress up cranberry sauce and make it something people are happy to see on the table at Thanksgiving.


I’m pretty sure my favorite cooking blog, Mel’s Kitchen CafĂ©, heard me because all of a sudden there was a post of exactly what I was looking for. It tastes amazing and is enjoyed by everyone at Thanksgiving. It’s the perfect compliment to turkey… and chicken …and duck … and probably venison but I’ve not tried that yet. I also love that I make it ahead and then simply warm it up when it’s time to serve.


I often use the leftovers to make cranberry muffins, or cranberry coffee cake. If you know you’re going to do that and want to make sure it stays more sweet than savory, you can omit the onions. The celery will still help balance the tart and sweet and is worth keeping. Enjoy!


Cranberry Chutney Sauce


4 cups fresh/frozen cranberries

1 cup dried cranberries (craisins)

½ cup white sugar

¾ cup packed brown sugar

2 tsp ground cinnamon

1 tsp minced fresh garlic root

¼ tsp ground cloves

1 cup water

½ cup onion, finely minced

½ cup Pink Lady apple, peeled, cored, chopped

½ cup celery, finely chopped


Mix the cranberries, craisins, white sugar, brown sugar, cinnamon, ginger, cloves and water in a sauce pan and bring to a boil at medium-hi heat. Once it reaches a boil, reduce the heat and let the mix simmer until the berries start to pop, maybe 7-10 minutes.


Once the berries start popping, add the onion, apple, and celery and stir to mix them in. Let the sauce continue to simmer for about 5-10 minutes to allow the sauce to thicken a bit. Take the sauce off the heat and allow it to cool for a few minutes, then transfer it to a container and cover it. Place it in the refrigerator to let the flavors settle. It’s best to do this at least 24 hours in advance, and simply warm it up when it’s time to serve.


Thursday, December 14, 2023

A Second Miniature Tree Skirt


I have been collecting miniature ornaments since I was a kid. I love the small details intricately placed into each piece. Over the years, I have collected so many that I needed to get a second tree.


I was a little sad about that because I couldn’t find a tree like my first one. They weren’t as tall and the branches are thicker with needles. I found one that was good quality and decided that was most important. 


This year when setting everything up, I realized I really needed a new tree skirt for the new tree. At first, I thought about making a whole new style, but when I looked at my Christmas fabric stash and the style of my miniature trees, I decided doing the same thing again makes the most sense.


Super simple pattern, different backing than the original, and I used green instead of the red for the binding. Great way to use up some of the scraps, and to create a new skirt that’s similar, but not exact.


When making the second skirt, I felt that the tie wasn't necessary and I rarely use it.  On the new design, I left the tie off.  I thought about adding some snaps, buttons, or Velcro but in the end, it sits nicely under the tree and isn't disturbed the way a skirt on the floor under a large tree would be.


I was curious to see when I made the first one and was surprised to discover it was 10 years ago! Back in 2013 I made the first skirt, and now I’ve made my second one 10 years later. Hopefully it will encourage me to finally make a tree skirt for the big tree. We’ll see.

Wednesday, December 13, 2023

Scrappy Green Irish Chain Quilt


Back in the fall of 2021, I made a scrappy double irish chain using fall colors. I was so happy with how explosive and vibrant the colors were when mixed together in that pattern that I felt like I needed to try it again. Of course, I had to collect the fabrics for it first.


So, in the spring if 2022, I made a scrappy clover quilt which I’d been collecting fabrics for over a long period of time. When that was complete, I was left with a bunch of different sized scraps; perfect for making a scrappy double irish chain.


First, I decided on a very dark green to make the main crosshatch of the irish chain. Then I broke the other colors into lights and darks. I chose the colors that would follow the dark crosshatch, and which would surround the white center of the light sections.


I learned some lessons from my first scrappy double irish chain, like the size and how many blocks and how to organize the colors. This was a good way for me to test my newfound knowledge. I’m so glad I did!


I love how much POP of green there is and movement that flows through this quilt top.  I didn’t want to add borders as I wanted to keep it more modern and simplistic.


The backing was a green fabric that my mom had in her stash that she bought for a backing but then changed her mind about it. It looks like a batik with the color gradient movement but isn’t. I think it works perfect for this project.


Because of the busy nature of the quilt top. I kept the quilting simple with a basic meander. I was careful not to sew over the white pieces as I wanted to keep those as white as possible for the effect.


The binding is the same as the backing, and of course I added a tag. 


This was a fun finish, and I’m glad I was able to experiment more with color variation, pattern use, and sizing. It will be a great addition to my spring quilts for March.