Thursday, July 31, 2014

Fitting it all in

Summer is wrapping up for the kiddos around here and we have been scrambling to fit in as much summer as we can in these last couple of weeks. So many places offer summer event programs, and we have been trying to take advantage of as much as possible, including...

Making puppets. Going to the movies. Learning to roller skate. Building bug houses. Playing in mud puddles.


And, of course, going to the beach.


There was so much more mixed in there that I'm missing, but all in all, we have been having a blast this summer.  We've also been quite successful at avoiding the heat while still enjoying ourselves, HUGE WIN!

So, with all this going on, I haven't been able to get many pictures of what I'm working on. I'm almost done with my Vintage Stars Quilt top, I just need to complete the binding on my latest Alphabet Quilt, and mixed in between has been multiple little bags and a couple of large pillows for the couch. I also picked up a new project to make cushions for the outdoor chairs. Hoping to get that done soon.

I have also been busy in the kitchen. I have been trying to find recipes that don't heat up the kitchen too much, like grilling outside and crockpot cooking.  We have been eating some great salads and just last night we had a kickin' shredded chicken bbq from the crockpot.  Awesome!

Hopefully, I'll be able to get back to work on posting things. It's just a matter of finding photo time. I have also been working to put some new things on my Etsy site; you gotta come check it out! Some supplies and completed items, there's a little for everyone and a lot to choose from.

Hope everyone else is having a wonderful/busy summer as well.

Tuesday, July 22, 2014

Finally Finished my Vintage Stars

Last week we went to San Diego for a wonderful beach trip and while there we stopped at my fave San Diego fabric shop, Rosies Calico Cupboard. Amongst other things, I found a gray fabric to finish my vintage star blocks. I hate when you can't find the exact one, but I'm glad they at least had something that was close and would work.  Can you see the difference?


So, now that I have all the blocks finished, I am trying to figure out layouts.  I always struggle with making sure to get just the right balance of colors across the quilt.  Making sure the eye is drawn into the quilt and not away, etc. I took some pics so I could look more at the balance before I start making it more permanent this afternoon.


I am really happy with how it's turning out, though.  (Can you spot the new gray strips vs. the old?) I still have to figure out borders and such, so I have a little ways to go, but I think this one is going to turn out real fun!

I'm linking up with Kelly on My Quilt Infatuation for Needle and Thread Thursday. Can't wait to see how this turns out by next week.

Tuesday, July 15, 2014

Star-light...

I keep thinking about my fabric stash and how much I want to do with it, so today I decided to start a new project.  Even though I have a couple other things going on, it was time to bust out with something I have had for a V-E-R-Y  L-O-N-G  T-I-M-E.


I was inspired to make an Alaskan-inspired quilt after our honeymoon, oh, 11 years ago. I knew exactly what fabric I wanted to use; batiks with Alaskan animals on it. Beyond that, I didn't know what to do with it.

Several years ago, I decided stars would be perfect for the quilt, but again couldn't find the perfect pattern and it was tabled, again.

About a year ago I tried to motivate myself to get to work on it, and I found this wonderful yellow batik that matches the animal fabrics well and I thought would be perfect for the stars, but still no pattern.


That all changed today. I spent the better part of an hour scouring all my resources to find it, but I found it! The perfect star pattern for my Alaskan Quilt! Now I'm motivated! It was actually pretty easy to cut out the pieces and sew together, which is relieving. That motivates me even more. I am on a mission to cut as many as I can before next week so I know if I need more fabric, and to decide if I want to try incorporating another yellow. We shall see.

I'm linking up with My Quilt Infatuation for Needle and Thread Thursday. Hopefully I'll have some time while on the beach to look and see what everyone is working on.

Sunday, July 13, 2014

Jam Sandwich Cookies

I tried making a cherry pie with the cherries I canned a few weeks ago to see how they turned out. In the process I ended up with some extra crust.  Waste not, want not, right? I decided to pull out my new biscuit cutters and cut out some cookies from the pie crusts.


I baked them for about 15 minutes at 375 and once they had cooled I added a dollop of the apricot jam I also made a few weeks ago.  That jam is absolutely, spoon-licking good! I have been enjoying that stuff on biscuits, toast, by itself (I admit) and now in these wonderful little cookies.


After the jam was placed in the center, I placed one of the cookies with a hole in the center on top and then let them set for the night.  The next morning they were amazing. I admit, I made breakfast out of these little beauties. I couldn't resist! I had to take some to my parents just to keep me from eating them all myself.


They were more than willing to help me with my little "problem". Afterwards, I started thinking/wondering how chocolate would taste in the center? Mmmm, I might have some experimenting to do...

I'm linking up with Hun..What's for Dinner.  I would LOVE to have these for dinner, but I'd better browse around and see if there's something that might be a little more nutritious and save these for dessert.  Oh yeah...dessert!

Friday, July 11, 2014

Some More Bags

I was searching thru my mom's stash for a particular fabric and I came across this cute blue and yellow sewing-themed pre-quilted fabric. I thought it would make some cute little bags, so I snagged it.  First I made a pencil bag, but then I needed more zippers. Everything was on hold until the zippers arrived, and then I was able to crank it out.


I made another pencil bag, and I made a set of two ditty bags.


Then, I decided to try making a different handbag than I've made in the past.


Like the handles A LOT on this one.  They are short enough to stay out of the way, thick enough for easy grabbing, and the bag size is great for carrying your sewing needs around when on the move.


I included a small ditty bag to keep inside for those little things that like to hide in the bottom of your bag.


No pockets on this bad boy; I focused on creating a bag with high tote-ability. I also tried using a zigzag stitch to minimize the bulk that can occur when using pre-quilted fabric like this.


I love the flair the yellow adds at the top, and of course the blue on the bottom is fabulous.  Very fun little bag; glad I tried it out.


I am really feeling good about my bag skills. I am able to put them together faster and faster, and I am super happy with the results. Yeah!

I'm linking up with Crazy Mom Quilts for Finish Friday today.  I have had so many finishes and projects in the works I am struggling to keep up.  It's been wonderful! Can't wait to see what everyone else is working on. Have a great weekend!

Wednesday, July 9, 2014

Block Buster #4

We had our block of the month meeting last Saturday and I picked up the new pattern and fabric pieces. This one was a little more challenging than the first three.  The fabrics are as gorgeous as the others have been, although I wish I'd had more of the dark one. My biggest struggle was the pattern.


It's actually a very cool pattern, Monkey Wrench (or Snails Trail), but it's very balanced and the fabric pieces I have are not. I struggled with how much swirl to do, or if I should stick with box-in-a-box to try and make it look like a bloom of some sort (just a reminder, I am trying to make each block look like a flower of some sort, even if that is more about the quilting than piecework).


After a l-o-o-o-o-t of drawing patterns, I finally settled on a partial monkey wrench and finish it with green corners as 'leaves'. I am happy to have it done, and I am pleased with how it turned out. Now I can breath a sigh of relief and wait for next months!


I'm linking up with Freshly Pieced for WIP Wednesday. Hope everyone is finding some great projects this summer!

Friday, July 4, 2014

Marmalade ZigZag Quilt

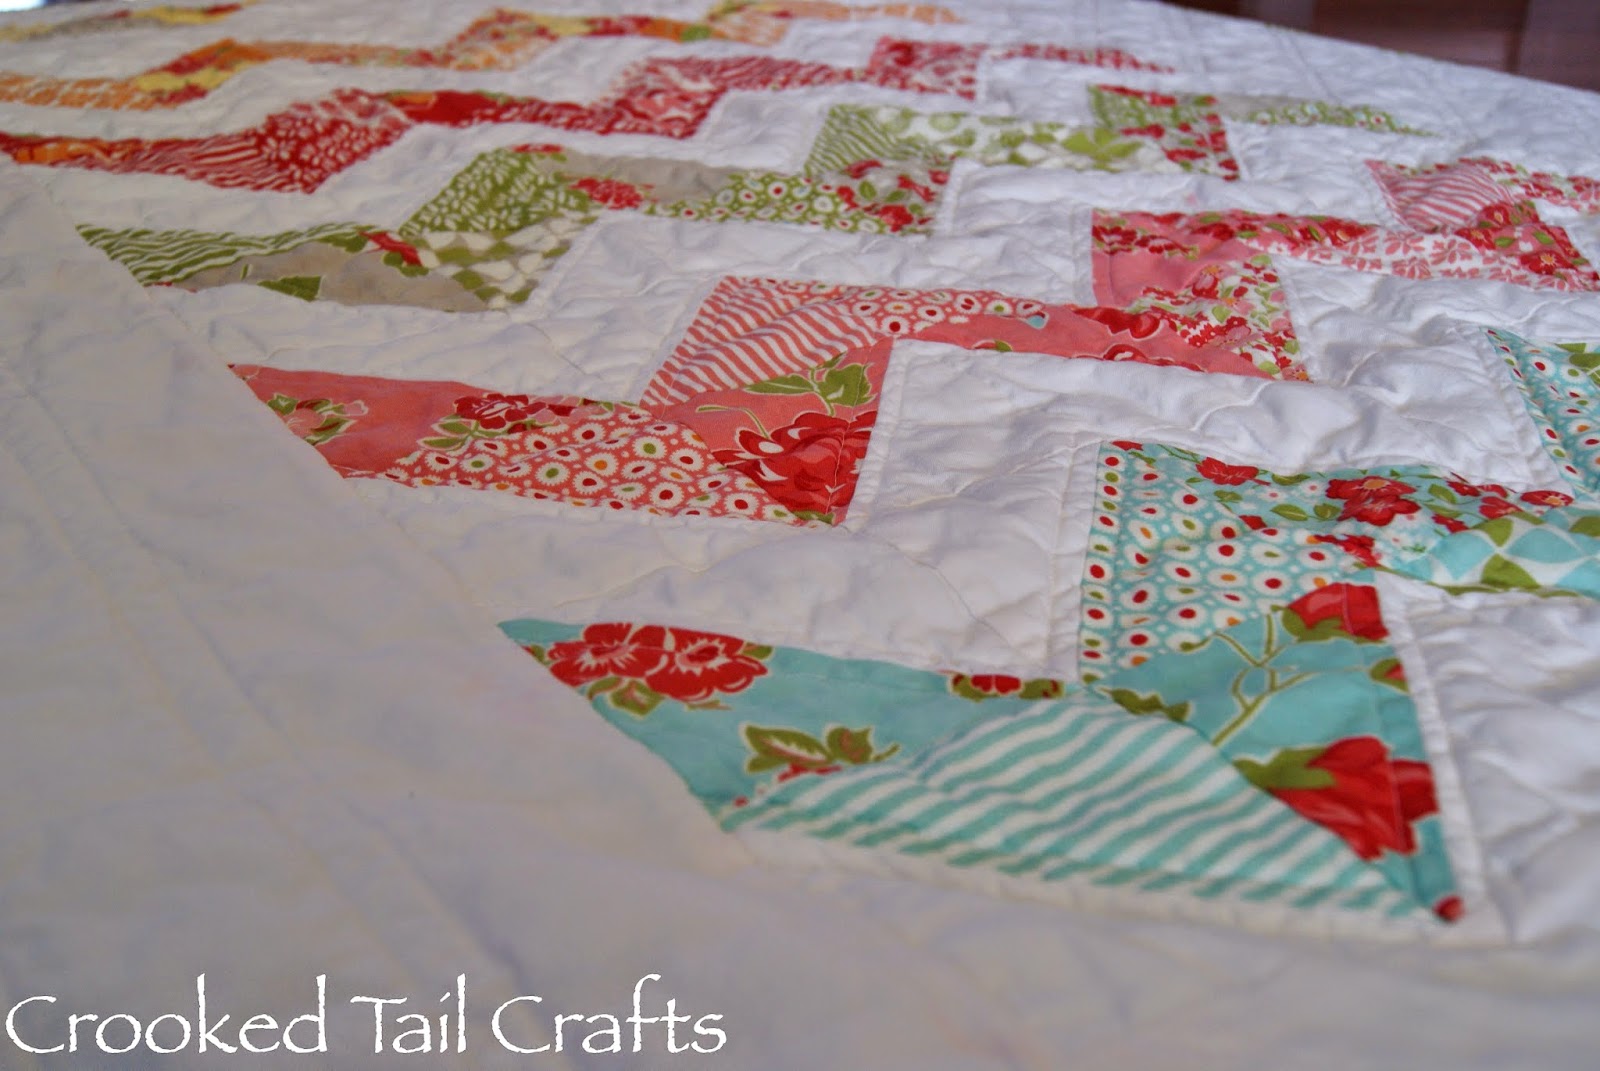
I have seen a lot of different methods on various blogs for creating a scrappy zigzag, and I felt like it was time to try one.  And what better to try it with than a charm pack of Marmalade by Bonnie and Camille using the HST-method.


I have totally been in a reproduction-retro kick. I see these fabrics and I'm immediately taken back to my childhood and playing at my Grandma's house. I love that look, that '50's feel.  This fabric totally hit that mark for me! The fact that it was a charm pack and would create a scrappy quilt, as if I had actually gone thru her old linens and put the set together myself, made it even more special.


Because it's a new twist on an old classic, it made a modern twist on the zigzag pattern an even better fit. I set the quilt on white to create the modern feel, and then added the white borders to continue that trend.  I love the yellow/gray strips in the corner to help frame it. I debated putting smaller ones in each corner, but decided I liked having the one long corner best.


When it came to quilting, I just mirrored the zigzag, and then extended that zigzag into the white border. The corner that has the yellow/gray strips I created long lines that continued all the way to the edges. It was a lot of fun quilting this, but man is it tiring to zig and zag with your quilt.  Goes a lot of slower than you'd imagine. I'm so used to FMQ that can by pretty speedy because you're all over, but with this I wanted straight lines with every turn so I was trying to be more careful. Totally worth it for the final product, though.


I am trying to use my stash and for some reason I had a GIANT piece of this garden fabric.  It's beautiful, but I have way too much and using it for a backing was perfect. I still have a couple more yards to save for another project. You can really see the quilting on the back; it just pops!


I feel like this quilt would be perfect for a baby (I don't know who's yet) but I didn't want to make it super girly with a pink binding, although pink it the perfect color for, like, everything; right?!? So, I went with a green from the same line that has the florets on it.  It creates some interest in the border without getting too busy.


I decided to hand-bind this one.  I'm getting pretty good at that now and can crank out a binding on a quilt this size in a couple days. Cool! The tailored-finish really makes this piece look fancy, don'tcha think?


So, once again it's my signature lap quilt, wall hanging, baby quilt size. That's okay; that allows me to practice and experiment, and that's what I'm really after with all this, right? And, maybe some day I'll know someone who's having a baby that I can give this to. Until then, it's found a nice warm spot on a shelf in our living room with a couple of its buddies.

I'm linking up with Crazy Mom Quilts for Finish Friday.  So happy to show off this little guy, and I'm looking forward to seeing what everyone else is wrapping up. Happy 4th of July!

Thursday, July 3, 2014

Apricot Jam and Canned Cherries

It's that time of year when we have a ridiculous amount of mouth-watering fruits available for amazing prices.  It's so hard to enjoy it all right away, and I know come November-ish I'm going to be wishing for some apricots, cherries, peaches, all those wonderful flavors. So I decided to try out some more canning and work on perfecting my skill so it becomes second nature and I can really crank out some great stuff to save for the fall and winter.


This round I was playing with apricots to make jam, and cherries to save for pies and cheesecake topping in the future. First up was the jam...


It came out looking absolutely to-die-for! The flavor is perfect, too! I was really happy with how well it went. I was surprised I didn't need to peel the skins off and you wouldn't know when eating the jam.  I admit, though, I put too much fruit in the batch based on how much pectin and sugar I was using. It's a little runny, but still great on toast.  I am also thinking it will taste amazing in some jam cookies, and as a filling in a layer cake or donut. I think next time I will puree it a little more.  I enjoy the fruit bits, but the fam; not so much.  It's all good! The flavor makes up for it all!


Next, I had the cherries. I pit over 4lbs of cherries, and my fingers were a reddish-brown for the next few days to prove it. I canned them using the Ball Blue Book recipe for cherries that will be used as a filling.  They have a little sugar added, but not much.  That way, when it's time to use them I simply drain, rinse, and add my own sugars, etc to the pie. Maybe I can try that for 4th of July tomorrow! I nice warm cherry pie for dessert would be wonderful!


I love experimenting, but I admit that it's even better when it goes well.  When I experiment with something that's a total flop, it's kind of a bummer and not motivating to try again.  These are two recipes I will definitely try again. I also recently canned mangoes and pineapple so I can try making some salsa with them in the future. I need to try it out and see how it goes. Hmm, what else is on sale right now... I'm ready to can it!