Saturday, December 11, 2021

Halloween Candy Quilt


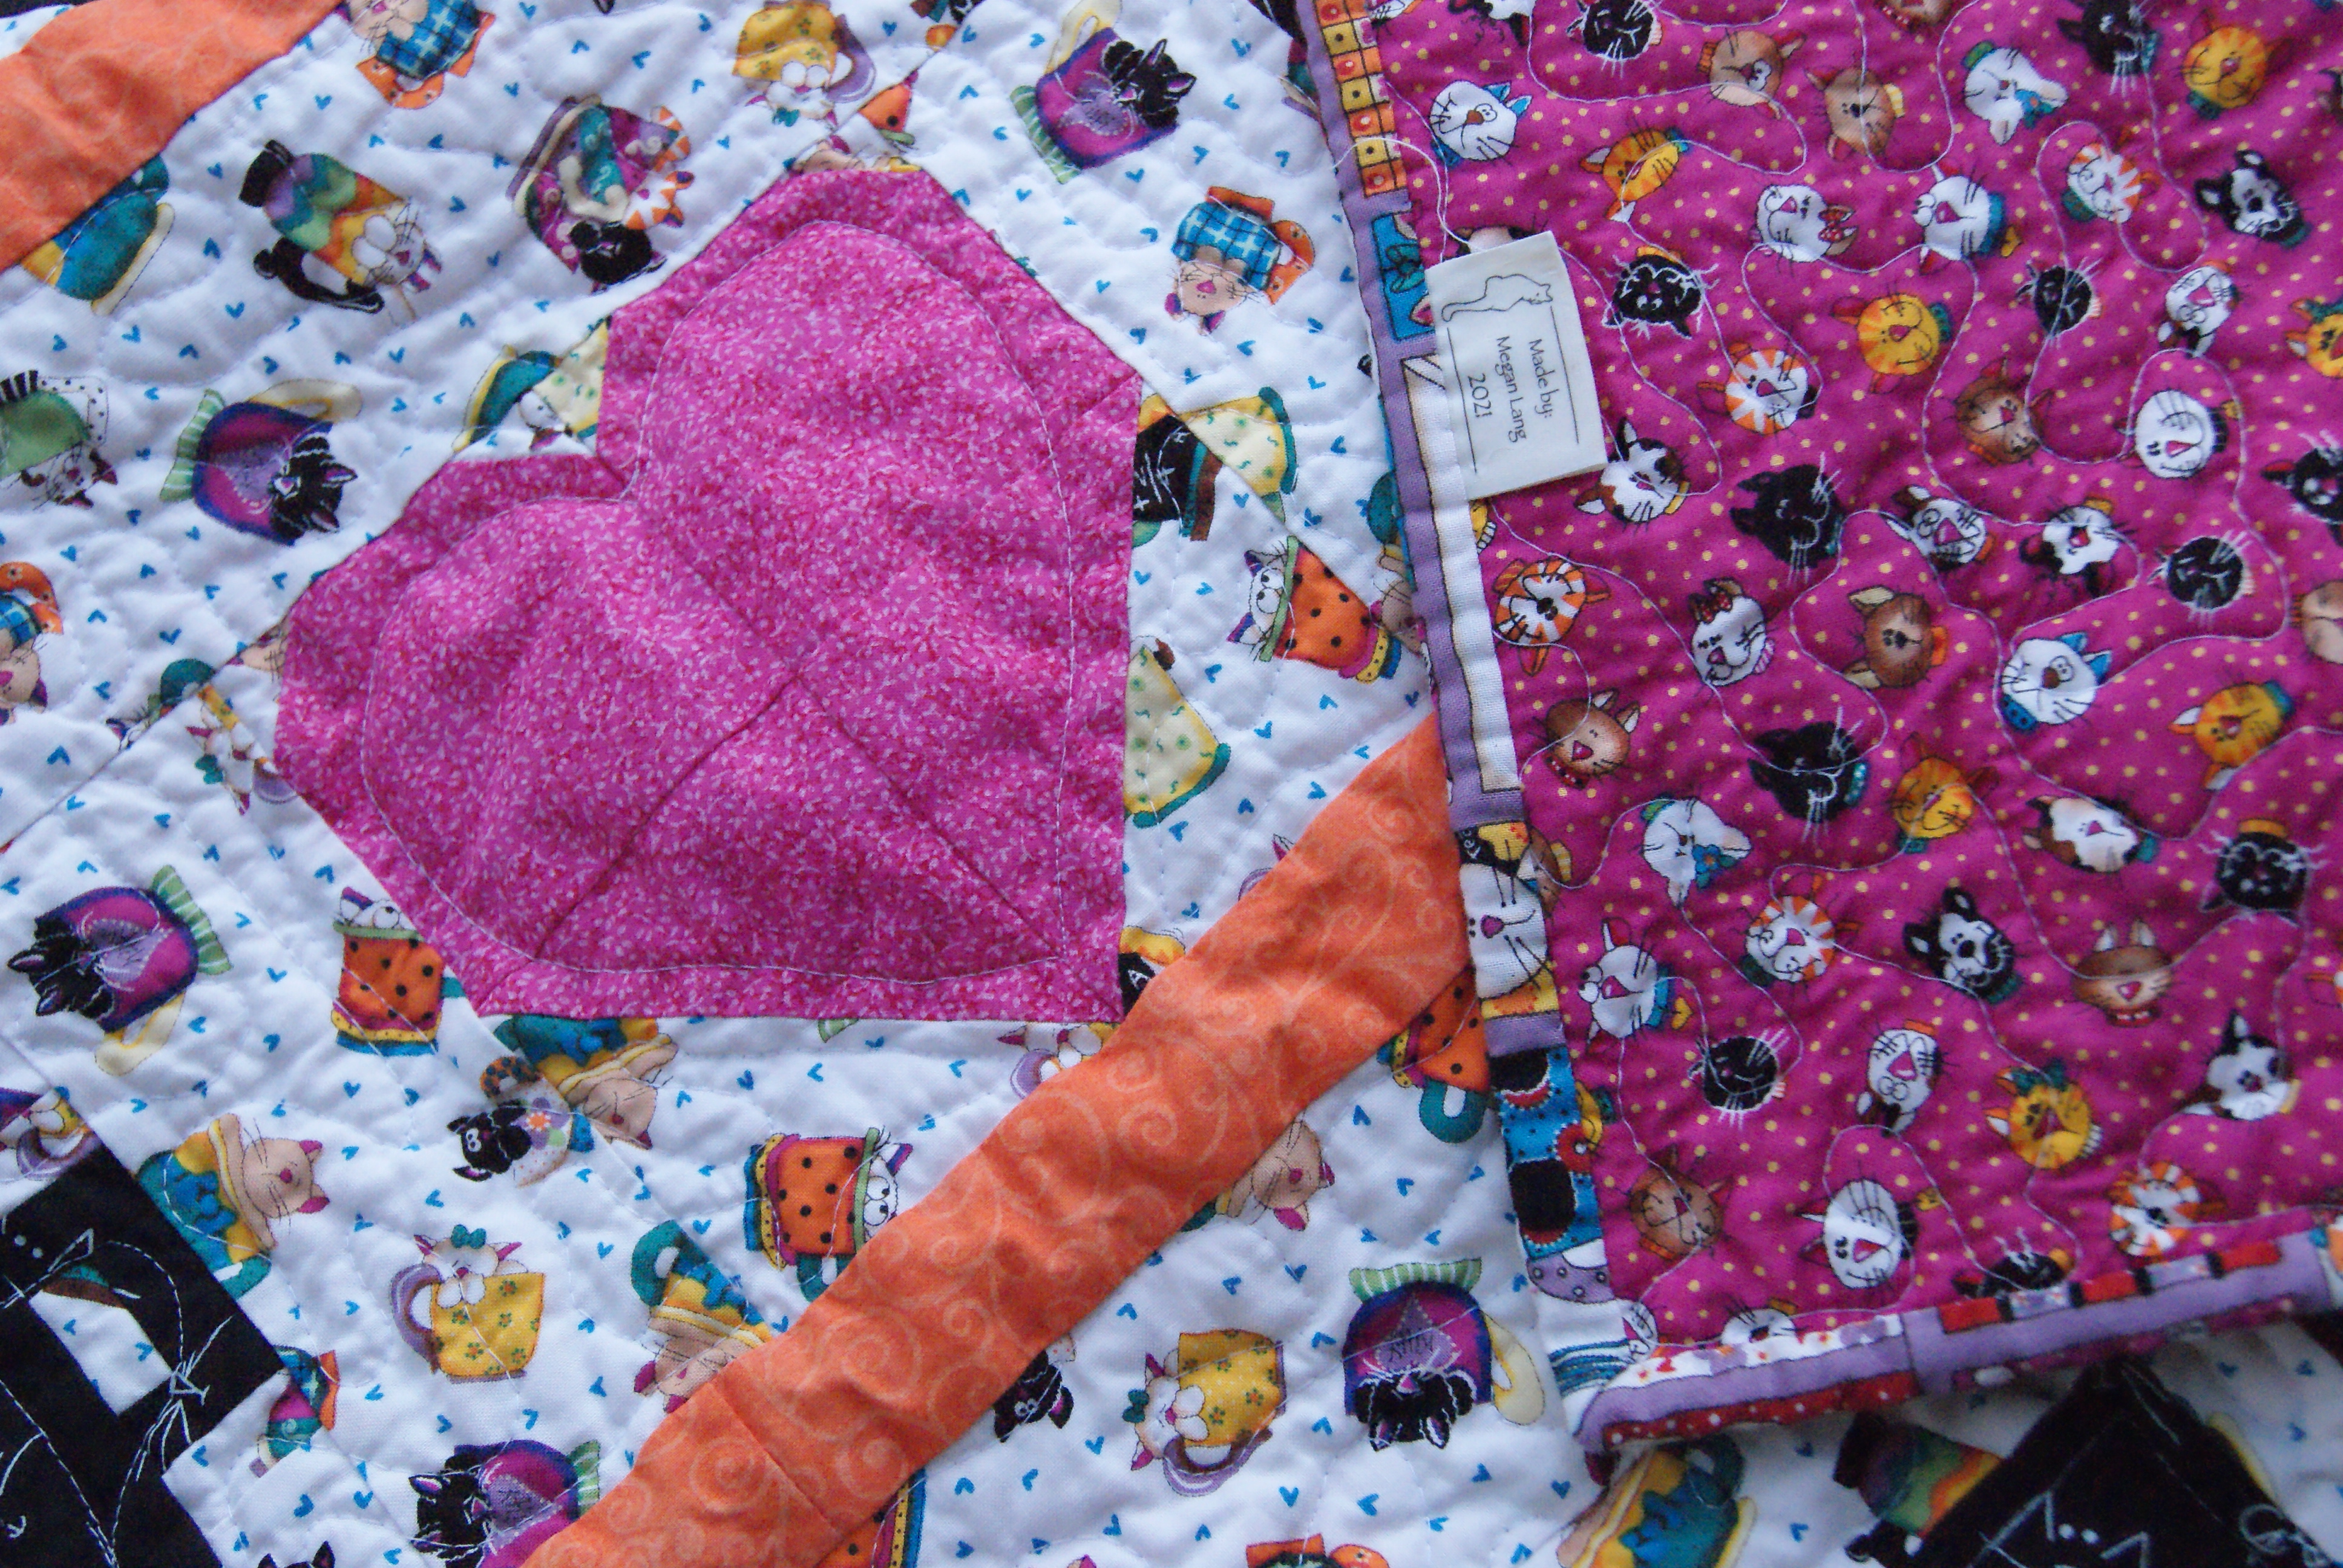
Doesn’t this one just look like a bowl of candies waiting to be collected by an excited child? When I was browsing through my mom’s collection of Halloween fabrics, I discovered several that were glittery. It felt only right to use them together in a Halloween quilt. And what better way to honor these bright, fun, yummy looking fabrics than to make it look like a candy bowl.


I knew I wanted to do a scrappy squares quilt, but I wasn’t sure what to put in the centers of the squares. Then I found this neat black fabric that had squiggly lines in different Halloween colors. Later I discovered it was supposed to go with the witches brew set from the last quilt finish, but it worked so perfectly to tie these glitter fabrics together I had to go for it.


Once I got all my squares and strips cut out, I got to work sewing them all together. These blocks came together pretty quickly, and soon I had a big stack of blocks ready to be mixed up and placed for the quilt top.


The color I had the least of was green so I really wanted to make sure I placed those all over the quilt. Orange was the color I had the most of, so it was a little challenging to keep a mixed up look. Of course, the purple was a great buffer between them all and once I was happy with the layout, I began methodically sewing them all together.


Honestly, it’s probably the hardest part of scrappy quilts for me. I don’t have a piece board for placement. They are laid out on the floor and I try to get done as fast as I can so the cats don’t mess it up.  It’s challenging sometimes, and sometimes the blocks don’t end up where I intended. I wish the greens had been placed a bit different, but it’s all good.


Once the top was done, I used the Halloween fabric that we had the most of for the backing, and did a simple meander in black. It minimizes the visual distraction from the fun part of this quilt, which is the glittery fabric.


I went for a solid black binding to create a simple frame and declared this fun quilt finished. I am so happy with how this one turned out. It’s everything “Halloween” I was looking for. Spooky designs, fun colors, eclectic pattern with a scrappy look. I Look forward to displaying this one next year for the spooky holiday in fall.


Sunday, December 5, 2021

Scrappy Witches Brew Wall Hanging Quilt


For several years I have relied on a couple of Halloween quilts to decorate my house. My mom has a huge collection of fun Halloween fabrics, and this year I thought it was time to update my décor.


This is the first of my Halloween quilts. My mom had a neat collection of scraps from a project she did years ago. I decided to try strip quilting. I started with paper squares to give me an idea of how big I wanted them to be.  I used a solid orange fabric to create the center angle, but I didn't measure so the blocks don't all match up perfectly. 


After that, I simply took the strips of scrap fabric and sewed them on one at a time. Similar to paper piecing. Once a block was finished, I trimmed the fabric to make equally sized squares.


The strips were not of equal size, but they were all within a ½” of each other. There was actually two different fabric lines mixed together here, which helped create a more scrappy feel.


Once I had used up all of the small strip scraps to make the blocks, I realized the quilt was still quite small. I also hadn’t incorporated the witches from a matching panel. I decided with the remaining long strips I would incorporate the witches and their pumpkins. 


There was some sewing and picking to make sure it was laid out just how I wanted. At first, it ended up super long and awkward for hanging as decoration. I doubled up the witches on the top and bottom and added some of the strips to the side to make it a bit wider. This shortened it as well and gave the quilt more balance. 


Next, I got to work on the backing. I took the largest cut in the pile and used that to make the backing. It is a fun pattern and compliments the front on the quilt well. I pinned the quilt together and used black thread for a basic meander. I kept the quilting simple, but used a stitch that does a great job creating great texture.  


Finally, the binding finished the project. I used the solid orange that is in the scrappy blocks. I think it did a nice job pulling everything together.


I’m so happy with how this turned out. It was a lot of fun experimenting with strip quilting. I never realized how time consuming the process can be. I look forward to doing another one in the future with the collection of scraps I’ve been saving. Until then, I will enjoy my new Halloween quilt.

Wednesday, December 1, 2021

Sausage Orecchiette and Broccoli in a Cream Sauce


I’m not going to lie, this recipe was attractive to me because of the noodles. The little bowl shaped pasta is irresistible. I envisioned a delicious sauce sitting in the beds of those  little pasta bowls, ready to tantalize my taste buds with their yumminess. And let me tell you, this recipe does not disappoint.


The sausage adds a wonderful layer of flavor. I used a sweet sausage for my kiddos, but it would taste amazing with a spice sausage as well. I did add red pepper flakes, but if you use the spicy sausage, you might taste it first. It all depends on how hot you like it. 


The other nice thing is that this is a quick meal. It doesn’t take long to put together the ingredients and have a tasty meal for the family. You just can’t go wrong with a great pasta dish for dinner!


Sausage Orecchiette and Broccoli in a Cream Sauce


3 sausage links, casings removed (mild, sweet, or hot)

1 Tbs EVOO

2 garlic cloves, minced

2 Tbs butter

2 Tbs all purpose flour

2 c milk (whole or 2%)

2 Tbs parmesan cheese, grated

1 12oz box orecchiette pasta, cooked to al dente

1 c reserved pasta water

10 oz broccoli, frozen or fresh, cooked and drained

Red pepper flakes, optional


Boil the pasta, following the directions on the package. Drain, reserving 1 cup of water, and set aside. Warm a skillet to med-high. Add the EVOO and brown the sausage. Once cooked, lower the heat to med-low and add the minced garlic. Cook for another minute, stirring frequently.


Add the butter to the skillet. Once melted, add the flour and mix well. Add the milk and parm cheese to the skillet. Stir as the liquid heats, scraping any bits off the bottom of the skillet. Once the sauce reaches a simmer, cover the skillet and cook for about 10 minutes. If it starts to get too hot, turn it down to keep it at a simmer.


Cook the broccoli and add it to the sauce. Next, add the pasta and about ¼ c reserved water to help thin out the sauce. Stir together and add more water if the sauce still seems too thick. Add salt if needed, and sprinkle some red pepper flakes on top. Serve immediately.


Tuesday, November 9, 2021

Baja Shrimp Burritos with Old Bay Sauce


I love seafood, especially shrimp. It’s very versatile, and can vary from being the center of the meal to a flavor booster and everything in between. Unfortunately, my family doesn’t feel the same. They are not seafood fans at all and I struggle to find ways to make these meals without having a bunch of waste.


While visiting my sister in Seattle, we decided to try this shrimp burrito recipe. She’s always ready to try my experiments and loves seafood as much as me. We followed the directions pretty much to a tee and the end result was pretty delicious. There were a few things I wanted to change up, but good. 


When I got home, we had Mexican dinner and I ended up with leftover rice and beans. I decided to try the shrimp recipe again, but this time I was making some changes. Instead of full-sized shrimp, I used popcorn shrimp. Also, I focused on the Old Bay seasoning as it was so delicious in the sauce.


The experimenting paid off! It was amazing! I was able to have lunch for 4 days with this wonderful recipe. I am so glad I tried it again, and made the changes that I made. I cannot wait to do this one again.


Baja Shrimp Burritos with Old Bay Sauce


Shrimp Filling:

½ c onion

1 T EVOO

2 cloves garlic, minced

1 lb popcorn shrimp (can sub with small shrimp, de-veined and tails removed, and chopped into bite size pieces)

¼ tsp old bay seasoning

¼ tsp paprika

Salt and pepper to taste

1 c white rice, cooked

1 15oz can black beans, drained and rinsed

1 8oz pkg pico de gallo

4 10inch tortillas


Aioli Sauce:

1/3 c mayo

¾ tsp lemon juice

1 1/2 tsp sriracha

½ tsp old bay seasoning


First, mix together the ingredients for the aioli sauce. Set that aside and begin work on the filling. Heat up the oil to medium high heat. Brown the onions and add the minced garlic. Once browned, add the shrimp, old bay seasoning and paprika, and salt and pepper to taste.  Once all the juices have cooked down, turn the heat down to low and add the rice, black beans, and pico de gallo. Mix together completely and remove from heat.

For assembly, place one tortilla on a flat surface. Use a teaspoon of sauce and spread onto the tortilla. Scoop a quarter of the filling onto the tortilla. Roll the tortilla up burrito style, cut in half for serving, and add a little more aioli sauce.


*I used leftover Spanish rice from a previous mexican dinner. The flavors added a great kick to this burrito. This is a great meal for using up leftover sides from other dishes.


*Because I made this for me alone, I only assembled one burrito. The leftover filling was kept in the refrigerator as was the sauce and I just assembled a new burrito when I was ready to eat one.

Sunday, September 19, 2021

Quarantine UFO Series #17, Happy Birthday Banner Quilt


When my kiddos were little and let me get lots of quilting projects done, I found this super cute panel that was flags in primary colors that spelled out “happy birthday”. I thought it would make a great birthday celebration decoration piece!


The only problem was, I wasn’t sure what to do with it, and frankly the triangle piecework was a little intimidating. I would pull it out and stare at it to get ideas, and then I’d put it away and work on something else.


Eventually I stopped pulling it out and it sat in the storage bin for years.


When lockdown started, this was actually one of the first projects I pulled out. I immediately started cutting out the triangles of the banner and planning out how to piece it together.


Things were going alright until I ran out of the black fabric I was using, and was struggling to find more. Black is one of those colors that has a ton of shades so I had to look in the stores for the right ones. It meant I had to put it aside until I could get back into the stores for the hunt.


I was finally able to get more black fabric to finish the project but by then I’d started other projects and it sat once again… Until now… It was finally time to finish this bad boy. My kids are going to be moving out before I get this done.


I finished the black piecework and then added a slim red border for framing. Finally, I added a black confetti fabric for a final border. I briefly entertained adding more to this, like a row of presents and a row of candles, but in the end I decided it was time to be done with this project. I really wanted a banner, not a quilt.


For the backing, I admit I have a lot of baby quilt type fabric I’m trying to use up. This particular one had primary colors that went along with the birthday banner front so I went for it.


I wanted to keep the quilting simple, so I outlined the banner flags and then did a meander in black all over the rest. It really helped make the flags pop out a bit more. If I had thought of it before, I would have added more batting to make more of a trapunto style on the flags.


I finished with a black binding and we had a birthday banner just in time for my son’s 12th birthday. It only took 10 years, ha!


Another fun finish! Now I’m ready to move to the net project. Yeah!

Tuesday, August 24, 2021

Quarantine UFO Series #16, Rainbow in the Storm Quilt


In January of 2021, an event occurred that was a sign of hope. I was watching the presidential inauguration and trying to plan out a new quilt. These were scraps I’ve had since 2012 when I made Over the Rainbow quilt. These fabrics were so beautiful and I just couldn’t part with them. But I also didn’t want to do any old project with them. They have been patiently waiting on the shelf all these years, and I was finally inspired. 


The last few years have felt very stormy. Lots of differing opinions, and strong personalities. Then throw a pandemic in the mix with everything closed down for safety, and it starts to feel like the storm won’t end. The Inauguration felt like a fresh breath. There was hope, positivity, inspiration. Whether that will continue is still up in the air, but in that moment on that day, I was feeling optimistic.


I got to work to figure out this rainbow quilt. It needed to match how I was feeling. I checked the colors against black, which was too harsh, and white, which was too bright. I had several greys and settled on this darker one. It matched the color of a stormy cloud, but was soft enough to keep the focus on the rainbow of colors.


I didn’t want to trim any of the beautiful rainbow fabric. Fortunately for me, the rectangles in the scrap pile worked fine for the basket weave look I created with the colors and grey.  Once I had all the rectangle strips sewn into squares, it was just a matter of laying it out.


Trying to stick to a rainbow look was challenging because there were so many choices. Should I go straight across? Try to arch the colors? Maybe I should mix the colors up a bit as they’re laid out (I’ve never been good at that). 

In the end, I decided to go with colors straight across, but the grey basket weaves allowed them to be staggered and help them blend together. I used all the scraps I had, but it seemed a little small so I added some borders of the grey and a rainbow batik.


The backing is the grey with the rest of the rainbow batik. I am really trying to use up all my fabric with each project.  Keep my scrap pile to a minimum. I finished it with a grey binding and my label. All done!


When I look back at it, I can remember that awesome feeling I had that day and smile. I can also remember that I finished another UFO that has been hanging around all these years. 


Sunday, July 18, 2021

Quarantine UFO Series #15, The Last Cat Quilt


Back in the early 2000’s, my mom introduced me to quilting. She invited me to a block-of-the-month at a local sewing shop and I was hooked. Around that time, my mom found a whimsical fabric that she loved. It was on clearance and she wasn’t sure what her plan was for it yet, so she decided to buy the bolts that were left; 3 in total.


A couple of years past and I think she may have completed a small baby quilt with some of it. She asked if I thought I’d like to make something with it, and I thought… why not? It would be fun to practice a block pattern and my quilting. 


I finished a churn dash quilt in 2007 and then decided it would be super fun to make tea cups, as that is the theme on the fabric. I designed a pattern and started working. After finishing 16 tea cups, I was at a loss as to what to do next. I didn’t have enough tea cups to make a reasonably sized quilt and I was really tired of making the tea cups. You can only do fussy work for so long. So, the project got tabled. Life got busy and I was distracted with other projects.


Fast forward to now and I have really been trying hard to work through all my backed up UFOs. I have been doing so well and really cranking out these projects. I feel like it’s given me some freedom to consider new projects, and it’s cleared out some of my stash so I can get some new goodies. 


This one really needed to get finished. It was time. I pulled out the blocks and thought I’d get back to work on them, but instead I realized I can make more blocks that are something other than tea cups. It really opened up the possibilities in my mind.


I was able to come up with a sweet little heart pattern to alternate with the tea cups and then laid it out in a pattern that looks like shelving. I finished the top with a border on 3 sides.


For the back, I used the fabric I had the most of, the pink kitty faces. I had so much of this that even after making the quilt, I was able to make 5 pillow cases to match! What?!?


For the quilting, I outlined the tea cups and the hearts, and then did a basic meander to fill in the rest. I finished it with binding with the same fabric I’d used for the borders, and this bad boy was all done.


It felt so good to use up the last of this fabric. It also felt good to complete a vision I had long ago, even if it was different than what I expected.


I’m not sure what I’m going to do with this one. It’s future is yet to be determined. That’s okay though. I was able to practice some techniques, fine tune my skill, and fall in love with possibilities all over again. What a great finish!

Sunday, July 4, 2021

The American Flag Quilt


For years… since I started quilting… I have wanted to make a quilt for each month. I display one on my living room wall for the month and it’s a wonderful way to decorate for the different holidays and keep the house new and fresh.


For years I have had this goal, and yet it still hasn’t happened. I’m getting closer though. Covid lockdown really helped me focus on a lot of those projects I’ve always wanted to do, but haven’t. It was finally the right time to get some patriotic quilts going.


I went through my stash to find some reds, whites, and blues to create a scrappy look. I was surprised how few reds, whites, and blues I have. Apparently, I really like pinks (seriously, too much pink, not enough diversity). 


Even still, I was able to pull enough fabrics to create a good scrappy look and started researching piece sizes and finished quilt sizes for this. I have learned SO MUCH about the American flag dimensions and the design; it was awesome. First, I discovered the blue is always on the left, even if it’s hanging length-wise. I really wanted the flag to hang length-wise so I Made sure to put the blue on the left, which felt backwards at first the when it was all done it worked.


I also learned the length and width of the flag is very specific. To accomplish that, I figured out how big each piece needed to be to accomplish those dimensions. It’s not perfect, but it’s close. Also, the number of stripes and their order is very specific. This one I knew and was prepared for it.


Once everything was laid out, I got to work sewing. I put the pieces together in groups and made 4 sections. Then I sewed those sections together to get the final look. At this point my hubby was getting very interested in the project and asked me to leave as is, without borders. To keep it simple I did a basic meander in an off-white to match the white stripes.


I found a great classic americana fabric for the backing at a LQS and was able to use whole cloth without piecing anything for the backing. I wasn’t sure what to do about the binding. I didn’t want to do the whole thing in red and have that on the blue. But I also didn’t want to do it all in blue just for one section. So, I pieced the binding together so that the blue would match with the blue and the red would match with the red. It worked perfectly!


I am so happy with how this project came together. This is a very traditional quilt. I am hoping to make some more modern mini-flag quilts in the future, as well some stars and stripes themed quilts. For now, I finally have some patriotic colors to adorn my wall and enjoy the holiday.