Saturday, February 27, 2021

Classic, Crispy French Fries

When trying to decide which fast food joint is the best, a lot of people consider whose fries are the best. It is a deal-breaker for some if the fries are no good. But if you can create those perfect fries at home; well, you just one the jackpot!


There is nothing better than a fresh batch of French fries! The crisp snap when you first bite into them, followed by the soft inside of the potato. Still warm from cooking, and a little salt added for flavor.


The truth is, they are super simple to make. All you need is some potatoes, some oil for frying, and of course some salt for flavoring at the end. That’s it! The trick to getting the restaurant quality fries at home though, is to double fry them. Seems so simple, but man does it make a difference. You CAN NOT skip that step. Your family will be in awe at your master skill with this one simple step. 


Now, it’s time to make some fries. Give it a try! It’s totally worth it!


Double-Fried French Fries


4 russet potatoes

Salt to taste

Canola Oil


Peel the potatoes and slice them as desired (wedges, strings, sticks, etc.). Place them in a bowl with cold water and let them sit at least 30 minutes, but it can be a few hours for prep needs. When it’s time to cook, remove them from the water and dry them as best as you can on towels.


Heat the frying oil to 350. Fry the potatoes in batches to maintain the temperature. Cook for 4-5 minutes; long enough for them to be rigid with a slight crisp, but not tanned at all yet. Remove to a paper towel to drain. Once all of the batches are complete, heat the oil up to 375. Once at temperature, start the batches again, only this time look for a nice tan on the fries; about 2-3 minutes depending on the thickness of your fries.


Remove to a paper towel to drain and then place in a lightly heated oven (about 220-250) to keep them warm as you finish the other batches. Sprinkle with salt and serve immediately upon completion of the batches. They will go soggy over time.


Tuesday, February 23, 2021

Watermelon Table Runner

I have been really cranking through projects! It feels good to get so many tabled projects done, but I haven’t done as well with keeping up with photos of everything. There are so many things I want to share, and simply not enough time to get to them all.


Today, I have a table runner I finished. There’s actually a quilt that preceded this project, but I haven’t quite finished it yet. I still need to quilt it and bind it. Soon! Soon!


This table runner is actually made of the scraps from the other quilt that’s almost done. I was ready to throw away the scraps because they were awkward triangle shapes, and I admit I was getting tired of the fabric and pattern. 


I rallied myself to complete this one last project, and I am so glad I did! I am so happy with how it turned out! It is just the right size for my entry way table, and the colors and patterns are perfect as we usher in spring and summer.


To make it a bit wider, I positioned the blocks off-center and added fabric to help create flow. I also used more fabric for the backing from my stash (feels so good!) and then finished it with a pink/coral fabric I found in my mom’s stash (thanks Mom!). 


One thing I would have done differently is use a different batting. I was trying to use up scraps of batting leftover from other projects and had a natural-colored batting that was the perfect size. Once it was all done, I realized the natural color shows a bit through the white sashing around the blocks. It’s all good though. As soon as I washed it, the white seemed a bit brighter and all was good. Now it’s on to more!


Monday, February 15, 2021

The Bomb! Burger Sliders

 We have a tough household when it comes to burgers. Some like sweet Hawaiian style, others like a more savory Pub style. I’m more of a “put your hands together” kind of gal. A flavorful blend of sweet and savory; and a versatile burger that could be matched with all sorts of things.


This particular recipe turned out so amazing, I couldn’t wait to get it in my recipe book. It was a hit with everyone! That never happens! I had to record what I did before I forgot, and now I have a winner to add to the dinner rotation.


This is not the first time we’ve tried sliders. Pinterest is flooded with ideas, which is great but they weren’t working for us. Doing the sheet of burger didn’t create a good meat-to-bread ratio, and baking the sliders in a sheet AFTER the burgers were placed made the bread too dry and over-toasted on the outside while it became soggy inside. This method I used allowed for a slight crisp on the roll, and the proper ratios with each bite. Totally worth the change in the order for the slider construction.


The other cool thing is that it doesn’t have to be beef. We’ve used this method with chicken burgers, BBQ pork, sloppy joes, all sorts of things. This is an absolute must try!!


The Bomb! Burger Sliders


1 12-pack Hawaiian sweet rolls

3 Tbs butter, melted

1 ¼ lb ground beef

2 tsp Steak Seasoning

1/3 c honey


 Warm the oven to 375. Remove the rolls from the package and keep them intact as a sheet. Slice the sheet of rolls lengthwise and place the tops and bottoms on a jelly roll pan with the inside up. Butter the inside of the rolls and bake in the oven for about 10 minutes, just enough to get a nice tan “toast” on the bread. Remove from the oven and set aside. Turn the oven down to 250 degrees.


Meanwhile, mix the rest of the ingredients together and divide the meat mix into 12 small balls (each about 1 ½ inches diameter). Work the balls into flat disks about ½ an inch thick. Heat a griddle or large sauté pan on a medium-high heat. Because these burgers are small you don’t want too hot of a griddle, they will cook fast. I use a cast iron press to squish the burgers down and help preserve their shape during cooking. After a few minutes, flip the burgers to brown the other side. Again, I use the press which helps evenly distribute the heat for complete cooking.


Place the bottom sheet of the rolls into a 9x13 baking dish. Remove the burgers from the griddle and place one on each of the 12 roll bottoms. If you’d like to add cheese slices or chopped onion, etc, now is the time. Once all of the burgers are ready, place the top sheet of the rolls on top of the burgers.


Finally, I put a piece of foil loosely over the top to keep them warm in the oven until the rest of dinner is ready. 


Friday, February 5, 2021

Rainbow Stripes Quilt

This post feels severely delayed, but it’s been hard to get good pictures of this bad boy. It’s actually my last finish of 2020! It took a lot longer than I thought it would, but we’ve all had that happen before.


Throughout 2020, I was trying to work through the fabric collections I’ve acquired over the years. Some from friends and family, others I fell in love with and couldn’t resist getting. This fabric collection is one of those stories. I can’t even remember exactly when or where I got it. Possibly on one of my trips to Washington, or maybe at a quilt show that was having a special. Regardless, it was such a beautiful collection of Bella solids and I knew someday I’d find the right pattern for them.


Because I have so many fabric sets, I have browsed A LOT of patterns. When I started thinking about what to do with this rainbow set, the striped blocks came up and it seemed perfect! I had just finished two quilts that were heavy in triangles and I really needed a change of pace. How hard could a bunch of strips be? Easy peasy! Ha!


I got to work cutting the colored strips first so I’d know how much white I’d need. It was a close one, but I had just enough white to get the job done. I really wanted to try and add a little more to make it more rectangular, but I couldn’t find a match for the white and decided this would do.


It took so long to make these blocks because they had to be sewn and ironed each time. Yes, I could chain piece with the colors but then I had to go iron, get the next batch ready and go back to it. Sew, iron, and repeat; sew, iron, and repeat. As the blocks came together, I was super happy with the results, and the necessary efforts.


The fabric backing I picked out was just a touch too small, so I added a little leftover peach from the front to make it work.


Quilting also confused me on this one. I am used to a basic meander. It’s quick, it flows throughout the entire quilt top, and my machine can handle that type of quilting. But the straight lines and right angles of this quilt made it feel like it needed a different approach. I went out of my comfort zone and did a simple square pattern. I wasn’t sure how I felt about it all the way to the end, but now I LOVE IT! It was exactly what this modern quilt needed.


I used the matching navy blue for the binding, and it’s quickly become a favorite in the house.


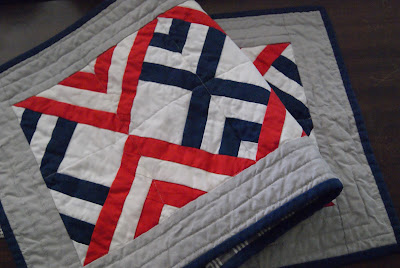
I still had the leftover triangles from the trimming I had to do to make straight edges. I couldn’t let them go to waste, so I made a beautiful table runner with them. It has very patriotic colors and I kept it simple with gray borders (which also came in the original color pack).


I used a boxed grey for the backing and used the same blue binding as the main quilt. I am glad I have a different table runner for our front entry now. I need to make some more so I can mix it up during the year. What a great way to use up the extra fabric.


When all was said and done, I had only a few scraps left that were added to my scrap bins and saved for a scrappy project of some sort. Awesome!