Tuesday, July 28, 2020

Beef Satay with Peanut Sauce of the Side

A recipe I’ve always wanted to try, and now that I’ve tried it, I don’t know why I waited so long. I have had this one tucked away in a binder full of recipes. Over the years, long before pinterest, I have been clipping recipes from various magazines, catalogs, brochures and flyers. This one came from a Lifestyle magazine that included recipes that are simple, fast, and healthy. My hubby loves peanut butter, and steak. What a better way to combine the two than this.


The best thing about this recipe is that it’s quick and easy and perfect for busy nights. It’s also a “clean” meal that doesn’t weigh you down. Easy proteins for digestion and a soft, sweet flavor of peanut butter to add interest.


This meal also reheats really well if you end up with leftovers. I’ve used leftovers of this to make salads and Chinese wraps. It’s amazing! I’m sure there’s more applications, too that I’m not even thinking of right now. Definitely worth a try.


Beef Satay with Peanut Sauce on the Side


1 ½ lbs flank steak (thinly sliced across the grain)

2 Tbs canola oil

1 ½ tsp coriander

½ tsp salt and pepper

6-8 wooden skewers, moistened


¼ c peanut butter

1 ½ Tbs light brown sugar

2 Tbs lite soy sauce

1 Tbs lime juice

3 Tbs water (more if needed)


Heat the broiler on high with the top rack 4 inches from the heat source. Slice the meat and place it in a bowl. Add the oil, coriander, salt and pepper. Mix them together making sure the meat is well coated with the oil and seasonings. Thread the meat onto the wooden skewers and place them on a rimmed baking sheet. You can line it with foil to make clean up easier. Place in the broiler, and allow to cook for 4-5 minutes for a medium cook.


Meanwhile, whisk together the peanut butter, brown sugar, soy sauce, lime juice, and water. You can add more water to thin the sauce if you prefer. Serve the sauce on the side or brush it on the meat when it comes out of the broiler. Serve with broccoli and rice for a fast and delicious meal.


Monday, July 20, 2020

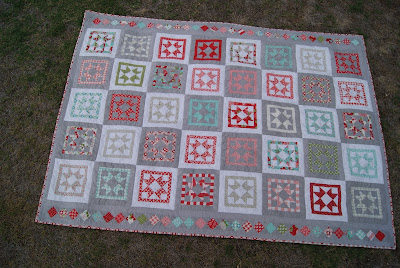
Quarantine UFO Series #5, Vintage Modern Quilt

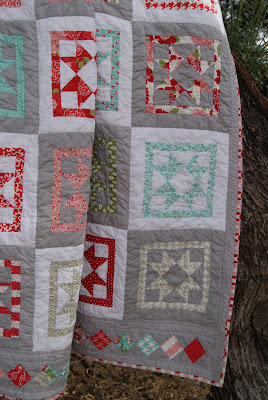
Vintage Modern Quilt


This quilt… so beautiful… so frustrating… so glad it’s finished.


The short story for this is that I love doing my own quilting but I don’t really have the right machine for it. I love following stencil patterns and creating flowing meanders across individual blocks and borders. Don’t get me wrong, my machine is pretty good. But over the years, it has given me trouble and its age has shown. That’s how this quilt got hung up on the UFO shelf for so long.


It started in May of 2014 when I found a beautiful jellyroll of Vintage Modern fabrics from Moda. I first blogged about it here, and explained my ideas and inspiration. I was so excited! You know those moments when you have a brainstorm idea and you can’t wait to get to it and see it to completion? I got to work and was doing great, but hit a wall when I ran out of grey fabric for the base of half my blocks. It took me some time but I found more grey and finished the stars! Yeah! I blogged about completing them and preparing to complete theproject here. That’s when I hit a new wall.


This quilt is a twin size, which for my little machine and cramped quarters, is quite a beast. I quilted a few blocks and was so disappointed and frustrated with the quality that I decided I’d rather put it away and wait for the right machine to complete it than to continue ruining the top with the quilting. Into the closet it went. Since then, it has been shuffled around and moved about and pulled out of the way of other items that we’ve needed over the years. But there it continued to wait for the “right time”.


After completing a couple of UFOs and feeling more confident about finishing projects, I decided it was time to finish that quilt. Nothing has changed. I still have the same machine in the same cramped quarters. I still find it awkward and difficult to accomplish what I envisioned it being. At the end of the day though, I really love this quilt and I wanted it finished so I can enjoy it.


I got back to work with the same stencils, the same efforts, and with each block, I felt more and more confident with the process. By the time it was all done, I was actually pretty happy with how it turned out. I am glad I pushed myself to make it happen and get it done.


I finished the binding by hand and added a 2020 label. I may have started in 2014, but I finished it in 2020. I washed the quilt in the gentle cycle to get the last of the stencil markings off, and to my surprise, they didn’t come off. What’s going on? I pulled it out of the washer and got a soft toothbrush to try and rub the stencil off.  Nope, still not working. I tried ironing it off, nope. I washed it again and hoped that it would be good enough. I’m a little bummed that I finally finished this project, and I couldn’t get the chalk out. The blocks that had marker on them came out no problem. Such a disappointment. Oh well, fortunately it matched the rest of the quilt well enough that it’s hard to notice. Maybe it will fade in time or wash out next time. Either way, I have finished this project... finally! I love it and am so happy with the design.

Tuesday, July 14, 2020

My Babies Blankets Quilt

I am one of the many people in the crafting world that sets aside baby clothes and other memorabilia with the intent of creating memory quilts. But, like many others, the ideas get tabled and the beautiful items get buried in the depths of daily life. My children have gotten into grade school now and are long past the use or need for flannel nursery blankets. Still, I couldn’t get rid of them because of the memories for me so I stashed them away until I could “find the right project”.


January of 2018, we received news that my sister was expecting her first daughter. I was so excited to pass on some of our favorite clothing pieces and other useful items. I pulled all of the goodies out of the closet, and started sifting. I came across the stack of flannel receiving blankets I’d tucked away. I used them in the basinet when they first came home from the hospital as a burp cloth for the first couple of months.  Their age showed in the yellowed spots left behind even after laundering them, but they were perfect to me.


I decided to use them to make a reversible quilt for myself. One side would have pieces from my sons blankets, and the other side with pieces from my daughters. I kept it simple with 4” squares, and carefully laid them out to make sure a random appearance emerged. The green blanket appears on both sides as it was a color I used with both them.


For the quilting, I pinned the tops together back to back, making sure they lined up, and used a simple meander all over. I found some white and green plaid flannel fabric that tied the two sides together to use for the binding. Of course, I also added a date tag; good thing too. I would have forgotten when I did this had I not put a dated tag on it.


Later, I was going through my daughter’s doll stuff and found a couple more flannel receiving blankets I wish I’d known about before. Since the quilt was done, I decided it needed a bag to store it in for protection. The final blankets worked perfect, and now the project is complete. I have a wonderful memorabilia blanket to cherish as my kiddos grow up. Who knows; maybe I’ll get to pull it out as a playmat when I’m a grandma. A girl can hope, right?

Monday, July 13, 2020

Around the Neighborhood Quilt

We’ve all done it. We’ve walked into a quilt shop in search of one piece to finish your current project, and something catches our eye. Could be the latest bundle of fabrics that just arrived, or a collection of fat quarters that you’ve had your eye on. In my case, it’s always the sale corner. I CAN NOT resist the sale corner. Beautiful quilting fabrics for $6/yard? Yes please!!


I found this cute set of fabrics calling to me in the sale room. There was a blue print with little houses, kites, hopscotch, and pathways along with a green print with pets doing all sorts of cute things around picket fences. I had no idea what I was going to do with it, but I was confident this fabric needed to be in a quilt.


Even though there were only two prints, they were busy and had lots of things going on. I decided to fussy cut the blue fabric so that each snowball block had something different going on. Then, I decided to use the green print as the “pathways” through the neighborhood. I framed the snowballs with white to add some contrast.


Once it was pieced together, I decided to use a bold red for the backing and the binding as a strong contrast color. For the quilting, I wanted to practice my elongated meander in a circular pattern. I wanted to keep going with the “path” idea, and thought it looked a lot like a maze in the hedges.


Finally, I attached one of my tags to it and finished the binding with a hand stitch. I was ready to declare this project done. But, alas, I had scraps, including a bunch of small half-triangle squares. They needed completion too.  


I sewed them together as a center of a small wall hanging, but it was a little too small. I added the last of the green print and blue print as an oversized border that is framed with thin strips of white.


I used the same red on the backing and the binding as I did on the bigger quilt, and hand stitched the binding. It pulled a bit when I was quilting (a risk of working with that many small half-triangle squares). It gave the quilt a slightly rolled look. That’s a bummer but I love how it turned out. This is a nursery set with the larger quilt measuring 45 x 65 and the smaller one measuring 25 x 35.


Hopefully someday someone will get to enjoy it. Until then, I continue working on new projects, and continue to be tempted by fabrics in the sale corner.

Tuesday, July 7, 2020

Quarantine UFO Series #4, Rainbow Fruit Quilt and Trivet

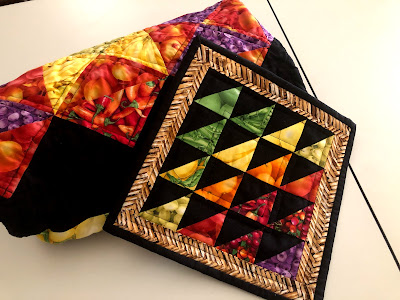
Rainbow Fruit Quilt


Every time I go into a fabric store and see fabrics with fruits and veggies, I was mesmerized by their color. I love the richness and amazing variety! I was collecting pieces until I had enough to make my fruit and veggie basket quilt. I actually ended up with enough blocks to make 2 smaller quilts, and a bunch of scraps. I just couldn’t let any of it go, and of course, had to find new projects for it.


I made a 12 inch block with the leftover ½ triangle squares that created a wonderful rainbow look. It was put away, like so many other projects I had been working on, and forgotten. As I worked through my UFO pile, I started to venture into my “lost blocks” pile, which is where I found the rainbow block. I pulled it out, along with the scraps, and tried to figure out how I can use this stuff up. I tried and tried, and couldn’t figure out what to do. I was chatting with the hubby about it and he asked why I needed to keep that block in the quilt if I had enough fabric to make a new one? Huh, good point!

I took the block out and started to layout the leftover pieces. I came up with a rainbow style layout creating a real pop of color. I set it on a black background, bringing the colors out even more, and then used the last of the scraps to create an off-set border.


So… then I needed a backing. I went into my stash and found a picnic table pattern with ants crawling on it. Could NOT be more perfect! My daughter saw it and said she wanted a face mask made with it. As much as I loved that idea, I needed all of it to make the backing. I trimmed it with a little black to get to the size I needed. Worked excellent!


The quilting was a simple straight stitch crosshatch on the rainbow element and then a basic meander on the black. It keeps the attention on the colors and rainbow style. I’m really happy with how this turned out. I’m so glad I saved these fabrics, and thought outside the box to create this.


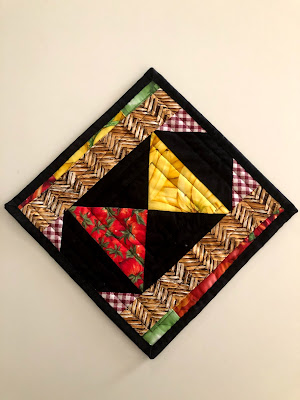
Of course, the block that started this project was still unaccounted for. I decided to make a simple trivet with it. I used the very last of the scraps to make a patchwork backing and used a simple straight stitch for quilting. It is now gracing my counter with its bold colors and providing function when I pull something out of the oven.


And with that, I have yet another project finished. Love how I’ve been able to clean through my fabric stash and unfinished projects at the same time.


Of course, going into the UFO block pile opened a door, and now I have more projects I want to get to work on. Let’s see...

Wednesday, July 1, 2020

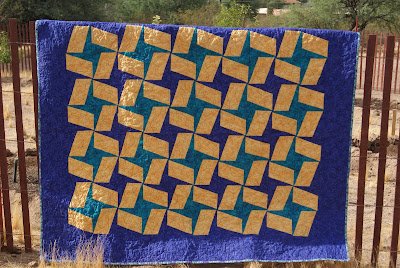
Quarantine UFO Series #3, Squared Stars

 Squared Stars Quilt


Several years ago, when I first started quilting, I wanted to make a quilt with a book I had found. It had a pattern for an easy-to-assemble blocked star pattern. Essentially, you sew 2 strips of fabric to a center fabric strip and then cut using a quilting ruler at a tilt so the strips are triangular. When you assemble it, they become stars with blunt points.


When it was all finished, I confess I wasn’t thrilled with how it turned out. The colors were too simple, and the pattern didn’t allow for much interest in its color movement. I didn’t know what my plan was with the quilt at the time, so I filed it away and began working on other projects.


In the UFO pile it has sat… all these years it has been forgotten and shuffled.  I didn’t have the heart to get rid of it. I felt an obligation to finish it, but I lacked the motivation I needed to make it happen.


A few years ago, on our annual trip to San Diego, I bribed my family with treats to stop at my favorite fabric shop there; Rosie’s Calico Cupboard (If you’ve never been to this store, you really should check it out. I haven’t been in a while, but I was always in awe of the huge selection and reasonable prices.). I had a list of backings I wanted and how big of cuts I needed. I found a beautiful fabric with similar colors as the front of the star quilt and decided it had a lot of interest and might counteract some of the simplicity on the front of the quilt. I brought it home and put it with the quilt top, in hopes of motivating me.


Well, years more went by and I stopped quilting all together for a bit. I’d look at my UFOs and think of how I could finish them, but it felt like a time-sucking task I couldn’t handle. Enter quarantine. All of a sudden, time is not the issue and I am out of excuses. I got to work and tried to focus on getting it done. I decided on an all-over circle meander with 3-pointed twists mixed in to match the pattern on the purple fabric. I used a purple thread so it wouldn’t be too noticeable on the back or the darker areas of the front.


While working on it, I was unhappy with how it was going. I kept second-guessing myself and wondering if I should pick it out and start over. I didn’t realize how bold the purple thread would be on the yellow fabric, and wasn’t sure how I felt about that. But I pressed on. I told myself I wasn’t a fan of the quilt in general and it was just for practice.


I used the leftover backing fabric for the binding and finished it off with a hand-stitch. I included my tag for the year finished, but even that got too hot under the iron and melted a bit. It seemed poetic on a quilt that had given me such trouble and disappointment.


All was said and done. There was nothing left for me to do with this quilt. I shook it out and looked back at what I’d created. Huh… actually don’t hate. In fact, I dare say, I might actually like it a little.  The purple stitching on the yellow fabric added just the interest I needed, and when looking at the whole thing at once, the quality of the quilting turned out pretty nice.


I am so happy to have this UFO done and I can put it away. I have thought about donating it to a good cause, or maybe gifting it to someone. Not sure yet, but for now I will sit back and revel in the fact that one more project has been completed! Yeah!