A few years ago, I started making pizza at home with store purchased dough. It was good, but I knew eventually I wanted to try my own dough. I don't know why I didn't do it sooner. I guess I thought I would have to wait hours for it to rise, or it would be a complex mixing process; I'm not sure. I'm just so glad I finally took the plunge and tried it out.
I found a food website that I am in love with called Mel's Kitchen Cafe. She has a recipe for everything, and the recipes are simple, easy and yummy. I actually used her dough recipe as a starting point and have made some modifications to fit our taste-buds.
The best thing about pizza is that you can put whatever you want on it. When we travelled to visit family for Thanksgiving, my sister-in-law suggested we put leftover taco meat on one and make a tex-mex pizza; it was awesome! I also tried a spinach-alfredo pizza; amazing! There are no limits; bbq pizza, mac'n'cheese pizza, anything. I think my husbands favorite was the meat lovers pizza with pepperoni and sausage. Have fun with it! Enjoy!
Pizza Dough:
- 3 c white flour
- 1 heaping Tbs olive oil
- 1 heaping Tbs honey
- 1 Tbs garlic salt
- 2 pkgs rapid rise yeast ( 1 heaping Tbs)
- 1 c warm water (120-125 degrees)
Homemade Marinara Sauce:
- 1 can (6oz) tomato paste
- 1 can (14.5oz) diced tomatoes w/ basil, garlic, and oregano
- 1 tsp garlic salt
Preheat oven and pizza stone (if you're using one) to 450 degrees for about 30 minutes before putting any pizza's in. Mix all the dough ingredients in the processor and finish by kneading on the counter. Split into 2 dough balls and set aside in a towel to rise for a few minutes (or if you're making one large pizza, don't split).
Meanwhile, mix the sauce ingredients using a whisk or hand blender. If you prefer chunky sauce, be careful not to blend too much. If you are making an alfredo sauce, this would be the time to mix the ingredients on the stove top to warm and combine.
Once the sauce is ready, take one dough ball and shape. I use a rolling pin to get started and press and flip to finish. Place the formed dough on parchment paper for easy transfer into and out of the oven. Top it however you would like, including the sauce you prefer and place it (with the parchment paper) on the pizza stone in the oven. Bake for 8-10 minutes. Repeat with the second dough ball.
Makes 2 regular pizza's (12-14 inches) or 1 large pizza (16-18 inches). Enjoy!
I found this difficult to find, so here's my Spinach Alfredo Pizza:
1/2 c Alfredo Sauce (butter, heavy cream, parmesan. Heat on the stovetop and then cool to warm)
1 medium tomato, sliced or diced
2 c chopped fresh spinach
1 1/2 c cooked chicken, sliced or diced (optional)
Saturday, March 30, 2013
Wednesday, March 27, 2013
Working on my Night Vision
It's been a while since I posted progress on this quilt. It's coming along nicely. I can't wait to get it done. I was able to get borders on, get the backing together and get it pinned.
I wanted to practice my stencil quilting, and so far I am pretty happy with how it turned out.
I debated whether to do any free-motion quilting on the sashing, but in the end I went for it. Then I ran out of thread; bummer. So, the project has been put on hold until I get some more.
I am linking up with Freshly Pieced today for WIP Wednesday. Have a great day!
Sunday, March 24, 2013
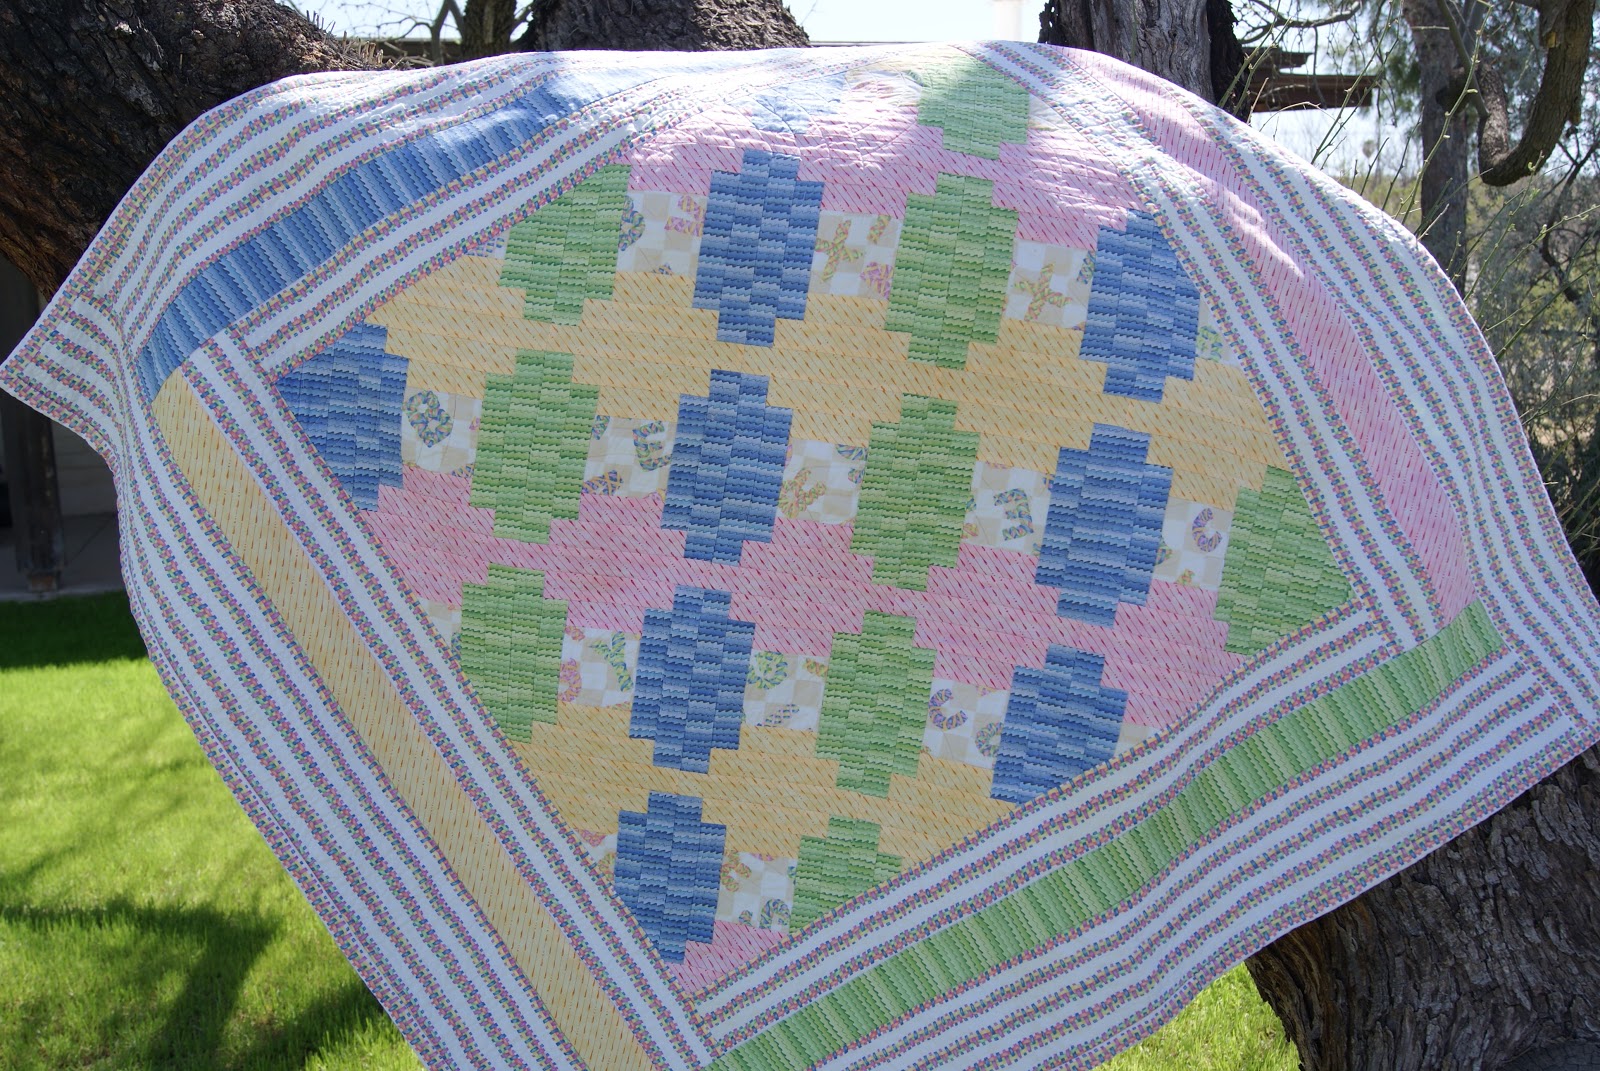
My Baby's Blanket
My husband and I have been together for 19 years. Our 10th wedding anniversary is this week, and it's amazing to think how much has happened in those many years together. When we decided to start a family, I was already picking out fabrics and patterns and thinking about how I would decorate the nursery. At the same time, a friend announced she was expecting her first baby.
I started working on this quilt for her with the idea of doing a modified log cabin, but when I started putting the blocks together I realized it looked more like a basket weave, so I went with it. Do you ever feel like sometimes the quilt talks to you? Tells you through the fabric what it wants you to do?
The white-based fabrics are an alphabet line from Hancock's, many years ago. The yellow, blue, green, and pink fabrics were purchased at Rosie's, my favorite, and were from a line called Noah's Ark I believe. Again, it was many years ago.
Once the top was finished, I decided to use fleece for the backing and started planning out the quilting. I liked the idea of the baptist fans (hope that's the right name), and my husband fashioned a tool to make the arch pattern for stitching. This picture isn't the best, but you can see the quilting. Sorry about the shadows.
I was so very happy with how it turned out. I was so happy with it that I fell in love with it and couldn't give it away. I felt so guilty, but I was able to put together another quilt for her in time (and actually it worked out because the new quilt was primary colors-to be posted later- and she ended up having a boy).
The long end of this story is that we now have a 1 year old little girl (as well as her older brother) and this quilt has been perfect for her. It took 6 years, but this quilt finally has a baby to love. It's like the quilt knew all along :).
I'm linking up with Finished Friday at Crazy Mom Quilts. Have a great weekend, and thanks for stopping by!
Saturday, March 23, 2013
Hard Days Work
For many years, my husband worked outside and went through a lot of jeans. They'd get stained, ripped, worn out, painted on, you name it. It seemed like such a waste to throw all of that naturally weathered material away, so I started saving it. I managed to accumulate enough to make 2 quilts that are very useful for picnics because of their weight and durability (don't want a cactus sticker poking through :P).
This one is called, "Hard Days Work" because of the origin of the material, and I used a log cabin pattern. I wasn't sure how it would turn out, but I cut as I went and tried to mix up the worn colors as best as I could.
I am really happy with how it turned out. The black squares provided a center-piece for each block, and then the black sashing that frames each block kind of finishes them. I don't usually skip borders, but I felt like this quilt didn't need it (and it was getting pretty heavy already).
I did, however, really want to complete a denim back, which kind of turned into its own quilt because of the diagonal piecing and the worn and weathered attributes of the denim. I love the back as much as the front.
Rather than trying to quilt this (way too thick and heavy for my machine to handle) I decided to just tie it with yarn. I chose a coral-colored yarn left over from another tying project I completed for a friends baby quilt. I also didn't bind it, but rather sewed the back and front together and turned it right-side-out and hand-sewed the opening.
Now I am ready to do it again. I have found new pattern ideas and I am restocking my denim. Unfortunately, my husband isn't going through denim like he used to, so it's going to be a slower process for sure.
Wednesday, March 20, 2013
WIP Wednesday
One of my first posts was about a Thangles project I had completed with 1930's fabrics. It was a lot of fun and I knew I wanted to use them again. Well, that time has come. A couple of years ago, I ordered fabric from Connecting Threads, and I am finally getting around to using it. I have had visions of what I wanted to do, and I am super excited to see them come to life.
So, the first task was to get all the triangles made with the Thangles; holy moly! What have I gotten myself into! It's all good because it will totally be worth it in the end, right?!? I hope so because this is turning out to be a lot of triangles.
I might actually need to count the number of squares in this when I am all done. But wait, that's it?!? After all those triangles? :O
Math has never been my strength, and once again it's laughing at me. I didn't put together that 2" squares make 4" squares and that means there needs to be a lot of squares to be a decent sized quilt. So, back to the sewing machine...
But that's okay. I have the fabric, I have the Thangles that I need to use up, and I have the interest in seeing the finished product. Maybe by the end of the year? I hope! right now I have a lot of trimming and pressing to do. I'd better get to work!
I am linking up with Freshly Pieced for the WIP Wednesday. Thanks for checking out my blog, and I love hearing from people if you want to leave a note.
Thursday, March 14, 2013
Ride 'em Cowboy
When I began my quilting, I felt like I wanted to make a quilt for everybody I knew. When I finished each quilt, though, it was hard to let them go. This quilt has that story, but I am not going to go into the details right now.
The big reason I was so attached to this quilt was the new techniques I was able to try, and I was really happy with how they turned out.
The first thing I wanted to try was fussy cutting. The cowboy fabric had the cutest rodeo scenes and I wanted to capture them individually and set them in the quilt. I then added the 9-patch blocks in between them in contrasting colors. Finally, I added the borders to frame it, including more of the red bandana fabric that I love.
The most exciting thing I wanted to try though, was the binding. I made a bias binding and then frayed the edges like a raggy-shaggy quilt. It was not easy brushing all of it out to make it fray, but I was so happy with how it turned out. It was so long ago I can't even remember what magazine I read about this technique in, but all that work was totally worth it as it looks, and feels great!
This was also my first attempt at quilting myself, and although the straight lines turned out nice, the meander is horrible. There's a reason there's no photo's of that; I wasn't brave enough to post those pictures. I guess this is a good quilt to remind myself how far I have come with my quilting.
Monday, March 11, 2013
Goody, Goody Gumdrops
When I was young, I LOVED that saying. Whenever I was told I could do something I really wanted, I said, "Goody, goody gumdrops!" When I finished this quilt, I was reminded of those wonderful days. I was so excited about this quilt.
While in San Diego I picked up a Moda Turnovers pack of a fabric line called, 'Swanky' by Chez Moi. It was, of course, from that wonderful shop Rosie's (can't get enough of that shop). I also bought the white I used to set the blocks. I knew I wanted to do pinwheels that were a little different and used a pattern from one of the BOM's that I had done before.
The pinwheels are set on-point and bordered with more paisley fabric from the same line. The back is also a fabric from the same line that I got from a wonderful little shop I found on-line called Sew Fabulous. The backing reminds me of watermelon, and the colors on the front make me think of spring and the warmth of the sun.
I continued to practice my 'quilting with a pattern', and I think it turned out pretty good. I feel like my lines are getting smoother and my hands are getting more relaxed. I was really happy with how this one turned out. I even had some leftovers of the paisley fabric and the backing and thought about trying a hexagon pattern with it. One of the many projects that are in line and waiting their turn. :)
I am linking up with Crazy Mom Quilts for Finished Friday! Have a great weekend!
Friday, March 8, 2013
Finished, For Now...
I have been working on this quilt for a few weeks now and have reached the point for backing and quilting. There's a shop in San Diego, Rosies Quilt Shop, that has a fantastic selection of just about any collection of fabric you might want. I mean, I can get lost in that store for a couple of hours; of course my bank account doesn't appreciate that so much. :)
I was super worried I wasn't going to have enough green for the border. I wanted to make it look like the triangles were floating on the green. Now I'm hoping I have enough for the binding. It will be a while though, so for now, I'm declaring it finished! Yeah!
I am hooking up with Crazy Mom Quilts for the Finish it Friday! Enjoy the weekend!
Wednesday, March 6, 2013
WIP Wednesday
I have been trying hard to get some of my UFO's worked on. There are 2 in particular that I have been focused on.
1) This is a quilt I am working on for a friend who's expecting a new arrival in May. Last time it was a stack of blocks, so I am really happy with the progress I have made. Once all of the pinwheels were sewn together I decided I wanted to make it a little bigger, so I bought some more of the dark pink to use as borders and binding and I am thinking I'll put some more pinwheels in the corners to frame it a little. Getting excited with how it's turning out.
Last time I posted this I was debating on fleece backing vs. cotton backing. There was more support of the fleece in the comments, and I think I agree so that's what I'm going to go with. Thanks to those with the feedback! Much appreciated!
2) This second project is something I have been on and off with since late 2011, when my machine was in and out of the shop for almost a year. I had a loaner machine, but it wasn't able to quilt so I got A LOT of piecing done during that time. I made two of these (not sure why now) and the first one is already done. I just need a back for this one, so I have pulled it out to work on when I am out of fabric for the other projects I have going :).
The black really makes a bold statement with the fruits and veggies! I love the look! Interested to see how this back looks; I'm so used to whole cloth that it's been challenging to piece it together instead. Can't wait to see how it turns out!
I am linking up today with Freshly Pieced for WIP Wednesday. Can't wait to see what everyone else is working on!
Tuesday, March 5, 2013
Baby Girl Quilt
Many of the quilts I've made are for friends, which I love. I admit I get a warm, fuzzy feeling when I see pictures of the quilt in use. Whether it be on the floor as a play mat or on the wall in a nursery, I like knowing it's loved.
Something I like about baby quilts is that fat quarter "Sweet Treat" packs from Pincushion Boutique are the perfect amount of fabric. With minimal additions from my stash I can complete a fun little quilt.
For this one, I had some extra yardage to complete the pink squares and then used the fat quarters to complete the wonky sashing, and the borders. I modeled it after a quilt that was given to me by a friend when my first was born. I loved the border on this quilt, but man was it challenging to get all the measurements to add up. I wish I was better with patterns; I'm sure it would make my life easier, and my quilting faster. But where's the challenge in that :).
Often for backs I use fleece to make it soft and light-weight (we live in the hot desert remember), but I wanted to use the last of the yardage, so I pieced this back. I wish I had better pictures, but many of my baby quilt gifts were pictured in haste as I was about to wrap and send off. Procrastinator? Maybe. :)
Sunday, March 3, 2013
Great Day for a Picnic
I love this time of year! The sun is warming things up, but the mornings are still crisp and pleasant. Things don't get unbearably hot, and the kids can run around outside for hours. Wonderful! Makes me want to have a picnic, and of course every picnic needs a picnic blanket.
My husband goes through a lot of jeans. I mean, A LOT! So, I started wondering what I could do with all those old jeans. The worn colors create depth and variety; I just couldn't let that go to waste. I came up with this Denim Weave Quilt. The back (not pictured) is all denim strips sewn together. It makes for a durable quilt that doesn't let sticks or rocks poke you when you sit down (very important out here). I only wish it were thorn-proof. :P
This was actually #2 of 2 denim quilts I made. I was pretty sick of denim after this and swore I would do no more. Since then, I have found some more patterns I like and have already started collecting more denim. It's actually pretty nice to work with. No batting; it's heavy enough without adding more bulk or weight, and no quilting. This one is tied together with a buttonhole stitch in thread matching the teal fabric. It's not visible in these pictures, but it worked pretty well. I was really happy with how it turned out. :)
Subscribe to:
Posts (Atom)