Pages

Fave Blogs

Thursday, February 28, 2013

Color Play Quilt


When I first started quilting in 2003, I joined a block-of-the-month project with my mom at the local Hancock's fabric store.  It was fun because it let me experiment with a lot of different blocks to get an idea of what style I liked.


I decided to make pinwheels and a large sashing so it would be double-size, but I lost the guest room when we started having children. I thought this quilt would be tucked away in a closet, but it turns out it's a perfect play mat. There's lots of room for rolling, crawling, and even some space left for the cat to join in. 


We've also used it for some great picnics! Turned out to be a pretty useful quilt that I don't mind roughing up. I had it quilted by Arlys Bjorke locally and she did a wonderful job. I declared the quilt done in 2005, and I was so proud that I finished my very first quilt!  

Wednesday, February 27, 2013

WIP Wednesday-baby quilt

I love making baby quilts. They are relatively fast, fun, and simple, and the colors are great! I am working on a new one for an expected arrival in May, so I still have time. I am not sure what exactly the finished product is going to look like because, true to my form, I am not big on patterns.  I guess I'll have to see what it ends up looking like. So far, this is what I have done...


I think there are 15 pinwheels there and another 15 to go in the pile of triangles. Not sure if I will sew all of the triangles together yet; I thought about using some of them to make the border, but we'll see.


I am worried I might need to go get some more fabric (any excuse to go to the quilt shop). I also haven't decided whether I should use fleece or cotton fabric for the backing.  I have time, right?

Can't wait to see everyone's WIP's. I am linking up with Freshly Pieced WIP Wednesday.

Tuesday, February 26, 2013

Cowgirl Up


Hopefully I can get a better picture of this soon. I LOVE this quilt.  It was a panel quilt that I cut up from a fabric line called 'Queen of the Ranch' by Moda a few years ago. I added the sashing and borders and practiced stencil quilting on it.  It is rodeo time down here, so I hang this quilt in the house during that time.  However, this is also my go-to quilt when I don't have a specific quilt I want up on the wall; I just love it so much.


This is a close-up shot of the quilting.  I was really happy with how it turned out. I even made my own paisley pattern for the outside border (which can't be seen in this photo). 


Monday, February 25, 2013

Frosted Brownies

Oh, this is a recipe we grew up with.  My Mom got this recipe from a friend, Cathy, when we were young little kiddos running around.  It's a family favorite, and the perfect answer to a chocolate craving! They taste great without the frosting as well, but true chocoholics will LOVE the frosting with them.


Batter Ingredients:
1 1/2 cups flour
10 Tbs Baking Cocoa
2 cups sugar
2tsp Vanilla
1 cup melted butter
4 unbeaten eggs
1/2 tsp salt
1 cup nuts (optional, not pictured)

Frosting Ingredients:
2 Tbs butter, softened
2 Tbs milk (more if necessary)
1 cup powdered sugar (more if necessary)
2 heaping tsp of baking cocoa

Preheat oven to 350F. Heat the butter just until melted (I use the microwave for this).  Let it cool for a few minutes while you continue with other ingredients.  Put all of the dry ingredients for the batter into the mixer (except nuts). Blend them together. Crack eggs into the mixer.  Turn on the mixer and carefully pour cooled, melted butter into the mixer.  Continue mixing until all ingredients are blended together; about 2 minutes.
If you would like nuts, now is the time to fold them in with a spatula.  Pour the batter into a greased 9x13 pan and place it in the oven for 25-35 minutes. Use a toothpick to see if they are baked through. Set aside to cool.
Afterwards, make the frosting.  Let the brownies cool completely before putting the frosting on. Mix all frosting ingredients together, slowly adding the powdered sugar. It makes mixing a lot easier if your butter is softened.  I usually set it out while the brownies are baking so it has plenty of time to warm to room temperature. Make sure the frosting isn't too thick; that makes it hard to spread.  The addition of milk can help to create the proper consistency.  And don't worry if you add too much milk and make it too thin.  You can always add more sugar to find the right consistency.
Finally, make sure to have a big glass of milk with you when you bite into these babies! Enjoy!


Thursday, February 21, 2013

Banana Bread

Mmm, just the smell of bread in the oven, any bread, creates such a warm feeling.  The weather has been so cold and snowy/stormy that warm, fresh from the oven treats are so very welcoming.  So selecting what type of bread is the next step.

I always seem to have a couple of bananas that have ripened to a point that no one in the house will eat them.  The number always varies; 1, 2, 3; occasionally it's as many as 5, and there's different recipes for the number you have to work with. There's also a lot of variety in how much sugar goes into the recipes, and I prefer using as little as possible.

This is a recipe I modified from the cookbook, "Pilsbury Complete Cook Book." It has the least amount of sugar per banana and the easiest flexibility as far as the number of banana's I have to work with.  It also turns out super moist with a slight crisp to the edge.  My kiddos would eat this every meal of the day if they could when it's in the kitchen.


Ingredients:

- 3/4 cup sugar
- 1/2 cup butter, softened
- 2 eggs, room temperature if possible
- 1 1/2 cups (3 medium) mashed ripe bananas
- 1/3 cup milk
- 1 tsp vanilla
- 2 cups flour
- 1 tsp baking soda
- 1/2 tsp salt
- 1/2 c chopped nuts, optional


1) In one bowl, mash bananas and mix in the milk. Set aside.
2) In a second bowl, sift together flour, baking soda, and salt. Set aside.
3) In mixer, cream together softened butter and sugar. Add eggs one at a time until smooth. Add vanilla.
4) Add about 1/2 cup of the flour mix. Once blended, add about 1/2 cup banana mix.  Continue in this alternating manner until all the flour and banana mixes are completely added. If you want to add the nuts, fold them in at this time. If you would prefer chocolate chips you add those in the same manner.
5)This recipe makes 1 large loaf or 3 small loaves. Grease your pans before adding the batter. Oven should be heated to 350F. Baking time varies on the size of pan. Three small pans will bake in 30-40 minutes while the one larger pan will bake in about 50-60 minutes.

Variation:
- You can make these in whatever pan you desire.  Here's an example of how I made them into Mini Muffins. I also added chocolate chips instead of nuts; awesome!

Wednesday, February 20, 2013

WIP Wednesday


I have a couple of projects I want to share today that I have been working on. 

1) Not sure what to call it yet, so right now it's just oriental triangles.  Hopefully I can come up with something better than that. 

It started with another 'sweet treat' pack from Pin Cushion Boutique that I purchased a couple of years ago.  I also had some oriental's in my stash that I added to get some lights into the quilt.  I actually was using the camera to help me see lights and darks better when laying it all out. I am in the process of piecing the triangles together now. Over half way done, yeah! Not sure what to do for a border yet, so this might get sidelined.  We'll see. 

2) Yet another Sweet Treat pack that I supplemented with extra yardage to complete the borders.  I so LOVE these colors! They are so great together and really POP!


I had not tried the night vision block before, but I love how it looks like origami or something.  Maybe I should have used orientals for this one :). There was some in-setting, but it all went smoothly and I am really happy with the results.  This needs to be quilted now and I just acquired the backing, so hopefully this one will be done soon. 

There's always a huge list, but these are my focus right now. My challenge for myself this year is to try to purchase as little as possible and just work through my stash.  We'll see how I'm feeling about that in a couple months :). Until then, it's back to work.

Oh, and I am going to try linking up with Freshly Pieced WIP.  Hope it works; crossing my fingers.


Sunday, February 17, 2013

Simple Pancakes

For the longest time I thought items like pancakes, waffles, and biscuits were super challenging.  That's why there's box mixes, right? Several months ago, my son wanted pancakes and I had no mix so my husband found a pancake recipe in our cookbook, "America's Test Kitchen Family Cookbook".  I was surprised how easy were to make, and now only make pancakes this way. I have modified a couple of things to make it a little easier, and make a smaller batch (I am not feeding an army).  Leftovers are okay, but I'd rather not.  Super easy, I'm telling you.

Ingredients:

- 1 cup unbleached, white flour
- 1 Tb sugar
- 1 tsp baking powder
- 1/4 tsp baking soda
- 1/4 tsp salt
- 1 large egg
- 1 1/2 tbs butter
- 1 cup buttermilk*


Instructions:
In a bowl, combine the flour, sugar, baking powder, baking soda and salt.  Set aside. In a small bowl, melt your butter. Mix the buttermilk and egg in a large measuring cup ( I use a 2-cup size). Pour the liquid mix into the flour mix, stirring with a whisk.  Add the butter while whisking and mix until incorporated! Have your skillet heated and ready and you will cook up about 8-10 average sized pancakes in a few minutes. We have added blueberries to them while cooking, and chocolate chips, and they are scrumptious! Enjoy!

*There's a few different ways to accomplish this ingredient, depending on what you have on hand. If I don't have buttermilk, which I usually don't, I will add 4 tablespoons of buttermilk powder to my dry ingredients and use 1 cup water instead of 1 cup milk in the measuring cup. This makes great pancake mix for camping or other travel (just add the liquids). Everything else is the same.
If I don't have buttermilk powder either, I will add 1 tablespoon white vinegar to 1 cup milk and let it sit for a few minutes. Everything else is the same.
Experiment with what works for you.

Here's a Whole Wheat Pancake version.  Not any big change from the original, but I wanted to add the link in case you're interested (and so I have a reference to remind me of the options I have with this recipe). Hope you like them as much as I do.

Friday, February 15, 2013

Trapunto Tutorial

I tried a new trapunto technique with this quilt and wanted to remember how I did it.  I got the idea from Craft Passion, but had to improvise a little because the project itself was a little different.

1. First things first, finish the quilt top.  I could have kept the panel whole but I didn't like it as much so I added my own sashing. Either way would have worked fine, though.


2. I used 'Extra-loft' polyester batting to create the 'puff'. Because the letters were black, I used a black thread to trace the letters and pictures that I wanted puffy; make sure to match your thread so the stitch is a little more hidden. Looking back, I can't help but wonder if they would puff even more if I had doubled up the batting (deep thoughts).


3. This was the most time-consuming part, mostly because I had so many shapes that were small. Cut out the excess batting so there's only batting on the parts you want puffy.


4. You are now ready to make your sandwich with the quilt top, batting and backing. I used a basic cotton batting for this part and pinned.


5. For the quilting itself, do a really small stipple around the parts you want to puff. Because there were so many different colors in this quilt, I chose to use thread that matched each individual block. I really wanted the attention to be on the letters and pictures. I also did a straight black stitch along the black and white checker boarder.


6. Complete the quilting with stippling in the four corners and the border and straight double lines along the sashing. Trim and bind, and you're all done.


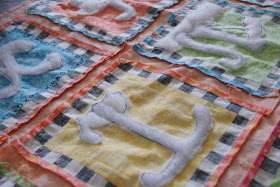
The puff is hard to get on camera, but you can see and feel it in person.  This is a project I definitely see myself doing again. It was totally worth it, and I think a lot of fun for kids to interact with. I hope you find this helpful. :)

Thursday, February 14, 2013

Learning the ABC's

Oh, I am so excited! I finished the alphabet quilt (titled "Learning the ABC's).  My kids are already having a good time with it.  My son in particular is enjoying feeling the puffy creatures on the quilt and naming them.  It turned out just the way I'd hoped! I am going to put together a little tutorial on how I did it (pictures included) so I can refer back to it. It's definitely something I can see myself doing again.


This picture doesn't really do justice as far as the puffiness of the letters and pictures. The tutorial will have better pictures.

Now I have to figure out what to work on next.  Too many ideas. Maybe a triangle quilt with my oriental prints. Oohhhh....that might be fun.  I have seen so many great ideas to try I am not sure what to do. What a great problem to have.

Saturday, February 9, 2013

The Quilters High

Oh, I am suffering from a fantastic quilters high.  I have been working on my alphabet quilt and it is turning out just like I had hoped.  I am going to post details and pictures when I finish because I want to remember how I did it.

I really wanted to try a trapunto method, which was hard to find information about.  I found this tutorial on Craft Passion and decided to try it out.  It was a bit labor intensive, but now that I have completed the stippling and can see the almost finished product, I am really excited about it.

Now I just need to calm down and get to sleep. Hopefully I can finish it by Monday.

Wednesday, February 6, 2013

How Many is Too Many?

I hope others have experienced the same type of scenario that I have.  Lots of ideas, lots of things started and purchased and in various stages of completion, but slow on the final steps. I wanted to list some of the things I am working on and hope to finish in the coming months.

Haunted House Quilt

I was so proud of myself with this one.  I got the top pieced together in a couple days, the backing and batting all laid out and pinned and was ready to quilt before Halloween.  About 2 days before Halloween. Oh well, maybe next year. Now I have time to complete it slowly, right?


I have been making good progress on it.  The quilting on the blocks is complete with spider webs across the panel-centers and curly-cue's on the orange and purple. I wish I had changed my thread to match the orange as the black really pops out, but live and learn, right? I am still pretty happy with how it looks so far.  All I have left is the border, and I need to think about it, so I am tabling the project for a while to work on this...

Alphabet Quilt

This fabric was a panel I bought at the Quilt Show several years ago.  I liked the letters, but didn't like the 'sashing' between the letters, so I fussy cut all the letters out and added my own sashing.  Then I found a wild black-and-white border and we're ready to quilt, which is where I want to try something new; Trapunto.


I am really excited to try this method I read about.  Since some parts of the letters can be really narrow, I am going to use an extra-loft batting and then trim before adding regular cotton batting and stipling about the letters.  We'll see how it goes.

Monday, February 4, 2013

My First Flannel

The very first quilt I decided to attempt was a flannel.  Anyone who lives in the southwest knows flannel is a difficult fabric to find locally.  Now I know. :)  I actually found the fabrics I used in the blocks at the local quilt show not realizing how much trouble it would be to find the backing and the alternating green blocks.


I painstakingly marked every line I was to sew on each square, and cut way too many squares.  I still have a ton of leftovers and I am not sure what to do with them. I was pretty happy with how my first attempt came out, though.  I learned a lot about how I wanted to quilt and how to coordinate colors.


The quilting was done by a local quilter, Arlyss Bjorke. She did an amazing job with little direction from me! I have been able to get some use out of the quilt at a couple of overnight horseback riding events.  My cats also enjoyed curling up on it when we had a guest room (that room has since been turned into a room for my son; too bad for the cats). These pictures were taken on a rare cloudy day, which was helpful for me as I practice taking photo's. I had so many goals when I decided to stay home with my kids, I am so happy I am finally getting some of them accomplished!

Friday, February 1, 2013

1930's Thangles

I am new to the blogging world, but an interested in cataloging my various projects that I always seem to have going on.  Between quilting, scrapbooking, card-making, and cooking I have a lot to remember.  It seems to be too much pressure for my memory and I want to help it out. I plan on posting pictures of various quilts I am working on and have finished as well as add recipes I am in love with and card and page layouts I complete for the many scrapbooks I have going on simultaneously.

So, this is my practice run.  How do I learn how to use the system? By doing it.


This was my first attempt at learning to use Thangles.  It was a BOM kit I purchased at Bella's Quiltworks many years ago. There was enough fabric in the kit to complete 2 quilts.


I have to say, I liked working with Thangles.  It was a fun way to figure out different patterns using triangles and squares. I think they lend themselves particularly well to the 1930's reproductions fabrics, although I also completed a civil war reproductions quilt (to be posted later) and a batik theme quilt.  I used my stash to complete the sashing, and used the scraps to complete the borders. I also used these quilts as practice for learning to stitch feathering. It feels like the quilt is more 'my creation' if I have completed every element of that creation. I am still practicing the feathering.