Pages

Fave Blogs

Monday, April 29, 2013

Creamy Potato Salad, Including Instant Pot Instructions

I love potato salad.  It is one of those side dishes that creates the meal for me.  When I contemplate dinner and potato salad jumps into my head, I immediately begin putting a meal together just so that I can have potato salad.  I have tried several store bought and deli style salads, but none compare to the homemade recipe I have from my Mom (thanks Mom!).
This recipe is creamy with a slight bit of tang. It has a variety of textures, including smooth and crunchy.  It is a perfect balance! And, you can eat it with all sorts of wonderful spring-type meals.  It goes with hamburgers, shredded meat sandwiches, BBQ chicken (BBQ anything for that matter). It pairs well with corn on the cob and fresh green salads.  It is almost the perfect side! And it's pretty easy to make.  This is my Mom's recipe that she's passed onto me.  Love, love, love it!

Creamy Potato Salad
6-8 large potatoes, unpeeled
1/2 green pepper, diced
2 stalks celery, diced
1/2 large onion, diced
4-6 hard-boiled eggs, diced

Dressing
6 serving spoons Miracle Whip or Mayo
1 Tbs yellow mustard
2 Tbs vinegar
1 Tbs sugar
salt and pepper to taste
Paprika


Place the potatoes into a cooking pot and cover potatoes completely with water.  Add 1 tsp salt and let boil.  Water should be almost boiled away before you remove the potatoes. They should be soft when poked with a fork. Set them aside to cool.
At the same time, in another pot, hardboil your eggs. Have an ice-cold water bath ready and let them boil for 10 minutes.  When they are done, place them directly into the ice-bath to cool (this prevents greening of the yolks).
Meanwhile, mix the dressing: miracle whip (I use Trader Joe's mayonnaise, which is a bit sweeter than other mayo's), mustard, vinegar, and sugar.
Peel the skins off the potatoes and dice them into 1inch (bite-size) pieces. Do the same with the eggs. Pour them into a large bowl along with the vegetables and mix together.  Add salt and pepper to taste. Then, add the dressing and mix together. Once everything is incorporated, smooth the top and sprinkle Paprika on.

*Instant Pot Instructions:
Peel and chop the potatoes into 1 inch chunks. Pour 1 1/2 cups water into the instant pot, and pour the potatoes in. Place 3-4 eggs on top of the potatoes and close the instant pot. Make sure the pressure release is closed. Set pressure cook to manual, high pressure for 4 minutes. When it's finished, allow it to naturally release for 4-5 minutes and then quick release the pressure. Be careful of the steam when doing so. Remove the eggs and place them in a prepared ice bath to cool. Pour the potatoes into a strainer to drain excess water.
Pull the eggs out of the ice bath and peel them. Remove the yolks into a separate bowl, and chop the egg whites. Using a fork, mash up the egg yolks. Add the mayonnaise, vinegar, mustard, and sugar. Whisk together until smooth.
Pour the potatoes, egg whites, onion, pepper, and celery into a large serving bowl. Add the dressing and mix together. Add salt and pepper to taste, and finally garnish with paprika.


Side Note: This recipe was originally adapted for a large family (8-10) and for pot luck/picnic functions, so it is large.  For my smaller family (4-6), I have minimized the recipe a bit by splitting it in half and it works great!

Friday, April 26, 2013

Baby Girl R2 Quilt

Seems like quite a silly name for a quilt, but we don't know the name of the new arrival yet, and they already have a first child, so I had to throw a 2 in there.  The quilt itself is quite different from the last one, though. I was happy with how this one turned out. I still look at it and think of things I could have done differently, but it's all good.


I started with the light pink star fabric purchased at the local Quilt Show and then picked out the white, aqua, and dark pink at the LQS Quilters Market. I knew I wanted to make pinwheels, but I wasn't sure what I was going to do with them.


I kind of wish I had kept the dark pinks in the corners and the lighter colors in the center, but oh well.  Can't change it now. I do like the colors together, though; very light and happy for a new baby.


On the back, I used fleece.  It's a nice lightweight fabric that's fuzzy and soft.  It's perfect for a spring/summer baby down here in the desert. For the quilting, I was trying to create a windblown, wave type of pattern with some FMQ. I was pretty happy with how it turned out.  Like the wind is blowing the pinwheels.


I am sending it off this weekend! Hope she likes it, and the baby likes it, too! I am linking up with Crazy Mom Quilts today for the Finished Friday.  Hope everyone has a great weekend!


Wednesday, April 24, 2013

WIP-Hidden Garden

I feel so accomplished! Last week I was able to get a baby quilt finished for a friend who's expecting, and I finished my Origami-Night Vision quilt. I am finally at a point where I can move on to new projects, and of course that list is never ending.


I pulled out some fabric that I have had now for about 2 years, just waiting for me to do something with it. I got it at the local Quilt Show and it's time I use it. I have done so many triangles lately, I really needed a change of pace, so this quilt is going to be super straight-foward with a focus on the floral pattern fabric.  I want to showcase that piece; it's just such an awesome pattern.


Admittedly, I am not sure yet how I am going to lay it all out. I wanted to put them on point, but we'll see. I also thought about doing an X-O type of thing; again, we'll see.  So many possibilities! I am just enjoying the colors and fabric right now.


I also thought about introducing another color, like a butter-cream kind of color. I am worried if I only use these three fabrics, it will be too much.  Maybe break it up with some white and butter sashing? I'm going to finish the squares and then lay some options out; see how it looks.

I am linking up with Freshly Pieced WIP Wednesday! Thanks for checking out WIP for the week!

Tuesday, April 23, 2013

Chicken Casserole

Okay, I admit it. I cook with canned soup sometimes.  I know, it's one of my dirty little secrets, but sometimes it's just easier.  It makes a quick meal that tastes good and can really stretch a buck. I don't have too many recipes that call for canned soup, but this is one of them. Talk about no brainer; 'throw it all in and heat'; last minute 'need to get the food on the table' type of meal.  
This was originally made with canned tuna, but my husband is not a fish fan, so I switched out the tuna for the chicken and it was a hit. I didn't think he would like it as much as he does, but good for me when I am in a hurry. It's also a kid-friendly meal.  It has noodles, shredded chicken, and peas, which are all easy to pick up and eat like finger foods. Finally, it re-heats pretty well, too.  Leftovers of this meal actually get eaten! That's a huge plus for me! Okay, I will stop justifying why this meal is worth it.  I have said my piece :P

Chicken Casserole

1Tbs butter
1 medium onion
2 c dry noodles, cooked
1 can cream of mushroom soup
1/2 c milk
1 can chicken
1 jar diced pimentos
1 c frozen peas
1 c crushed potato chips (optional)


Cook the noodles according to the package instructions, drain and set aside. Pre-heat the oven to 375 degrees.

Melt butter in pan and saute onions.  Once they are soft and translucent, add the soup and milk. Blend together, and add the chicken, pimentos, and peas. Finally, add the noodles and mix it all together. Pour into a 2 qt baking dish and crumble the potato chips on top.  Place in the oven for 20 minutes, or until heated through and slight browning has occurred on the chips.


I like to serve this meal with salad (makes it a little healthier looking?) or by itself. It also works well in individual ramekin dishes if you prefer that, or if your kiddos prefer having their own dish. Enjoy!

Sunday, April 21, 2013

Rustic Penne Pasta

This is one yummy dish!  We are not big on jarred sauce at our house; too sweet.  I am always looking  for recipes, though, that are kind of saucy with basic ingredients. I don't even remember where I found this recipe originally, but over the years, I have made additions and alterations that work for us.
One of the nice things about this recipe is that it is very flexible.  You could green peppers, or squash to incorporate more vegetables.  You can also use whatever pasta you like best (normally we really like penne, but I didn't have any when I made this particular meal, so it's campanelle). Finally, you can substitute the cheese.  The recipe calls for mozzarella, but I have used various italian mixes and blends and they always turn out good.
Side note, the pictures are not so good and don't do the meal justice.  One day, I will figure out how to photograph food. :/

Rustic Penne Pasta

1 lb ground beef or turkey
1/2 tsp butter
1 large onion, chopped
6oz button mushrooms, sliced
3 1/2 c penne pasta
1 can (14.5oz) diced tomatoes w/basil, garlic, and oregano
1 can (6oz) tomato paste
1/2 c water
3 c shredded mozzarella cheese, divided

Boil the noodles as directed and set aside. In a large skillet, melt the butter and saute the onions and mushrooms, set aside when done.  In the same pan, brown the meat and drain excess fat.  Add the onions and mushrooms, and the tomatoes, tomato paste and water to the meat and stir. Season with salt and pepper to taste (I don't typically add too much), and heat through allowing sauce to simmer. 
Combine the pasta with the meat sauce and mix. Add 2 cups of the cheese and mix in.  Pour into a baking dish and top evenly with remaining cheese.

Bake uncovered in a preheated oven at 350 degrees for 20-25 minutes, until cheese is melted and it's heated through. Serve with salad or a heated vegetable like green beans or broccoli (my sons favorite). Serves 6-8. Enjoy!


Friday, April 19, 2013

Origami Night Vision

I FINALLY finished my Origami Quilt.  It feels like I have been working on this forever.  I am very happy with how it turned out, though, so it was totally worth it.  This was a pack of fabric that I purchased at our local annual quilt show from Pin Cushion Boutiques along with a couple of extra yards of matching fabric. I am weak for the pink and green combo, especially this time of year.  It feels so spring-ish!


With this 'Night Vision' block, I practiced my in-setting.  It went well and the blocks turned out nicely. I used just about every inch of the fat quarters I had, and also maxed out the striped fabric to make the borders, so there was very little waste and very few scraps (I am not so good with scraps, they just sit around). 


I wanted to practice some stencil quilting, so I put some of that on the blocks themselves.  Then I filled in with some FMQ, swirls and flowers, which I am NOT good at.  I love meander, but swirls are a struggle for some reason.  Finally, I added a chain of flowers around the quilt on the border and called it good. Above are a couple of pictures I tried to get of the quilting itself. 


Finally I used the same stripe fabric to complete the binding and washed it up to get the quilted crinkle look that I love. Phew, glad it's done and now we can enjoy it on the wall for a while. Eventually, I assume it will keep someone warm, but the 100's are just around the corner, so it will be a while.

I am linking up with Finish Friday on Crazy Mom Quilts.  Hope you enjoy, and have a great weekend!

Tuesday, April 16, 2013

Desert Rose

This time of year, the weather is unpredictable, dry, and windy. I am not such a fan of the wind, it makes hair difficult to style, and seems to get kiddos wound up.  It also blows a lot of dust around in my neck of the woods.  The best thing about this time of year is the sun is coming up sooner, which I love! I joke that I am solar powered; I don't know if I'd make it up north because of the short winter days :P.

This quilt is perfect for this time of year.  It has a soft, "dusty" feel to it.  The colors are all muted and calm, and yet they still depict work that needs to be done out on the ranch.  When pregnant with my son, I was on a mission to finish as many of the fabric packs I had accumulated as possible.  This was one more on the list that I wrapped up.  The fabric line is called "Queen of the Ranch", and I didn't realize at the time that it was the same line as the panel I used in my "Cowgirl up" quilt. Clearly, I really liked this fabric line.

For this quilt, I decided to do a quick random-square pattern with the charm pack and then added borders in the rose pattern from the collection and the dusty-pink paisley pattern, both of which I had purchased extra yardage for this project. On the brown border, I added corner-stone blocks simply because I had one extra square from the charm pack and I just couldn't let it go to waste.


I love the fabric I used on the back, and it's perfect backing fabric because it's such a big print. The horse depicted looks just like my first horse, Sunny. Miss him so much! Maybe that's the other reason I like this quilt so much; it reminds me of him. I did a simple cross-hatch stitch on the squares, and on the border I had a little fun with some FMQ.  Along with the swirls (which I feel I am no good at) I added paisleys and roses (which turned out well).  I finished it with the brown roses fabric for the binding, which provided a nice frame. I was really happy with how it turned out considering I was working within the limits of what was available in my stash. This is, and probably always will be, one of my favorite quilts.

Wednesday, April 10, 2013

Baby F's Blanket Wrap

My cousin in Washington was expecting her first child and I wanted to make something a little different   for her baby; something warmer. I found this pattern in a magazine, but for the life of me, I cannot remember which magazine.


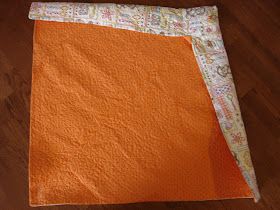
It was super easy to make, though.  I just took two pieces of flannel and put batting in between. Basically, it's a whole-cloth quilt.  Instead of binding in a traditional fashion, I sandwich-sewed face-to-face with the batting on one side, leaving a small opening so I could flip it right side out. Finally, I stitched it shut and it was ready to quilt. I did a simple meander on the whole thing to complete the quilt.


The last step was to make it easy to wrap the baby in.  I folded one corner in about 4 inches, and sewed it together. Then, rather than cut it, I folded it flat and tacked it down.  That way, it could be turned into a flat blanket later on, but the bulge wouldn't bother the baby while they used it as a bundle.

This was a fun and easy project to make.  If it weren't so warm down here, I would make more of them for friends.  It was a challenge to find the flannel, but Quilters Market never disappoints. This was a fun little project!

Tuesday, April 2, 2013

Holiday Sugar Cookies

Every holiday, it doesn't matter which, invokes the desire for sugar cookies! They're quick, easy, make the house smell good, and there are smiles all around. Add a good frosting and maybe some decorative features and you can serve these bad boys at parties, cookie exchanges, or an afternoon snack at home.


The recipe I use the most actually comes from the Pilsbury Cook Book I have.  I have tried a lot of different recipes, and I like this one because it tastes real buttery and it makes more dough, which creates more cookies. More cookies = more yumminess.


Rolled Sugar Cookies

- 1 c sugar
- 1 c butter, softened
- 3 Tbs milk
- 1 tsp vanilla
- 1 egg
- 3 c all-purpose flour
- 1 1/2 tsp baking powder
- 1/2 tsp salt

- frosting recipe of your choice


Cream the butter and sugar together. Add the egg and vanilla, then the milk, baking powder, and salt. Add the flour and mix until all ingredients are incorporated and the dough is sticking together and not to the side of the bowl. Remove from mixer, cover, and place in the refrigerator for 1 hour.

Meanwhile, heat the oven to 400 degrees and prepare your surface for rolling the dough out. Remove about 1/3 of the dough and roll it out on the floured surface. I like my cookies thick and soft so I roll out the dough to no less than 1/4-inch thickness. Play with this a little to determine what you prefer.

Use the cookie cutters of choice to cut out your shapes and place them on a cookie sheet about 1-inch apart. Continue rolling and cutting until all the dough has been used. Bake 5 - 9 minutes, depending on your oven and how crispy you like your cookies (we like them really soft so I bake for 6 - 7 minutes). Remove them from the cookies sheets and allow the cookies to cool before handling or frosting them.

In these pictures I was playing with neon food coloring, hence the wacky colors, and I was playing with some of my decorator kit bits. Not the prettiest and hopefully I'll get more pictures at the next holiday because you know I'll be making more sugar cookies! Until then, I am sure the kids will bring themselves to eat these delicious little treats.