Pages

Fave Blogs

Tuesday, May 7, 2024

Classic 1800's Star Quilt


When I was first getting into quilting in the early 2000s, I started collecting fabrics I liked. I didn’t have much reasoning other than whether I liked it. It’s a risky game because you can end up with a lot of different genres of fabrics. 


We had gone to our local quilt show and I found this beautiful fat quarter bundle of 1800’s reproductions fabrics. They came in reds, blues, greens, and browns. I loved it and added it to my collection.


I always had an idea of what I wanted to do, but I was so new to quilting I didn’t know how to do it yet. I needed to study and learn more first. In the meantime, I knew I needed white contrasting fabrics in each of the colors, so I started looking out for those too.


After so many years, this pack came out of the deep storage of project fabrics. I matched up the dark fat quarters with the light reproductions I had collected. Things were looking up. I decided a star pattern would fit the genre of fabric, and used my computer program to design a star block that I liked. 


I wanted to make a checkerboard style layout, so I mixed the different lights and darks and put them together randomly. Then, I laid the blocks randomly while still creating the checkerboard look. 


Once all the blocks were together, I felt like it was complete. It didn’t need any borders; I wanted to keep it simple. I found a nice, neutral colored backing and used a basic meander for the quilting. I felt like it didn’t need anything elaborate since it was a scrappy look.


The binding was a bit tricky. I didn’t want anything I’d already used in the quilt, but I also didn’t want it to take away from the rest of the top. I found a perfect dark blue in my mom’s stash. Binding done. All that was left was adding my tag. 


I am so glad this one is finally finished. I’ve loved this fabric since I found it all those years ago. Every time I saw it in the stash bin I was bummed I hadn’t used it yet. This was just the finish I was looking for with this collection.


I actually still have some darker reds and blues from this set that I pulled aside for another project. I’m hoping to get that one done next. Keep checking back.

Sweet and Spicy BBQ Sauce


I will admit that I am NOT from Texas. I don’t have BBQ running through my veins. I absolutely love it though, and wish I had a better grasp on it. On the flip side of that, I have eaten a lot of Texas BBQ and when I taste other bottled sauces you can get at the store, they just don’t compare.


At one time, Trader Joes had a Sriracha BBQ Sauce that was pretty darn close to the Texas awesomeness. When they stopped carrying it, I found myself once again without a good sauce to use at home. It was time for me to take matters into my own hands.


 I looked up some of my favorite recipe websites and started experimenting. They were good, but it seemed like too much sugar, too much ketchup, not enough kick, not enough flavor depth. I started mixing all these different ideas together and was able to come up with a sauce that hits all the marks I was looking for.


My hubby likes a more classic BBQ sauce, while I prefer the sweet and heat mixed together. The nice thing about making it at home is that I can make it just like we like, and I can customize even more with the sriracha for mine.


This recipe hit the spot for us on BBQ. I am ready for summer now and the great picnics and camp trips we can enhance with awesome BBQ.


Sweet and Spicy BBQ Sauce


½ c ketchup

1 ½ c  (15oz can) tomato sauce (or 6oz tomato paste with water to make 1 ½ c)

¼ c cider vinegar

¼ c + 2T molasses

2T mustard

¼ c red wine vinegar

1 tsp paprika, garlic powder, salt

2 tsp onion powder

½ tsp cayenne pepper

1 ½ T brown sugar

½ tsp liquid smoke

1 tsp sriracha (optional)*


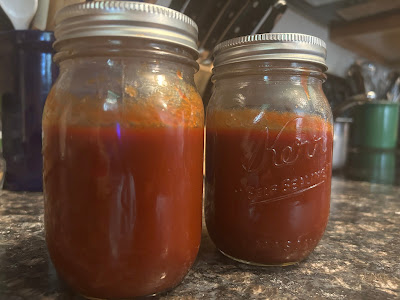
Add all of the ingredients (see note for sriracha) into a saucepan and turn the heat to medium-high. Bring it to a boil, and then reduce to a simmer. Simmer for about 20 minutes. The longer you simmer, the more the flavors will blend and become super tasty.


Serve warm or save in the refrigerator for about 2 weeks. This recipe makes about 2 half pints. Freeze in batches for up to 6 months.


* If adding sriracha, I wait until the end, split into two different batches and then add ½ tsp sriracha to one batch and leave the other without. You can add all of the sriracha with everything else if you want the whole batch to have it.