Pages

Fave Blogs

Wednesday, December 28, 2022

Crispy Honey Garlic Chicken


You know how there are just some foods you can’t make at home as well as the restaurant does? Well, I’m actually finding that to be less and less an issue; except for Chinese food. 


I’m excited today, though, as I have finally found a Chinese honey chicken recipe that is restaurant quality, done at home, and it’s quick and easy with familiar ingredients.  WHAT?!? How can it be? I might not need to go out for Chinese food again… but maybe I still will.  You know, for research.


Now, I admit, the best way to make this chicken is in the deep fryer. It’s the least amount of mess, and creates a nice crunchy shell on the juicy chicken bites. If you don’t have a deep fryer, that’s okay too. You can simply use heated oil on the stove top.


As for the sauce, there’s a great balance of soy sauce and honey so neither is too overpowering. I tend to be afraid of ginger, but not in this recipe. It’s subtle and really adds to the overall dish. If you like heat, add more red pepper flakes. If you don’t like heat, use less. It’s totally optional.


I mixed the veggies right into the sauce right before serving so they wouldn’t get overcooked or absorb too much of the sauce. You can do this, or keep them separate; totally up to you. Don’t be afraid to experiment a little with that. Whatever you do, enjoy this amazing Chinese chicken meal.


Crispy Honey Garlic Chicken


The Chicken:

2 large chicken breasts, cut into bite size pieces

1 tsp onion powder

1 tsp garlic powder

1 tsp paprika

2 Tbs cornstarch

Black pepper to taste


The Batter:

¾ c cornstarch

¼ c flour

1 tsp baking powder

1 tsp baking soda

1 tsp granulated sugar

½ tsp kosher salt

2/3 c ice-cold water

1 lg egg

Oil for frying


The Honey Garlic Sauce:

½ c honey

4 T soy sauce

4 lg garlic cloves, crushed

¼ t ginger

¼ t red pepper flakes

1/3 c water


Prepare the deep fryer oil by heating it to 375°F. Then, mix the sauce ingredients and bring to a simmer for about 15 minutes. In a bowl, mix together the chicken pieces with the onion powder, garlic powder, paprika, corn starch, and black pepper. Set aside. Next, whisk together the dry ingredients for the batter in a large bowl, and mix the water and egg in a measuring cup or small bowl. Combine the wet ingredients with the dry ingredients to make the batter. Finally, add the chicken pieces.

Fry the chicken pieces in batches so they don’t stick together. Flip the chicken after a few minutes and let it cook for a few more minutes, until it has a nice golden color. Remove and place on a cooling rack lined with paper towel.

Place the cooked chicken pieces in a bowl and pour the sauce over it to coat. You can also serve the sauce on the side for dipping. Serve with rice and possibly some pineapple slices, sugar peas, or some broccoli.

Thursday, December 15, 2022

Granny's Holly Jolly Christmas Quilt


No, this isn’t really my Granny’s quilt. That would be cool though. This was a project I’ve thought about for a while and really wanted to keep the whole thing vintage style. I’m not sure why, but I don’t have a lot of Christmas quilts. Maybe it’s the time of the year hustle and bustle, or maybe because I’m trying to finish a bazillion other projects before the end of the year. Whatever the reason, I am on a mission to make this change.


In my stash, I discovered I had a charm pack called Swell Christmas by Urban Chiks. I fell in love with it all over again.  I love the vintage style fabrics, and wanted to collect more. In my search for more of that line, I discovered I was a few years too late and they’d moved on. I ordered what I could find of Swell, and then moved onto Holly Jolly until I could figure out something with the charm pack.


Meanwhile, Green Fairy Quilt Shop was having a sale on fat quarter packs so I snagged a Holly Jolly by Urban Chiks that has a similar vintage style. I knew right away I wanted to use a classic block pattern, and found Granny’s Square. Yes!


I matched up red with light pinks, pinks with whites, and greens with light greens. I tried to keep it as mixed up as I could, but somehow still ended up with similar and same fabrics near each other. Oh well, it’s the scrappy look that counts.


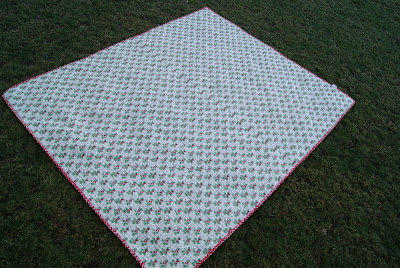
I kept a modern feel by not adding any borders, and made it a bit oversized for a lap quilt; it’s almost a twin. I did a simple meander for the quilting, and used a cute polka dot holly berry fabric from the collection for the backing.


I happened to go to a quilt expo as I was finishing this top and found a great red plaid for the binding that’s from the collection. Saved me from having to order it; yeah!


I’m not thrilled with my new tags, but oh well. I will keep hunting for something I like. My old ones would lay down nicely even after washing.


The funnest part of this quilt finish is that my kitties love it! They wanted to be on it before I even finished the binding. I have it on the couch as a throw and one of them is always curled up on it. Gotta love Moda fabrics.


Now I need to get the Swell Pack done. Maybe I can actually get two Christmas finishes this year!

Tuesday, November 29, 2022

Chicken Fried Chicken (or Steak)


For a while there, I was trying to pinch pennies and was shopping the managers special cabinet at the store. It went well for a while, until I started buying too much and we couldn’t eat it fast enough. I had to slow down.


During that experimenting, a cut of meat appeared that I hadn’t tried before; cube steak.  I was intrigued and immediately started looking into it. Now, before you judge me, understand I live in the desert southwest. I know all about Mexican cuisine, but not much at all about southern cuisine. I’m learning though.


For my first attempt, I didn’t have enough meat for everyone so I decided to make some chicken as well.  Oh man! Don’t regret that decision at all! It was a hit and now the chicken is requested more than the steak.


I have found the key to frying any meat is seasoning. You have to season the meat and let it rest a bit. You also need to season the breading and let that set for a few minutes. These two tips will make your meat, either chicken or steak, taste amazing. Juicy, flavorful, and perfect with or without the gravy… and a side of mashed potatoes.  Mmm… mashed potatoes…


Chicken Fried Chicken (or Steak)


1 lb of chicken pieces, about 4oz each (or steak)

1 ½ c flour

1 tsp ground black pepper

1 tsp kosher salt

½ tsp each paprika, onion powder, garlic powder, baking soda, and baking powder

1 ½ cups buttermilk

2 eggs

Frying oil, about 4 cups


Gravy:

2 Tbs butter

3 Tbs flour

½ c chicken broth

½ c half and half (or ¼ milk, ¼ heavy cream)

Salt and pepper to taste


Pour the frying oil into the deep fryer and begin heating it to 325-350 degrees. Pat the chicken dry and season with kosher salt and pepper. Let it sit for a few minutes while you prepare the breading.


In a mixing bowl, combine flour, salt and pepper, and the seasonings including baking soda and baking powder. Whisk it together.


In a separate bowl, combine the buttermilk and the eggs and whisk it together.


Pat your chicken once more and dredge it in the flour mix. Shake the excess off and dip it into the buttermilk mix. Let it drip off and then transfer it back to the flour mix once more. Once it’s coated, leave it on the drying rack while you finish the other pieces.


Let the coating set for a few minutes. Once the oil is heated and ready, start carefully dropping your pieces into the deep fryer. Don’t overcrowd the fryer as it will drop your temperature, and the pieces will stick together. It will take about 4-5 minutes to get a nice golden brown fry on it. Once it’s cooked through, pull it out of the fryer and place it on the rack to drip and cool. You can heat the oven to 220F and keep the chicken warm in the oven while you cook all the pieces.


While the chicken is frying, you can work on the gravy. In a saucepan, melt the butter and then add the flour to make a paste. Give it a minute and then add the chicken broth and heavy cream. Bring it to a simmer and it will thicken. If it’s too thick, add more broth. You can also add salt and pepper to taste. Once it’s ready, set it aside.

These are amazing with mashed potatoes and some yummy green beans. Enjoy!

Friday, September 30, 2022

Beer Batter Fish and Chips


Oh man! Weeks of binge-watching repeats of Master Chef has gotten me in the mood to try all the challenges they throw at the contestants. One I knew I had to try was fish and chips. It’s a little tricky though because the people in my house aren’t really fish eaters… or so I thought.


I had this idea floating around in my head, but it all really started when I was at Trader Joes and I happened to see a frozen package of cod pieces.  The pieces were about ½ oz to 1 oz; perfect for bite size fried fish, at least that was my thought. It wasn’t that expensive, which made experimenting a little easier to do as well.


 knew I wanted to make a British style beer batter so I did a little research and found a great recipe. The only downfall was that the fish was a little bland and wet inside the fried batter shell. I did a little more research to perfect the technique to avoid these two problems and came up with an awesome beer batter fish recipe.


Of course, the fries are a classic and something I simply dug into my blog recipe book for. Easy peasy, and a great addition to this classic British meal.


The best part was how well it was received! My family loved it; my son in particular has requested a repeat several times. I love when they love my food like that. Yeah!


Beer Batter Fish and Chips


1 lb cod pieces (or another firm white fish for frying)

4-5 medium size russet potatoes

1 c flour

1 tsp baking powder

1 tsp salt

½ tsp onion powder

1 bottle beer (ale, stout, lager, they all work)

1 large egg


Prep the fish. Cut them into pieces about 2in x 3in, give or take, and pat them dry with paper towel. Sprinkle them with coarse salt and set them aside to season.


Peel the potatoes and then chop them into 3/8 inch strips to make fries. Put them in a bowl with cold water in the fridge for about 30 minutes. Heat the oil in your fryer and then pull out the chilled fries and dry them thoroughly with towels. You’ll cook the fries twice to maximize crunchiness. Do the first fry at about 330 degrees F for about 3 minutes. Cook them in batches so they don’t drop the oil temp too much. Let them drain on a paper towel while you work on the fish.


Increase the oil temperature to 370F. In a bowl, combine the flour, baking powder, onion powder, salt and pepper. Make a hole in the center and drop the egg. With a whisk, begin to blend the egg in with the dry ingredients, and then slowly add the beer. Continue to stir while you do this to avoid lumps in your batter. If the batter seems to runny, add a bit more flour and blend in.


Make another bed of flour to dredge the fish pieces. Flour the fish pieces, and then carefully dip them into the batter, coating them completely. Once coated, immediately drop them into the frier, being careful not to splash. Allow them to cook until they’re golden brown, about 4-5 minutes. I also flip them after a couple minutes to get even browning. Once they’re done, pull them out of the oil and place on paper towel to eliminate excess oil.


Once all of the fish is cooked, re-fry your French fries. Again, do this in batches so the oil stays hot. Allow them to cook for about 3 minutes again; pull them out when they are a nice golden color. Place them on a paper towel to drain and add salt for flavoring.


Serve with a great coleslaw and some tartar sauce. Enjoy!

Thursday, September 15, 2022

Spring Flowers Hanky Quilt


So many years ago, while visiting my sister in Seattle, we spent a whole day visiting local quilt shops. We found this great little shop in an old-country-style village complex. There was a small community garden with chickens running around a everything. It was fantastic! My sister took the kiddos to see the chickens and get some candy from the little old time candy shop so I could have some time to browse.


Amongst many other fun finds, I found this little panel of hankies by Me and My Sisters Designs. I love their fabrics, and surprisingly have a difficult time finding them in my hometown in Arizona where they are located.


Although I was super excited to put this piece into a quilt, I wasn’t sure what to do with it yet, and I didn’t have any other complimentary fabrics to pair it with. So, this piece went into hiding until I could find some inspiration.


Fast forward to the pandemic and I was at home with kiddos and a lot of fabric to work through. I pulled this piece out first, but still had nothing to match it with so I had to continue waiting. That summer, however, while in San Diego, I talked my family into hanging out for lunch in a parking lot of an amazing quilt shop that has everything you could dream of. I was able to find some great pieces by Me and My Sisters that worked with my project.


I got home and started piecing things together. I wanted to keep the pattern simple so the hankies would be the star of the quilt. The hardest part was layout because even though I didn’t really want a pattern, I found that it was the only way to get the blocks to work together so I went for it.


My mom had this great green floral piece that worked perfectly for the backing with a bright pink stripe to bring it up to size. I used a meandering flower pattern for the quilting on each block. I felt like too busy a pattern would take away from the piecework.


I finished the quilt with an orange binding. I like that the orange pulls on colors from the front as well as the back of the quilt. It’s like it tying it all together.


This was a fun finish. I like the bright colors, and the adorable hankies. It would be a wonderful addition to a little girls room with all the bright colors and fun floral pattern. 


Wednesday, September 7, 2022

Natures Lost Four-Patch Quilt


After finishing the Natures Beauty Garden Lattice Quilt, I still had a few pieces of 10” squares left from the layer cake pack. I decided to try making a hidden four-patch quilt. I have made hidden six-patches before, and I was intrigued with the narrow pieces and small squares. I had to give it a try.


To make the blocks, I simply took 2 white squares with 2 patterned squares. This created 2 blocks for every 10” square I had left to work with. Once I had the four patches sewn, I cut them and then mixed up the cuts to create a different look. I chose to go narrow, but you really could do whatever.


When it came to laying out the different patches, I tried to make it look random, but because I was working with so few pieces, it was really hard to avoid a pattern of some kind. I decided I was good with the semi-random, partly organized look. It was more about the flow of the colors than what patterns landed where. I really wanted the colors to pop and the quilt to have color flow, which I feel like I got.


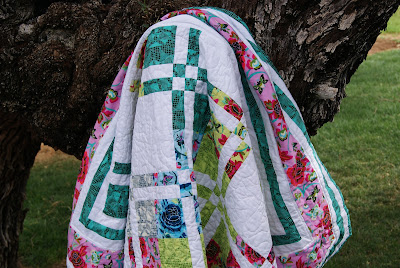
Once I got all the blocks together, I felt like the quilt was still a bit small. I ordered some more fabric so I could create some borders. I went with a double thin border with a large center border so I could maximize on the borders while still having some variety and interest.


The backing was more of the pink floral fabric I used in the border. I love this fabric! It’s a fun pattern without it being too overwhelming, and the pattern is large which works great on a backing where you have a large piece of fabric.


The quilting was kept simple with a basic meander for the blocks of the quilt, and a simple quarter-inch-in straight stitch on the border.


Finally, I used some more of the teal fabric for the binding to complete the project. This was a fun finish. I love that I was able to use the whole layer cake pack and create 2 very different quilts with it. I also love all the bright colors and funky patterns. Very different from what I usually work with, but still cheery and modern like I like it. 


Thursday, August 25, 2022

Spicy Sauted Fish Tacos


I have been really trying to use spices more in my cooking. First of all, it tastes amazing to add all of these different flavors. Also, it can reduce the need for other less healthy options like salt and butter. Finally, it usually eliminates the need for flouring or breading your protein, which is also a bit healthier.


My latest attempt at spicing things up in the kitchen was this amazing fish taco. Most fish tacos are breaded chicken and with mayo-based slaw. This one has a citrus-based slaw with a great mayo sauce. It lets you decide how much or how little you want. You can just focus on the flavors the fish has and not worry about anything else with it. Yum!


Admittedly, I don’t always eat this with tortillas and slaw. Sometimes I’ll just serve it with a crisp green salad, or maybe some black beans and corn. It’s a very versatile fish recipe. Let your imagination, and tastebuds, run with it.


Spicy Saucy Fish Tacos


Fish:

1 lb, about 4 pices, white fish of your choice (hoki, tilapia, cod, etc)

1 tsp salt (adjust to your preferences)

½ tsp black pepper, dried oregano, garlic powder, cumin powder

¼ tsp cayenne pepper, paprika

1 Tbs EVOO


Slaw:

2 c cabbage, finely shredded

2 tsp honey

½ a lime, juiced

1 Tbs cilantro


Sauce:

½ c mayonnaise

½ c sour cream

2 small garlic cloves, minced

¼ tsp cumin powder, cayenne pepper

Salt and pepper to taste

½ a lime, juiced


Mix together the dressing for the slaw and add the cabbage. Put that in the fridge to set. Next, mix the ingredients for the sauce and place that in the fridge to set. Now it’s onto the fish.


Mix together the spices so you have a rub. Pat your fish dry and cover the filets with half the rub. Rub it in so it will stick to the fish. Flip the fish over and repeat with the rest of the rub.

Heat EVOO over med-high burner. Brown one side of the fish, and flip after a few minutes. Cook the second side for a few minutes as well; long enough to ensure the fish is cooked through. 


Remove from heat to a plate. Gently pull the fish apart into bite size pieces. Serve with your slaw, sauce, and tortillas. You can also add some garnish like red onions or avocado slices. Enjoy! 


Tuesday, July 12, 2022

Natural Beauty Garden Lattice Quilt


Last year, while visiting my sister in Seattle, I had to visit a few quilt shops while there. One was an unexpected gem. We went to a shop called Ben Franklin. There used to be a Ben Franklin in my home town, so I was extra pumped to see it. While browsing through the store, I discovered a rockin’ fabric section… and they had some pre-cut sets marked down.


Yeah, I have to take a look at that for sure. It was so hard to pick what to get and what to leave behind. You know how it is when you’re trying to be good and not buy ALL the fabric. I bought a couple packs, including this one called Natural Beauty.


The colors are so bright and vibrant, and the patterns are so fun.  I immediately knew what pattern I wanted to use with this fabric. I had seen a neat block that when twisted, creates a fun lattice look. The scrap look allows all the different colors to pop all over the place. Its fantastic! I am so happy with how the patchwork came together.


The only problem was that it felt a bit small. I like lap quilts, but this one was a little too small. I decided to add some borders with the scraps leftover from the original blocks. I also added some black borders, again to pump up the size. The cool thing is that the borders really framed the lattice nicely and I ended up loving it even more.


I found some fun fabric for the backing at the LQS, and decided to free-hand quilt some leaves in the black of the block pattern. 


Then I finished off the borders with a basic meander. It allows the colorful fabrics to pop even more.


Finally, I finished the quilt with a binding made of the backing fabric leftovers. It’s not from the same line, but I like how it’s a little different and still frames the quilt well. I added my label, and called it good.


I am so happy with how this one turned out. It was a lot of fun to work with such colorful, wild fabrics. I am so glad I found this pre-cut pack and got to have such fun with it. An extra cool prize is that there were a couple fabrics that I thought worked really together, and not as much in this quilt. That will be posted soon…

Saturday, July 2, 2022

White Chicken Chili


Recently, I have been getting into using herbs and seasonings to flavor my meals. It’s amazing what a difference the right spices can do for a dish. It brings the food alive, especially proteins that can sometimes lack flavor.


I am also constantly on the hunt for meals that are easy to put together, can be done a bit ahead of time, and require minimal work right at the end. The instant pot can help with all these things.


This Chicken Chili is spectacular, mostly because of the flavors. It has a bit of heat, but not too much, and is creamy. It can be easily modified to fit your tastes, and offers a great source for protein and fiber.


This is a dish that goes great in the colder weather when you need a warm up. I like to serve it with some delicious corn muffins to help soak up all the yummy juices.


White Chicken Chili


1 lb chicken breasts

1 ½ tsp cumin

½ tsp each of paprika, dried oregano, ground coriander

¼ tsp cayenne pepper, salt, black pepper

½ medium onion, diced

1 T EVOO

2 cloves garlic, minced

2 c low sodium chicken broth, or 1 can

1 7oz can diced green chilis

Salt and pepper to taste

4oz pkg cream cheese, softened and cut into small pieces

1 ¼ c frozen of fresh corn

2 15oz cans cannellini beans

1 15oz can pinto beans


Mix together the spices (cumin, paprika, dried oregano, ground coriander, cayenne pepper, salt and black pepper). Pat the chicken dry with paper towel, and rub the spice mixture on the chicken. Meanwhile, in the Instant Pot, heat the EVOO on the sauté function. Brown the onion for a few minutes just until they’re soft and translucent, and then add the garlic for a minute more.

Turn off the sauté function and add 1 ½ c of the chicken broth and the can of green chilis. Place the chicken in, nestling it into the liquid a bit. Put on the lid, and make sure the pressure valve is open and steam is allowed out. Turn on the slow cooker function; high for 3 hours, low for 5 hours.

While the chicken is cooking, empty one can of beans into a colander and rinse. Dump into a bowl and then, using an immersion blender, puree the beans. Add ¼ - ½ c chicken broth while blending to make it smoother, and then set aside. Rinse the second can of beans in the colander and set aside. Remove the chicken for shredding and add the cream cheese to allow it to melt into the liquid mixture.

Once the cheese is melted and the chicken is shredded, return the shredded chicken to the pot, along with the pureed beans, beans, and corn. Heat through, adding more chicken broth if it’s too thick.